# Introduction to the Administration API
Source: https://docs.corti.ai/about/admin-api
Programmatic access to manage your Corti API Console account
## What is the Admin API?
The `Admin API` lets you manage your Corti API Console programmatically. It is built for administrators who want to automate account operations.
This `Admin API` is separate from the `Corti API` used for speech to text, text generation, and agentic workflows:
* Authentication and scope for the `Admin API` uses email-and-password to obtain a bearer token via `/auth/token`. This token is only used for API administration.
* The `Admin API` endpoints `/customers` and `/users` are only enabled and exposed for projects with Embedded Assistant.
Please [contact us](https://help.corti.app) if you have interest in this functionality or further questions.
### Use Cases
The following functionality is currently supported by the `Admin API`:
| Feature | Functionality | Scope |
| :------------------- | :----------------------------------------------------------------------- | :------------------------------- |
| **Authentication** | Authenticate user and get access token | All projects |
| **Manage Customers** | Create, update, list, and delete customer accounts within your project | Projects with Embedded Assistant |
| **Manage Users** | Create, update, list, and delete users associated with customer accounts | Projects with Embedded Assistant |
Permissions mirror the Corti API Console - only project admins or owners can create, update, or delete resources.
## Quickstart
* Sign up or log in at [console.corti.app](https://corti-api-console.web.app/)
* Ensure your account has a password set
Best practice: use a dedicated service account for Admin API automation. Assign only the minimal required role and rotate credentials regularly.
Call `/auth/token` with your Console email and password to obtain a JWT access token.
See API Reference: [Authenticate user and get access token](/api-reference/admin/auth/authenticate-user-and-get-access-token)
```bash theme={null}
curl -X POST https://api.console.corti.app/functions/v1/public/auth/token \
-H "Content-Type: application/json" \
-d '{
"email": "your-email@example.com",
"password": "your-password"
}'
```
Example response:
```json theme={null}
{
"accessToken": "eyJhbGciOiJIUzI1NiIsInR5cCI6IkpXVCJ9...",
"tokenType": "bearer",
"expiresIn": 3600
}
```
Include the token in the Authorization header for subsequent requests:
```bash theme={null}
curl -X GET https://api.console.corti.app/functions/v1/public/projects/{projectId}/customers \
-H "Authorization: Bearer eyJhbGciOiJIUzI1NiIsInR5cCI6IkpXVCJ9..."
```
Tokens expire after `expiresIn` seconds. Once expired, call the `auth/token` endpoint again to obtain a new token.
***
## Top Pages
Obtain an access token
Create a new customer in a project
Create a new user within a customer
Please [contact us](https://help.corti.app) for support or more information
# Compliance & Trust
Source: https://docs.corti.ai/about/compliance
# Errors
Source: https://docs.corti.ai/about/errors
Collection of known errors and solutions
[docs-get-access]: https://docs.corti.ai/get_started/getaccess
[docs-quickstart]: https://docs.corti.ai/get_started/quickstart
[docs-langs]: https://docs.corti.ai/about/languages
[support]: https://help.corti.app
[support-email]: help@corti.ai
## Access forbidden (`403`)
Code: `A0001`
You don't have the necessary permissions to access this feature or
information. Please check [Get access][docs-get-access] and
[Authentication][docs-quickstart].
## Timeout (`504`)
Code: `A0002`
The allowed time for this request has passed. Please try again with smaller
request size or contact the [support][support].
## Bad request (`400`)
Code: `A0003`
Your request couldn't be processed. Please check the relevant documentation,
base URL, endpoint, `Content-Type` header, required fields, field format
(e.g. UUIDs) and try again.
## Invalid token (`403`)
Code: `A0004`
The provided token was incomplete or not in correct format. Please check the
token or contact the [support][support].
## Invalid user (`403`)
Code: `A0005`
The provided token contains an invalid user. Please check the token or contact
the [support][support].
## Invalid ID (`400`)
Code: `A0006`
The provided ID is in an incorrect format or shape. Please check the
documentation for required ID formatting such as UUID.
## Interaction not found (`404`)
Code: `A0007`
The requested interaction could not be found in our system. Ensure the
interaction exists and you have permission to access it through the listing
endpoint.
## Invalid UUID (`400`)
Code: `A0008`
The provided UUID is in an incorrect format or shape. Please check the
documentation for required ID formatting such as UUID.
## Document not found (`404`)
Code: `A0009`
The requested document could not be found in our system. Ensure the document
exists and you have permission to access it through the listing endpoint.
## Error processing (`500`)
Code: `A0010`
The request could not be performed at the moment. Please try again later or
contact the [support][support].
## Recording not found (`404`)
Code: `A0011`
The requested recording could not be found in our system. Ensure the recording
exists and you have permission to access it through the listing endpoint.
## Transcript not found (`404`)
Code: `A0012`
The requested transcript could not be found in our system. Ensure the transcript
exists and you have permission to access it through the listing endpoint.
## Bad query in URL (`400`)
Code: `A0013`
The query parameters are invalid or incomplete. Please verify them against the
endpoint specification.
## Template section not found (`404`)
Code: `A0014`
The requested template section could not be located in our system. Ensure the
template section exists and you have permission to access it.
## Invalid context structure (`400`)
Code: `A0015`
The specified context structure is invalid. Ensure the request matches the
expected format.
## Limit reached (`400`)
Code: `A0016`
The provided input exceeds the maximum allowed limit. Please provide a
different value or check the endpoint's documentation.
## Duplicate value (`400`)
Code: `A0017`
The value provided already exists. Duplicate entries are not allowed for this
field. Refer to the endpoint specification for the field.
## Unsupported language (`400`)
Code: `A0018`
The requested language is not supported by the endpoint. Please check the
[supported languages][docs-langs] or contact the [support][support].
## Fact group not found (`404`)
Code: `A0019`
The requested fact group was not found in the system. Double-check such a group
exists or contact the [support][support].
## Fact not found (`404`)
Code: `A0020`
The requested fact was not found in the system. Double-check such a group
exists or contact the [support][support].
## Insufficient balance (`429`)
Code: `A0021`
You're currently in limited access mode. To unlock full API functionality, please add credits to continue using the API. For assistance, contact [support][support].
## Provided audio is invalid (`400`)
Code: `A0022`
Provided audio is invalid or corrupted. Please check the audio format and try again. For assistance or more information, contact [support][support].
## Invalid scope (`403`)
Code: `A0023`
The provided token does have a forbidden scope for this service. Please check the token scopes or contact the [support][support].
# Help Center
Source: https://docs.corti.ai/about/help
# Introduction to the Corti API
Source: https://docs.corti.ai/about/introduction
Overview of Corti application programming interfaces (API)
Corti is the all-in-one AI stack for healthcare, built for medical accuracy, compliance, and scale. Healthcare's complex language and specialized knowledge demands purpose-built AI infrastructure.
The Corti AI clinical speech understanding, LLMs, and agentic automation are delivered through a single platform that makes it easy to embed AI directly into healthcare workflows. From documentation and coding to billing and referrals, boosting care and fostering provider wellbeing, Corti enables product teams surface critical insights, improve patient outcomes, and ship faster with less effort.
Corti's goal is to be the most complete and accurate **AI infrastructure platform for healthcare developers** building products that demand medical-grade reasoning and enterprise reliability, without any compromises on integration speed or regulatory compliance.
Learn more about what makes the Corti AI platform the right choice for developers and healthcare organizations building the next generation of clinical applications.
***
## Why Choose the Corti API?
| | |
| :-------------------------------- | :-------------------------------------------------------------------------------------------------------------------------------------------------------- |
| **Purpose-built for healthcare** | Optimized for the unique needs and compliance standards of the medical field. |
| **Real-time processing** | Live data streaming with highly accurate fact generation enables instantaneous AI-driven support to integrated applications and healthcare professionals. |
| **Seamless workflow integration** | Designed to work across multiple modalities within clinical and operational workflows. |
| **Customizable and scalable** | Robust and adaptable capabilities to fit your organizational needs. |
Bespoke API integrations
SDKs and web components
Embeddable UI elements
Medical language proficiency
Secure and compliant
Real-time or asynchronous
***
## Integrate seamlessly
Corti AI can be integrated via the Corti API, allowing organizations to build bespoke AI-powered solutions that meet their specific needs. The same API powers [Corti Assistant](/assistant/welcome) - a fully packaged, EHR agnostic, real-time ambient AI scribe that automates documentation, information lookup, medical coding and more. If, however, you want to embed Corti AI into your workflow or customize the interactions, then take a deeper dive into the API documentation.

 Corti’s **model network and orchestration layer** for Text and Audio, powering Speech to Text, Text Generation, and Agent capabilities.
The power of reasoning and contextual inference unlocks critical functionality to power healthcare workflows.
Corti’s **model network and orchestration layer** for Text and Audio, powering Speech to Text, Text Generation, and Agent capabilities.
The power of reasoning and contextual inference unlocks critical functionality to power healthcare workflows.


 With the Corti API you can build any speech-enabled or text-based workflow for healthcare.
The capabilities of the Corti AI platform can be accessed directly via the API or with the help of SDKs, Web Components, and embeddable applications (as desired).
With the Corti API you can build any speech-enabled or text-based workflow for healthcare.
The capabilities of the Corti AI platform can be accessed directly via the API or with the help of SDKs, Web Components, and embeddable applications (as desired).

 ***
## Core Capabilities
***
## Core Capabilities


 ***
## Bringing it All Together
This documentation site outlines how to use the API and provides example workflows.
* Continue on to [How it works](/about/how_it_works) to learn more about the system architecture.
* Documentation pages [welcome](/about/welcome) you to the API and provide explanations of core capabilities.
* The [API Console](/get_started/getaccess/) to create an account and create client credentials so you can begin your journey.
* The [Javascript SDK](/quickstart/javascript-sdk/) page walks through how to get stated quickly with Corti API.
* The [API Reference](/api-reference/welcome) page provides detailed documentation for each available endpoint.
* The [Resources](/about/resources/) page provides release notes and other useful resources.
***
## Bringing it All Together
This documentation site outlines how to use the API and provides example workflows.
* Continue on to [How it works](/about/how_it_works) to learn more about the system architecture.
* Documentation pages [welcome](/about/welcome) you to the API and provide explanations of core capabilities.
* The [API Console](/get_started/getaccess/) to create an account and create client credentials so you can begin your journey.
* The [Javascript SDK](/quickstart/javascript-sdk/) page walks through how to get stated quickly with Corti API.
* The [API Reference](/api-reference/welcome) page provides detailed documentation for each available endpoint.
* The [Resources](/about/resources/) page provides release notes and other useful resources.
If you have any questions about how to implement Corti AI in your healthcare environment or application, then [contact us](https://help.corti.app) for more information.
# Languages
Source: https://docs.corti.ai/about/languages
Learn about how languages are supported in Corti APIs
Corti speech to text and text generation are specifically designed for use in the healthcare domain. Speech to text (STT) language models are designed to balance recognition speed, performance, and accuracy. Text generation LLMs accept various inputs depending on the workflow (e.g., transcripts or facts) and have defined guardrails to support quality assurance of facts and documents outputs.
The `language codes` listed below are used in API requests to define output language for speech to text and document generation.
* Learn more about speech to text endpoints [here](/stt/overview).
* Learn how to query the API for document templates available by language [here](/textgen/templates#retrieving-available-templates).
***
## Speech to Text Performance Tiers
Corti speech to text uses a tier system to categorize functionality and performance that is available per language:
| Tier | Description | Medical Terminology Validation |
| :----------- | :--------------------------------------------------------------------------------------------------------------- | :----------------------------------------------------------------------------------------------------------------------------------------------------------------------------: |
| **Base** | AI-powered speech recognition, ready to integrate with healthcare IT solutions | `Up to 1,000` |
| **Enhanced** | Base plus optimized medical vocabulary for a variety of specialties and improved support for real-time dictation | `1,000-99,999` |
| **Premier** | Enhanced plus speech to text models delivering the best performance in terms of accuracy, quality, and latency | `100,000+` |
***
## Language Availability per Endpoint
The table below summarizes languages supported by the Corti API and how they can be used with speech to text endpoints (`Transcribe`, `Stream`, and `Transcripts`) and text generation endpoints (`Documents`):
| Language | Language Code | ASR Performance | [Transcribe](/api-reference/transcribe) | [Stream](/api-reference/stream) | [Transcripts](/api-reference/transcripts/create-transcript) | [Documents1](/api-reference/documents/generate-document) |
| :---------------- | :------------------: | :-----------------------------------------------------------------------------------------------------------------------------: | :----------------------------------------------------------------------------------: | :----------------------------------------------------------------------------------: | :--------------------------------------------------------------------------------------------------------------: | :-------------------------------------------------------------------------------------------------------------: |
| Arabic | `ar` | Base | | | | |
| Danish | `da` | Premier | | | 2 | |
| Dutch | `nl` | Enhanced | | | | |
| English (US) | `en` or `en-US` | Premier | | | 2 | |
| English (UK) | `en-GB` | Premier | | | 2 | |
| French | `fr` | Premier | | | 2 | |
| German | `de` | Premier | | | 2 | |
| Hungarian | `hu` | Enhanced | | | | 5 |
| Italian | `it` | Base | | | | |
| Norwegian | `no` | Enhanced | | | | |
| Portuguese | `pt` | Base | | | | |
| Spanish | `es` | Base | | | | |
| Swedish | `sv` | Enhanced | | | | |
| Swiss German | `gsw-CH`3 | Enhanced | | 4 | 2 | |
| Swiss High German | `de-CH`3 | Premier | | 4 | 2 | |
**Notes:**
1 Use the language codes listed above for the `outputLanguage` parameter in `POST/documents` requests. Template(s) or section(s) in the defined output must be available for successful document generation.
2 Speech to text accuracy for async audio file processing via `/transcripts` endpoint may be degraded as compared to real-time recognition via the `/transcribe` and `/stream` endpoints. Further model updates are in progress to address the performance limitation.
3 Use language code `gsw-CH` for dialectical Swiss German workflows (e.g., conversational AI scribing), and language code `de-CH` when Swiss High German is spoken (e.g., dictation).
4 For Swiss German `/stream` configuration: Use `gsw-CH` for `primaryLanguage` as you transcribe dialectical spoken to written Swiss High German, and use `de-CH` for the facts `outputLanguage`.
5 Hungarian document generation via default templates upon request.
***
## Languages Available for Exploration
The table below summarizes languages that, upon request, can enabled with `base` tier functionality and performance.
Corti values the opportunity to expand to new markets, but we need your collaboration and partnership in speech-to-text validation and functionality refinement.
Please [contact us](https://help.corti.app) to discuss further.
| Language | Language Code |
| :--------- | :-----------: |
| Bulgarian | `bg` |
| Croatian | `hr` |
| Czech | `cs` |
| Estonian | `et` |
| Finnish | `fi` |
| Greek | `el` |
| Hebrew | `he` |
| Japanese | `ja` |
| Latvian | `lv` |
| Lithuanian | `lt` |
| Maltese | `mt` |
| Mandarin | `cmn` |
| Polish | `pl` |
| Romanian | `ro` |
| Russian | `ru` |
| Slovakian | `sk` |
| Slovenian | `sl` |
| Ukrainian | `uk` |
***
## Language Translation
* Translation (audio capture in one language with transcript output in a different language) is not officially supported in the Corti API at this time.
* Some general support for translation of `transcripts` in English to `facts` in other languages (e.g. German, French, Danish, etc.) is available in [stream](/textgen/facts_realtime#using-the-api) or [extract Facts](/api-reference/facts/extract-facts) requests.
* Additional translation language-pair combinations are not quality assessed or performance benchmarked.
Please [contact us](https://help.corti.app) if you are interested in a language that is not listed here, need help with tiers and endpoint definitions, or have questions about how to use language codes in API requests.
# Public Roadmap
Source: https://docs.corti.ai/about/roadmap
# A2A Protocol (Agent-to-Agent)
Source: https://docs.corti.ai/agentic/a2a-protocol
Learn about the Agent-to-Agent protocol for inter-agent communication
### What is the A2A Protocol
The **Agent-to-Agent (A2A)** protocol is an open standard that enables secure, framework-agnostic communication between autonomous AI agents. Instead of building bespoke integrations whenever you want agents to collaborate, A2A gives Corti-Agentic and other systems a **common language** agents can use to discover, talk to, and delegate work to one another.
For the full technical specification, see the official A2A project docs at [a2a-protocol.org](https://a2a-protocol.org/latest/).
Originally developed by Google and now stewarded under the Linux Foundation, A2A solves a core problem in multi-agent systems: interoperability across ecosystems, languages, and vendors. It lets you connect agents built in Python, JavaScript, Java, Go, .NET, or other languages and have them cooperate on complex workflows without exposing internal agent state or proprietary logic.
### Why Corti-Agentic Uses A2A
We chose A2A because it:
* **Standardizes agent communication.** Agents can talk to each other without siloed, point-to-point integrations. That makes composite workflows easier to build and maintain.
* **Supports real workflows.** A2A includes discovery, task negotiation, and streaming updates, so agents can coordinate long-running or multi-step jobs.
* **Preserves security and opacity.** Agents exchange structured messages without sharing internal memory or tools. That protects intellectual property and keeps interactions predictable.
* **Leverages open tooling.** There are open source SDKs in multiple languages and example implementations you can reuse.
In Corti-Agentic, A2A is the backbone for agent collaboration. Whether you’re orchestrating specialist agents, chaining reasoning tasks, or integrating external agent services, A2A gives you a robust, open foundation you don’t have to reinvent.
### Open Source SDKs and Tooling
For links to Corti’s official SDK and the official A2A project SDKs (Python, JavaScript/TypeScript, Java, Go, and .NET), see **[SDKs & Integrations](/agentic/sdks-integrations)**.
Please [contact us](https://help.corti.app/) if you need more information about the Corti Agentic Framework.
# Create Agent
Source: https://docs.corti.ai/agentic/agents/create-agent
agentic/auto-generated-openapi.yml post /agents
This endpoint allows the creation of a new agent that can be utilized in the `POST /agents/{id}/v1/message:send` endpoint.
# Delete Agent by ID
Source: https://docs.corti.ai/agentic/agents/delete-agent-by-id
agentic/auto-generated-openapi.yml delete /agents/{id}
This endpoint deletes an agent by its identifier. Once deleted, the agent can no longer be used in threads.
# Get Agent by ID
Source: https://docs.corti.ai/agentic/agents/get-agent-by-id
agentic/auto-generated-openapi.yml get /agents/{id}
This endpoint retrieves an agent by its identifier. The agent contains information about its capabilities and the experts it can call.
# Get Agent Card
Source: https://docs.corti.ai/agentic/agents/get-agent-card
agentic/auto-generated-openapi.yml get /agents/{id}/agent-card.json
This endpoint retrieves the agent card in JSON format, which provides metadata about the agent, including its name, description, and the experts it can call.
# Get Context by ID
Source: https://docs.corti.ai/agentic/agents/get-context-by-id
agentic/auto-generated-openapi.yml get /agents/{id}/v1/contexts/{contextId}
This endpoint retrieves all tasks and top-level messages associated with a specific context for the given agent.
# Get Task by ID
Source: https://docs.corti.ai/agentic/agents/get-task-by-id
agentic/auto-generated-openapi.yml get /agents/{id}/v1/tasks/{taskId}
This endpoint retrieves the status and details of a specific task associated with the given agent. It provides information about the task's current state, history, and any artifacts produced during its execution.
# List Agents
Source: https://docs.corti.ai/agentic/agents/list-agents
agentic/auto-generated-openapi.yml get /agents
This endpoint retrieves a list of all agents that can be called by the Corti Agent Framework.
# List Registry Experts
Source: https://docs.corti.ai/agentic/agents/list-registry-experts
agentic/auto-generated-openapi.yml get /agents/registry/experts
This endpoint retrieves the experts registry, which contains information about all available experts that can be referenced when creating agents through the AgentsExpertReference schema.
# Send Message to Agent
Source: https://docs.corti.ai/agentic/agents/send-message-to-agent
agentic/auto-generated-openapi.yml post /agents/{id}/v1/message:send
This endpoint sends a message to the specified agent to start or continue a task. The agent processes the message and returns a response. If the message contains a task ID that matches an ongoing task, the agent will continue that task; otherwise, it will start a new task.
# Update Agent by ID
Source: https://docs.corti.ai/agentic/agents/update-agent-by-id
agentic/auto-generated-openapi.yml patch /agents/{id}
This endpoint updates an existing agent. Only the fields provided in the request body will be updated; other fields will remain unchanged.
# System Architecture
Source: https://docs.corti.ai/agentic/architecture
Learn about the Agentic Framework system architecture
The Corti Agentic Framework adopts a **multi-agent architecture** to power development of healthcare AI solutions. As compared to a monolithic LLM, the Corti Agentic Framework allows for improved specialization and protocol-based composition.
## Architecture Components
 The architecture consists of three core components working together:
* **[Orchestrator](/agentic/orchestrator)** — The central coordinator that receives user requests and delegates tasks to specialized Experts via the A2A protocol.
* **[Experts](/agentic/experts)** — Specialized sub-agents that perform domain-specific work, potentially calling external services through MCP.
* **[Memory](/agentic/context-memory)** — Maintains persistent context and state, enabling the Orchestrator to make informed decisions and ensuring continuity across conversations.
Together, this architecture enables complex workflows through protocol-based composition while maintaining strict data isolation and stateless reasoning agents.
## Interaction mechanisms in Corti
The A2A Protocol supports various interaction patterns to accommodate different needs for responsiveness and persistence. Corti builds on these patterns so you can choose the right interaction model for your product:
* **Request/Response (Polling)**: Used for many synchronous Corti APIs where you send input and wait for a single response. For long‑running Corti tasks, your client can poll the task endpoint for status and results.
* **Streaming with Server-Sent Events (SSE)**: Used by Corti for real‑time experiences (for example, ambient notes or live guidance). Your client opens an SSE stream to receive incremental tokens, events, or status updates over an open HTTP connection.
The architecture consists of three core components working together:
* **[Orchestrator](/agentic/orchestrator)** — The central coordinator that receives user requests and delegates tasks to specialized Experts via the A2A protocol.
* **[Experts](/agentic/experts)** — Specialized sub-agents that perform domain-specific work, potentially calling external services through MCP.
* **[Memory](/agentic/context-memory)** — Maintains persistent context and state, enabling the Orchestrator to make informed decisions and ensuring continuity across conversations.
Together, this architecture enables complex workflows through protocol-based composition while maintaining strict data isolation and stateless reasoning agents.
## Interaction mechanisms in Corti
The A2A Protocol supports various interaction patterns to accommodate different needs for responsiveness and persistence. Corti builds on these patterns so you can choose the right interaction model for your product:
* **Request/Response (Polling)**: Used for many synchronous Corti APIs where you send input and wait for a single response. For long‑running Corti tasks, your client can poll the task endpoint for status and results.
* **Streaming with Server-Sent Events (SSE)**: Used by Corti for real‑time experiences (for example, ambient notes or live guidance). Your client opens an SSE stream to receive incremental tokens, events, or status updates over an open HTTP connection.
Please [contact us](https://help.corti.app/) if you need more information about the Corti Agentic Framework.
# Beginners' Guide to Agents
Source: https://docs.corti.ai/agentic/beginners-guide
How LLM agents work in the Corti Agentic Framework
export const Lottie = ({path, width = '100%', maxWidth = '800px', height = 'auto', loop = true, autoplay = true}) => {
const containerRef = useRef(null);
const animationRef = useRef(null);
const scriptRef = useRef(null);
const propsRef = useRef({
path,
loop,
autoplay
});
useEffect(() => {
propsRef.current = {
path,
loop,
autoplay
};
}, [path, loop, autoplay]);
const initializeAnimation = () => {
if (!window.lottie || !containerRef.current) {
return;
}
if (animationRef.current) {
animationRef.current.destroy();
animationRef.current = null;
}
const {path, loop, autoplay} = propsRef.current;
animationRef.current = window.lottie.loadAnimation({
container: containerRef.current,
renderer: 'svg',
loop: loop,
autoplay: autoplay,
path: path
});
};
useEffect(() => {
if (window.lottie) {
initializeAnimation();
return;
}
const existingScript = document.querySelector('script[src="https://cdnjs.cloudflare.com/ajax/libs/bodymovin/5.12.2/lottie.min.js"]');
if (existingScript) {
existingScript.addEventListener('load', initializeAnimation);
return () => {
existingScript.removeEventListener('load', initializeAnimation);
};
}
const script = document.createElement('script');
script.src = 'https://cdnjs.cloudflare.com/ajax/libs/bodymovin/5.12.2/lottie.min.js';
script.async = true;
scriptRef.current = script;
script.onload = initializeAnimation;
document.body.appendChild(script);
return () => {
if (scriptRef.current && document.body.contains(scriptRef.current)) {
document.body.removeChild(scriptRef.current);
scriptRef.current = null;
}
};
}, []);
useEffect(() => {
if (window.lottie) {
initializeAnimation();
}
return () => {
if (animationRef.current) {
animationRef.current.destroy();
animationRef.current = null;
}
};
}, [path, loop, autoplay]);
return ;
};
In healthcare, an **LLM agent** is not a chatbot trying to answer everything on its own. The language model is used primarily for reasoning and planning, understanding a request, breaking it down, and deciding which experts, tools, or data sources are best suited to handle each part of the task.
Instead of relying on internal knowledge, agents retrieve information from trusted external knowledge bases, clinical systems, and customer-owned data at runtime. When appropriate, they can also take controlled actions, such as writing structured data back to an EHR, triggering downstream workflows, or sending information to other systems.
The **Corti Agentic Framework** is the healthcare-grade platform that makes this possible in production. It provides the orchestration layer that allows agents to delegate work to specialized experts, operate within strict safety and governance boundaries, and remain fully auditable. This enables AI systems that can reason, look things up, and act, without guessing or bypassing clinical control.
# Context & Memory
Source: https://docs.corti.ai/agentic/context-memory
Learn how context and memory work in the Corti Agentic Framework
A **context** in the Corti Agentic Framework makes use of memory from previous text and data in the conversation so far—think of it as a thread that maintains conversation history. Understanding how context works is essential for building effective integrations that maintain continuity across multiple messages.
 ## What is Context?
A `Context` (identified by a server-generated `contextId`) is a logical grouping of related `Messages`, `Tasks`, and `Artifacts`, providing context across a multi-turn "conversation"". It enables you to associate multiple tasks and agents with a single patient encounter, call, or workflow, ensuring continuity and proper scoping of shared knowledge throughout.
The `contextId` is **always created on the server**. You never generate it client-side. This ensures proper state management and prevents conflicts.
### Data Isolation and Scoping
**Contexts provide strict data isolation**: Data can **NEVER** leak across contexts. Each `contextId` creates a completely isolated conversation scope. Messages, tasks, artifacts, and any data within one context are completely inaccessible to agents working in a different context. This ensures:
* **Privacy and security**: Patient data from one encounter cannot accidentally be exposed to another encounter
* **Data integrity**: Information from different workflows remains properly separated
* **Compliance**: You can confidently scope sensitive data to specific contexts without risk of cross-contamination
When you need to share information across contexts, you must explicitly pass it via `DataPart` objects in your messages—there is no automatic data sharing between contexts.
## Using Context for Automatic Memory Management
The simplest way to use context is to let the framework automatically manage conversation memory:
### Workflow Pattern
1. **First message**: Send your message **without** a `contextId`. The server will create a new context automatically.
2. **Response**: The server's response includes the newly created `contextId`.
3. **Subsequent messages**: Include that `contextId` in your requests. Memory from previous messages in that context is automatically managed and available to the agent.
When you include a `contextId` in your request, the agent has access to all previous messages, artifacts, and state within **that specific context only**. Data from other contexts is completely isolated and inaccessible. This enables natural, continuous conversations without manually passing history, while maintaining strict data boundaries between different encounters or workflows.
### Standalone Requests
If you don't want automatic memory management, always send messages **without** a `contextId`. Each message will then be treated as a standalone request without access to prior conversation history. This is useful for:
* One-off queries that don't depend on prior context
* Testing and debugging individual requests
* Scenarios where you want explicit control over what context is included
## Passing Additional Context with Each Request
In addition to automatic memory management via `contextId`, you can pass additional context in each request by including `DataPart` objects in your message. This is useful when you want to provide specific structured data, summaries, or other context that should be considered for that particular request.
```json theme={null}
{
"contextId": "ctx_abc123",
"messages": [
{
"role": "user",
"parts": [
{
"type": "text",
"text": "Generate a summary of this patient encounter"
},
{
"type": "data",
"data": {
"patientId": "pat_12345",
"encounterDate": "2025-12-15",
"chiefComplaint": "Chest pain",
"vitalSigns": {
"bloodPressure": "120/80",
"heartRate": 72,
"temperature": 98.6
}
}
}
]
}
]
}
```
This approach allows you to:
* Provide structured data (patient records, clinical facts, etc.) alongside text
* Include summaries or distilled information from external sources
* Pass metadata or configuration that should be considered for this specific request
* Combine automatic memory (via `contextId`) with explicit context (via `DataPart`)
## How Memory Works
The Corti Agentic Framework uses an intelligent memory system that automatically indexes and stores all content within a context, enabling semantic retrieval when needed.
### Automatic Indexing
Every `TextPart` and `DataPart` you send in messages is automatically indexed and stored in the context's memory. This includes:
* Text content from user and agent messages
* Structured data from `DataPart` objects (patient records, clinical facts, metadata, etc.)
* Artifacts generated by tasks
* Any other content that flows through the context
### Semantic Retrieval
The memory system operates like a RAG (Retrieval Augmented Generation) pipeline. When an agent processes a new message:
1. **Semantic search**: The system performs semantic search across all indexed content in the context's memory
2. **Relevant retrieval**: It retrieves the most semantically relevant information based on the current query or task
3. **Just-in-time injection**: This relevant context is automatically injected into the agent's prompt, ensuring it has access to the right information at the right time
This means you don't need to manually pass all relevant history with each request—the system intelligently retrieves what's needed based on semantic similarity. For example, if you ask "What was the patient's chief complaint?" in a later message, the system will automatically retrieve and include the relevant information from earlier in the conversation, even if it was mentioned many messages ago.
### Benefits
* **Efficient**: Only relevant information is retrieved and used, reducing token usage
* **Automatic**: No need to manually manage what context to include
* **Semantic**: Works based on meaning, not just keyword matching
* **Comprehensive**: All content in the context is searchable and retrievable
## Context vs. Reference Task IDs
The framework provides two mechanisms for linking related work:
* **`contextId`** – Groups multiple related `Messages`, `Tasks`, and `Artifacts` together (think of it as the encounter/call/workflow bucket). This provides automatic memory management and is sufficient for most use cases.
* **`referenceTaskIds`** – An optional list of specific past `Task` IDs within the same context that should be treated as explicit inputs or background. Note that `referenceTaskIds` are scoped to a context—they reference tasks within the same `contextId`.
**In most situations, you can ignore `referenceTaskIds`** since the automatic memory provided by `contextId` is sufficient. Only use `referenceTaskIds` when you need to explicitly direct the agent to pay attention to specific tasks or artifacts within the context, such as in complex multi-step workflows where you want to ensure certain outputs are prioritized.
## Context and Interaction IDs
If you're using contexts alongside Corti's internal interaction representation (for example, when integrating with Corti Assistant or other Corti products that use `interactionId`), note that **these two concepts are currently not linked**.
* **`contextId`** (from the Agentic Framework) and **`interactionId`** (from Corti's internal systems) are separate concepts that you will need to map yourself in your application.
* There is no automatic association between a Corti `interactionId` and an Agentic Framework `contextId`.
**Recommended approach:**
* **Use a fresh context per interaction**: When working with a Corti interaction, create a new `contextId` for that interaction. This keeps data properly scoped and isolated per interaction.
* Store the mapping between your `interactionId` and `contextId`(s) in your own application state or metadata.
* If you need to share data across multiple contexts within the same interaction, explicitly pass it via `DataPart` objects.
We're looking into ways to make the relationship between interactions and contexts more ergonomic if this is relevant to your use case. For now, maintaining your own mapping and using one context per interaction is the recommended pattern.
For more details on how context relates to other core concepts, see [Core Concepts](/agentic/core-concepts).
Please [contact us](https://help.corti.app/) if you need more information about context and memory in the Corti Agentic Framework.
# Core Concepts
Source: https://docs.corti.ai/agentic/core-concepts
Learn the fundamental building blocks of the Corti Agentic Framework
This page adds Corti-specific detail on top of the core A2A concepts. We have tried to adhere as closely as possible to the intended A2A protocol specification — for the canonical definition of these concepts, see the A2A documentation on [Core Concepts and Components in A2A](https://a2a-protocol.org/latest/topics/key-concepts).
The Corti Agentic Framework uses a set of core concepts that define how Corti agents, tools, and external systems interact. Understanding these building blocks is essential for developing on the Corti platform and for integrating your own systems using the A2A Protocol.
## Core Actors
At Corti, these actors typically map to concrete products and integrations:
* **User**: A clinician, contact-center agent, knowledge worker, or an automated service in your environment. The user initiates a request (for example, “summarize this consultation” or “triage this patient”) that requires assistance from one or more Corti-powered agents.
* **A2A Client (Client Agent)**: The application that calls Corti. This is your application/server. The client initiates communication using the A2A Protocol and orchestrates how results are used in your product.
* **A2A Server (Remote Agent)**: A Corti agent or agentic system that exposes an HTTP endpoint implementing the A2A Protocol. It receives requests from clients, processes tasks, and returns results or status updates.
## Fundamental Communication Elements
The following elements are fundamental to A2A communication and how Corti uses them:
A JSON metadata document describing an agent's identity, capabilities, endpoint, skills, and authentication requirements.
**Key Purpose:** Enables Corti and your applications to discover agents and understand how to call them securely and effectively.
A stateful unit of work initiated by an agent, with a unique ID and defined lifecycle.
**Key Purpose:** Powers long‑running operations in Corti (for example, document generation or multi‑step workflows) and enables tracking and collaboration.
A single turn of communication between a client and an agent, containing content and a role ("user" or "agent").
**Key Purpose:** Carries instructions, clinical context, user questions, and agent responses between your application, Corti Assistant, and remote agents.
The fundamental content container (for example, TextPart, FilePart, DataPart) used within Messages and Artifacts.
**Key Purpose:** Lets Corti exchange text, audio transcripts, structured JSON, and files in a consistent way across agents and tools.
A tangible output generated by an agent during a task (for example, a document, image, or structured data).
**Key Purpose:** Represents concrete Corti results such as SOAP notes, call summaries, recommendations, or other structured outputs.
A server-generated identifier (`contextId`) that logically groups multiple related `Task` objects, providing context across a series of interactions.
**Key Purpose:** Enables you to associate multiple tasks and agents with a single patient encounter, call, or workflow, ensuring continuity and proper scoping of shared knowledge throughout an interaction.
## Agent Cards in Corti
The Agent Card is a JSON document that serves as a digital business card for initial discovery and interaction setup. It provides essential metadata about an agent. Clients parse this information to determine if an agent is suitable for a given task, how to structure requests, and how to communicate securely. Key information includes identity, service endpoint (URL), A2A capabilities, authentication requirements, and a list of skills.
Within Corti, Agent Cards are how you:
* Discover first‑party Corti agents and their capabilities.
* Register and describe your own remote agents so Corti workflows can call them.
* Declare authentication and compliance requirements up front, before any PHI or sensitive data is exchanged.
## Messages and Parts in Corti
A message represents a single turn of communication between a client and an agent. It includes a role ("user" or "agent") and a unique `messageId`. It contains one or more Part objects, which are granular containers for the actual content. This design allows A2A to be modality independent and lets Corti mix clinical text, transcripts, and structured data safely in a single exchange.
The primary part kinds are:
* `TextPart`: Contains plain textual content, such as instructions, questions, or generated notes.
* `DataPart`: Carries structured JSON data. This is useful for clinical facts, workflow parameters, EHR identifiers, or any machine‑readable information you exchange with Corti.
* `FilePart`: Represents a file (for example, a PDF discharge letter or an audio recording). It can be transmitted either inline (Base64 encoded) or through a URI. It includes metadata like "name" and "mimeType". This is not yet fully supported.
## Artifacts in Corti
An artifact represents a tangible output or a concrete result generated by a remote agent during task processing. Unlike general messages, artifacts are the actual deliverables. An artifact has a unique `artifactId`, a human-readable name, and consists of one or more part objects. Artifacts are closely tied to the task lifecycle and can be streamed incrementally to the client.
In Corti, artifacts typically correspond to business outputs such as:
* Clinical notes (for example, SOAP notes, discharge summaries).
* Extracted clinical facts or coding suggestions.
* Generated documents, checklists, or other workflow‑specific artifacts.
## Agent response: Task or Message
The agent response can be a new `Task` (when the agent needs to perform a long-running operation) or a `Message` (when the agent can respond immediately).
On the Corti platform this means:
* For quick operations (for example, a short completion or a classification), your agent often responds with a `Message`.
* For longer workflows (for example, generating a full clinical document, coordinating multiple tools, or waiting on downstream systems), your agent responds with a `Task` that you can monitor and later retrieve artifacts from.
# Experts
Source: https://docs.corti.ai/agentic/experts
Learn about Experts available for use with the AI Agent
An **Expert** is an LLM-powered capability that an AI agent can utilize. Experts are designed to complete small, discrete tasks efficiently, enabling the Orchestrator to compose complex workflows by chaining multiple experts together.
## What is Context?
A `Context` (identified by a server-generated `contextId`) is a logical grouping of related `Messages`, `Tasks`, and `Artifacts`, providing context across a multi-turn "conversation"". It enables you to associate multiple tasks and agents with a single patient encounter, call, or workflow, ensuring continuity and proper scoping of shared knowledge throughout.
The `contextId` is **always created on the server**. You never generate it client-side. This ensures proper state management and prevents conflicts.
### Data Isolation and Scoping
**Contexts provide strict data isolation**: Data can **NEVER** leak across contexts. Each `contextId` creates a completely isolated conversation scope. Messages, tasks, artifacts, and any data within one context are completely inaccessible to agents working in a different context. This ensures:
* **Privacy and security**: Patient data from one encounter cannot accidentally be exposed to another encounter
* **Data integrity**: Information from different workflows remains properly separated
* **Compliance**: You can confidently scope sensitive data to specific contexts without risk of cross-contamination
When you need to share information across contexts, you must explicitly pass it via `DataPart` objects in your messages—there is no automatic data sharing between contexts.
## Using Context for Automatic Memory Management
The simplest way to use context is to let the framework automatically manage conversation memory:
### Workflow Pattern
1. **First message**: Send your message **without** a `contextId`. The server will create a new context automatically.
2. **Response**: The server's response includes the newly created `contextId`.
3. **Subsequent messages**: Include that `contextId` in your requests. Memory from previous messages in that context is automatically managed and available to the agent.
When you include a `contextId` in your request, the agent has access to all previous messages, artifacts, and state within **that specific context only**. Data from other contexts is completely isolated and inaccessible. This enables natural, continuous conversations without manually passing history, while maintaining strict data boundaries between different encounters or workflows.
### Standalone Requests
If you don't want automatic memory management, always send messages **without** a `contextId`. Each message will then be treated as a standalone request without access to prior conversation history. This is useful for:
* One-off queries that don't depend on prior context
* Testing and debugging individual requests
* Scenarios where you want explicit control over what context is included
## Passing Additional Context with Each Request
In addition to automatic memory management via `contextId`, you can pass additional context in each request by including `DataPart` objects in your message. This is useful when you want to provide specific structured data, summaries, or other context that should be considered for that particular request.
```json theme={null}
{
"contextId": "ctx_abc123",
"messages": [
{
"role": "user",
"parts": [
{
"type": "text",
"text": "Generate a summary of this patient encounter"
},
{
"type": "data",
"data": {
"patientId": "pat_12345",
"encounterDate": "2025-12-15",
"chiefComplaint": "Chest pain",
"vitalSigns": {
"bloodPressure": "120/80",
"heartRate": 72,
"temperature": 98.6
}
}
}
]
}
]
}
```
This approach allows you to:
* Provide structured data (patient records, clinical facts, etc.) alongside text
* Include summaries or distilled information from external sources
* Pass metadata or configuration that should be considered for this specific request
* Combine automatic memory (via `contextId`) with explicit context (via `DataPart`)
## How Memory Works
The Corti Agentic Framework uses an intelligent memory system that automatically indexes and stores all content within a context, enabling semantic retrieval when needed.
### Automatic Indexing
Every `TextPart` and `DataPart` you send in messages is automatically indexed and stored in the context's memory. This includes:
* Text content from user and agent messages
* Structured data from `DataPart` objects (patient records, clinical facts, metadata, etc.)
* Artifacts generated by tasks
* Any other content that flows through the context
### Semantic Retrieval
The memory system operates like a RAG (Retrieval Augmented Generation) pipeline. When an agent processes a new message:
1. **Semantic search**: The system performs semantic search across all indexed content in the context's memory
2. **Relevant retrieval**: It retrieves the most semantically relevant information based on the current query or task
3. **Just-in-time injection**: This relevant context is automatically injected into the agent's prompt, ensuring it has access to the right information at the right time
This means you don't need to manually pass all relevant history with each request—the system intelligently retrieves what's needed based on semantic similarity. For example, if you ask "What was the patient's chief complaint?" in a later message, the system will automatically retrieve and include the relevant information from earlier in the conversation, even if it was mentioned many messages ago.
### Benefits
* **Efficient**: Only relevant information is retrieved and used, reducing token usage
* **Automatic**: No need to manually manage what context to include
* **Semantic**: Works based on meaning, not just keyword matching
* **Comprehensive**: All content in the context is searchable and retrievable
## Context vs. Reference Task IDs
The framework provides two mechanisms for linking related work:
* **`contextId`** – Groups multiple related `Messages`, `Tasks`, and `Artifacts` together (think of it as the encounter/call/workflow bucket). This provides automatic memory management and is sufficient for most use cases.
* **`referenceTaskIds`** – An optional list of specific past `Task` IDs within the same context that should be treated as explicit inputs or background. Note that `referenceTaskIds` are scoped to a context—they reference tasks within the same `contextId`.
**In most situations, you can ignore `referenceTaskIds`** since the automatic memory provided by `contextId` is sufficient. Only use `referenceTaskIds` when you need to explicitly direct the agent to pay attention to specific tasks or artifacts within the context, such as in complex multi-step workflows where you want to ensure certain outputs are prioritized.
## Context and Interaction IDs
If you're using contexts alongside Corti's internal interaction representation (for example, when integrating with Corti Assistant or other Corti products that use `interactionId`), note that **these two concepts are currently not linked**.
* **`contextId`** (from the Agentic Framework) and **`interactionId`** (from Corti's internal systems) are separate concepts that you will need to map yourself in your application.
* There is no automatic association between a Corti `interactionId` and an Agentic Framework `contextId`.
**Recommended approach:**
* **Use a fresh context per interaction**: When working with a Corti interaction, create a new `contextId` for that interaction. This keeps data properly scoped and isolated per interaction.
* Store the mapping between your `interactionId` and `contextId`(s) in your own application state or metadata.
* If you need to share data across multiple contexts within the same interaction, explicitly pass it via `DataPart` objects.
We're looking into ways to make the relationship between interactions and contexts more ergonomic if this is relevant to your use case. For now, maintaining your own mapping and using one context per interaction is the recommended pattern.
For more details on how context relates to other core concepts, see [Core Concepts](/agentic/core-concepts).
Please [contact us](https://help.corti.app/) if you need more information about context and memory in the Corti Agentic Framework.
# Core Concepts
Source: https://docs.corti.ai/agentic/core-concepts
Learn the fundamental building blocks of the Corti Agentic Framework
This page adds Corti-specific detail on top of the core A2A concepts. We have tried to adhere as closely as possible to the intended A2A protocol specification — for the canonical definition of these concepts, see the A2A documentation on [Core Concepts and Components in A2A](https://a2a-protocol.org/latest/topics/key-concepts).
The Corti Agentic Framework uses a set of core concepts that define how Corti agents, tools, and external systems interact. Understanding these building blocks is essential for developing on the Corti platform and for integrating your own systems using the A2A Protocol.
## Core Actors
At Corti, these actors typically map to concrete products and integrations:
* **User**: A clinician, contact-center agent, knowledge worker, or an automated service in your environment. The user initiates a request (for example, “summarize this consultation” or “triage this patient”) that requires assistance from one or more Corti-powered agents.
* **A2A Client (Client Agent)**: The application that calls Corti. This is your application/server. The client initiates communication using the A2A Protocol and orchestrates how results are used in your product.
* **A2A Server (Remote Agent)**: A Corti agent or agentic system that exposes an HTTP endpoint implementing the A2A Protocol. It receives requests from clients, processes tasks, and returns results or status updates.
## Fundamental Communication Elements
The following elements are fundamental to A2A communication and how Corti uses them:
A JSON metadata document describing an agent's identity, capabilities, endpoint, skills, and authentication requirements.
**Key Purpose:** Enables Corti and your applications to discover agents and understand how to call them securely and effectively.
A stateful unit of work initiated by an agent, with a unique ID and defined lifecycle.
**Key Purpose:** Powers long‑running operations in Corti (for example, document generation or multi‑step workflows) and enables tracking and collaboration.
A single turn of communication between a client and an agent, containing content and a role ("user" or "agent").
**Key Purpose:** Carries instructions, clinical context, user questions, and agent responses between your application, Corti Assistant, and remote agents.
The fundamental content container (for example, TextPart, FilePart, DataPart) used within Messages and Artifacts.
**Key Purpose:** Lets Corti exchange text, audio transcripts, structured JSON, and files in a consistent way across agents and tools.
A tangible output generated by an agent during a task (for example, a document, image, or structured data).
**Key Purpose:** Represents concrete Corti results such as SOAP notes, call summaries, recommendations, or other structured outputs.
A server-generated identifier (`contextId`) that logically groups multiple related `Task` objects, providing context across a series of interactions.
**Key Purpose:** Enables you to associate multiple tasks and agents with a single patient encounter, call, or workflow, ensuring continuity and proper scoping of shared knowledge throughout an interaction.
## Agent Cards in Corti
The Agent Card is a JSON document that serves as a digital business card for initial discovery and interaction setup. It provides essential metadata about an agent. Clients parse this information to determine if an agent is suitable for a given task, how to structure requests, and how to communicate securely. Key information includes identity, service endpoint (URL), A2A capabilities, authentication requirements, and a list of skills.
Within Corti, Agent Cards are how you:
* Discover first‑party Corti agents and their capabilities.
* Register and describe your own remote agents so Corti workflows can call them.
* Declare authentication and compliance requirements up front, before any PHI or sensitive data is exchanged.
## Messages and Parts in Corti
A message represents a single turn of communication between a client and an agent. It includes a role ("user" or "agent") and a unique `messageId`. It contains one or more Part objects, which are granular containers for the actual content. This design allows A2A to be modality independent and lets Corti mix clinical text, transcripts, and structured data safely in a single exchange.
The primary part kinds are:
* `TextPart`: Contains plain textual content, such as instructions, questions, or generated notes.
* `DataPart`: Carries structured JSON data. This is useful for clinical facts, workflow parameters, EHR identifiers, or any machine‑readable information you exchange with Corti.
* `FilePart`: Represents a file (for example, a PDF discharge letter or an audio recording). It can be transmitted either inline (Base64 encoded) or through a URI. It includes metadata like "name" and "mimeType". This is not yet fully supported.
## Artifacts in Corti
An artifact represents a tangible output or a concrete result generated by a remote agent during task processing. Unlike general messages, artifacts are the actual deliverables. An artifact has a unique `artifactId`, a human-readable name, and consists of one or more part objects. Artifacts are closely tied to the task lifecycle and can be streamed incrementally to the client.
In Corti, artifacts typically correspond to business outputs such as:
* Clinical notes (for example, SOAP notes, discharge summaries).
* Extracted clinical facts or coding suggestions.
* Generated documents, checklists, or other workflow‑specific artifacts.
## Agent response: Task or Message
The agent response can be a new `Task` (when the agent needs to perform a long-running operation) or a `Message` (when the agent can respond immediately).
On the Corti platform this means:
* For quick operations (for example, a short completion or a classification), your agent often responds with a `Message`.
* For longer workflows (for example, generating a full clinical document, coordinating multiple tools, or waiting on downstream systems), your agent responds with a `Task` that you can monitor and later retrieve artifacts from.
# Experts
Source: https://docs.corti.ai/agentic/experts
Learn about Experts available for use with the AI Agent
An **Expert** is an LLM-powered capability that an AI agent can utilize. Experts are designed to complete small, discrete tasks efficiently, enabling the Orchestrator to compose complex workflows by chaining multiple experts together.
 ## Expert Registry
Corti maintains a **registry of experts** that includes both first-party experts built by Corti and third-party integrations. You can browse and discover available experts through the [Expert Registry API](/agentic/agents/list-agent) endpoint, which returns information about all available experts including their capabilities, descriptions, and configuration requirements.
The registry includes experts for various healthcare use cases such as:
* Clinical reference lookups
* Medical coding
* Document generation
* Data extraction
* And more
## Bring Your Own Expert
You can create custom experts by exposing an MCP (Model Context Protocol) server. When you register your MCP server, Corti wraps it in a custom LLM agent with a system prompt that you can control. This allows you to:
* Integrate your own tools and data sources
* Create domain-specific experts tailored to your workflows
* Maintain control over the expert's behavior through custom system prompts
* Leverage Corti's orchestration and memory management while using your own tools
### Expert Configuration
When creating a custom expert, you provide configuration that includes:
* **Expert metadata**: ID, name, and description
* **System prompt**: Controls how the LLM agent behaves and reasons about tasks
* **MCP server configuration**: Details about your MCP server including transport type, authorization, and connection details
```json Expert Configuration expandable theme={null}
[
{
"type": "expert",
"id": "ecg_interpreter",
"name": "ECG Interpreter",
"description": "Interprets 12 lead ECGs.",
"systemPrompt": "You are an expert ECG interpreter.",
"mcpServers": [
{
"id": "srv1",
"name": "ECG API Svc",
"transportType": "streamable_http",
"authorizationType": "none",
"url": "https://api.ecg.com/x"
}
]
}
]
```
### MCP Server Requirements
Your MCP server must:
* Implement the [Model Context Protocol](https://modelcontextprotocol.io/) specification
* Expose tools via the standard MCP `tools/list` and `tools/call` endpoints
* Handle authentication
Once registered, your custom expert becomes available to the Orchestrator and can be used alongside Corti's built-in experts in multi-expert workflows.
## Multi-Agent Composition
This feature is coming soon.
We're working on exposing A2A (Agent-to-Agent) endpoints that will allow you to attach multiple agents together, enabling more sophisticated multi-agent workflows. This will provide:
* Direct agent-to-agent communication using the A2A protocol
* Composition of complex workflows across multiple agents
* Fine-grained control over agent interactions and data flow
For now, the Orchestrator handles expert composition automatically. When A2A endpoints are available, you'll be able to build custom agent networks while still leveraging Corti's orchestration capabilities.
## Direct Expert Calls
This feature is coming soon.
We're also working on enabling direct calls to experts, allowing you to use them directly in your workflows rather than only through agents. This will provide:
* Direct API access to individual experts
* Integration of experts into custom workflows
* More flexible composition patterns beyond agent-based orchestration
**While AI chat is a useful mechanism, it's not the only option!**
The Corti Agentic Framework is API-first, enabling synchronous or async usage across a range of modalities: scheduled batch jobs, clinical event triggers, UI widgets, and direct EHR system calls.
[Let us know](https://help.corti.app) what types of use cases you're exploring, from doctor-facing chat bots to system-facing automation backends.
Please [contact us](https://help.corti.app/) if you need more information about Experts or creating custom experts in the Corti Agentic Framework.
# Amboss Researcher
Source: https://docs.corti.ai/agentic/experts/amboss-researcher
Learn about how the Amboss Researcher expert works
Agent framework and tools are currently `under development`. API details subject to change ahead of general release.
The **Amboss Researcher** expert provides access to Amboss's comprehensive medical knowledge base, enabling AI agents to retrieve evidence-based clinical information, medical concepts, and educational content.
Amboss Researcher is particularly useful for clinical decision support, medical education, and accessing up-to-date medical knowledge during patient care workflows.
## Capabilities
The Amboss Researcher expert can:
* Search and retrieve medical concepts and clinical information
* Access evidence-based medical content
* Provide structured medical knowledge for clinical workflows
* Support medical education and training scenarios
## Use Cases
* Clinical decision support during patient consultations
* Medical education and training
* Quick reference lookups for medical concepts
* Evidence-based practice support
## Detailed information
The Amboss Researcher expert integrates with Amboss's medical knowledge platform to provide reliable, evidence-based medical information. When invoked by an AI agent, it can search Amboss's database and return structured medical content that can be used to inform clinical decisions or provide educational context.
# ClinicalTrials.gov
Source: https://docs.corti.ai/agentic/experts/clinicaltrials-gov
Learn about how the ClinicalTrials.gov expert works
Agent framework and tools are currently `under development`. API details subject to change ahead of general release.
The **ClinicalTrials.gov** expert enables AI agents to search and retrieve information from ClinicalTrials.gov, the U.S. National Library of Medicine's database of privately and publicly funded clinical studies.
ClinicalTrials.gov is the primary resource for finding ongoing and completed clinical trials, helping connect patients with research opportunities.
## Capabilities
The ClinicalTrials.gov expert can:
* Search ClinicalTrials.gov's database of clinical studies
* Retrieve trial information including eligibility criteria, locations, and status
* Find relevant clinical trials based on medical conditions or interventions
* Access trial protocols and study details
## Use Cases
* Finding relevant clinical trials for patients
* Research study discovery
* Accessing trial protocols and eligibility criteria
* Clinical research support
## Detailed information
The ClinicalTrials.gov expert integrates with the ClinicalTrials.gov database, which contains information about clinical studies conducted around the world. When invoked by an AI agent, it can search for relevant trials based on medical conditions, interventions, or other criteria, helping healthcare providers identify research opportunities for their patients and access detailed trial information.
# DrugBank
Source: https://docs.corti.ai/agentic/experts/drugbank
Learn about how the DrugBank expert works
Agent framework and tools are currently `under development`. API details subject to change ahead of general release.
The **DrugBank** expert provides AI agents with access to DrugBank, a comprehensive database containing detailed drug and drug target information.
DrugBank is an essential resource for drug information, interactions, pharmacology, and medication-related queries.
## Capabilities
The DrugBank expert can:
* Search DrugBank's database for drug information
* Retrieve drug interactions, contraindications, and warnings
* Access pharmacological data and drug properties
* Find medication-related information and dosing guidelines
## Use Cases
* Drug interaction checking
* Medication information lookups
* Pharmacological research
* Clinical decision support for prescribing
## Detailed information
The DrugBank expert integrates with DrugBank's comprehensive pharmaceutical knowledge base, which contains detailed information about drugs, their mechanisms of action, interactions, pharmacokinetics, and pharmacodynamics. When invoked by an AI agent, it can retrieve critical medication information to support safe prescribing practices and clinical decision-making.
# Medical Calculator
Source: https://docs.corti.ai/agentic/experts/medical-calculator
Learn about how the Medical Calculator expert works
Agent framework and tools are currently `under development`. API details subject to change ahead of general release.
The **Medical Calculator** expert enables AI agents to perform medical calculations, including clinical scores, dosing calculations, risk assessments, and other healthcare-related computations.
Medical Calculator ensures accurate clinical calculations, reducing the risk of manual calculation errors in critical healthcare scenarios.
## Capabilities
The Medical Calculator expert can:
* Perform clinical scoring calculations (e.g., CHADS2-VASc, APACHE, etc.)
* Calculate medication dosages based on patient parameters
* Compute risk assessments and probability scores
* Execute various medical formulas and algorithms
## Use Cases
* Clinical risk scoring and assessment
* Medication dosing calculations
* Laboratory value interpretations
* Clinical decision support calculations
## Detailed information
The Medical Calculator expert provides a comprehensive set of medical calculation capabilities, including clinical scores, dosing formulas, risk assessments, and other healthcare computations. It ensures accuracy and consistency in calculations that are critical for patient care, reducing the risk of errors that can occur with manual calculations.
# Medical Coding
Source: https://docs.corti.ai/agentic/experts/medical-coding
Learn about how the Medical Coding expert works
Agent framework and tools are currently `under development`. API details subject to change ahead of general release.
The **Medical Coding** expert provides AI agents with the ability to assign appropriate medical codes (such as ICD-10, CPT, or other coding systems) based on clinical documentation and patient information.
Medical Coding is essential for billing, claims processing, and maintaining accurate medical records that comply with healthcare coding standards.
## Capabilities
The Medical Coding expert can:
* Assign appropriate medical codes from various coding systems
* Analyze clinical documentation to identify codeable conditions
* Suggest codes based on diagnoses, procedures, and clinical findings
* Ensure compliance with coding standards and guidelines
## Use Cases
* Automated medical coding for billing and claims
* Clinical documentation coding assistance
* Code validation and verification
* Revenue cycle management support
## Detailed information
The Medical Coding expert analyzes clinical documentation, patient records, and medical narratives to identify and assign appropriate medical codes. It supports various coding systems including ICD-10, CPT, HCPCS, and others. The expert can help ensure accurate coding, reduce manual coding errors, and improve efficiency in healthcare administrative workflows.
# Posos
Source: https://docs.corti.ai/agentic/experts/posos
Learn about how the Posos expert works
Agent framework and tools are currently `under development`. API details subject to change ahead of general release.
The **Posos** expert provides AI agents with access to Posos's medical knowledge platform, enabling retrieval of clinical information and medical reference data.
Posos offers comprehensive medical reference information that supports clinical decision-making and medical education.
## Capabilities
The Posos expert can:
* Access Posos's medical knowledge database
* Retrieve clinical reference information
* Provide medical content and educational materials
* Support clinical workflows with authoritative medical data
## Use Cases
* Clinical reference lookups
* Medical information retrieval
* Supporting clinical decision-making
* Medical education and training
## Detailed information
The Posos expert integrates with Posos's medical knowledge platform to provide access to their comprehensive database of medical information. When invoked by an AI agent, it can search and retrieve relevant clinical reference data, medical content, and educational materials that support healthcare workflows and clinical decision-making processes.
# PubMed
Source: https://docs.corti.ai/agentic/experts/pubmed
Learn about how the PubMed expert works
Agent framework and tools are currently `under development`. API details subject to change ahead of general release.
The **PubMed** expert provides AI agents with access to PubMed, the comprehensive database of biomedical literature maintained by the National Library of Medicine.
PubMed is the go-to resource for accessing peer-reviewed medical research, clinical studies, and scientific publications.
## Capabilities
The PubMed expert can:
* Search PubMed's database of biomedical literature
* Retrieve research papers, clinical studies, and scientific articles
* Access abstracts and metadata for publications
* Find relevant research based on medical queries
## Use Cases
* Literature reviews and research
* Evidence-based practice support
* Finding relevant clinical studies
* Accessing peer-reviewed medical research
## Detailed information
The PubMed expert integrates with PubMed's extensive database, which contains millions of citations from biomedical literature, life science journals, and online books. When invoked by an AI agent, it can search for relevant research papers, clinical studies, and scientific publications, providing access to the latest evidence-based medical research to support clinical decision-making.
# Questionnaire Interviewing Expert
Source: https://docs.corti.ai/agentic/experts/questionnaire-interviewing
Learn about how the Questionnaire Interviewing expert works
Agent framework and tools are currently `under development`. API details subject to change ahead of general release.
The **Questionnaire Interviewing** expert enables AI agents to conduct structured interviews and questionnaires, guiding conversations to collect specific information in a systematic manner.
This expert is ideal for patient intake, clinical assessments, and any scenario where structured data collection is required.
## Capabilities
The Questionnaire Interviewing expert can:
* Conduct structured interviews following predefined questionnaires
* Guide conversations to collect specific information
* Adapt questioning based on responses
* Ensure comprehensive data collection
## Use Cases
* Patient intake and history taking
* Clinical assessments and screenings
* Research data collection
* Structured information gathering workflows
## Detailed information
The Questionnaire Interviewing expert allows AI agents to conduct structured interviews by following predefined questionnaires or interview protocols. It can adapt its questioning based on patient responses, ensure all required information is collected, and maintain consistency across multiple interactions. This is particularly valuable for clinical workflows that require systematic data collection.
# Thieme
Source: https://docs.corti.ai/agentic/experts/thieme
Learn about how the Thieme expert works
Agent framework and tools are currently `under development`. API details subject to change ahead of general release.
The **Thieme** expert provides access to Thieme's medical reference materials and educational content, enabling AI agents to retrieve authoritative medical information from Thieme's publications.
Thieme is a trusted source for medical reference materials, textbooks, and educational content used by healthcare professionals worldwide.
## Capabilities
The Thieme expert can:
* Access Thieme's medical reference database
* Retrieve information from medical textbooks and publications
* Provide authoritative medical content
* Support clinical reference and education workflows
## Use Cases
* Clinical reference lookups
* Medical education and training
* Accessing authoritative medical information
* Supporting evidence-based practice
## Detailed information
The Thieme expert integrates with Thieme's medical knowledge platform, providing access to their extensive collection of medical reference materials, textbooks, and educational content. When invoked by an AI agent, it can search Thieme's database and return structured medical information that supports clinical decision-making and medical education.
# Web Search
Source: https://docs.corti.ai/agentic/experts/web-search
Learn about how the Web Search expert works
Agent framework and tools are currently `under development`. API details subject to change ahead of general release.
The **Web Search** expert enables AI agents to perform real-time web searches, allowing them to access current information from the internet that may not be available in static knowledge bases.
Web Search is essential for accessing the most up-to-date information, recent research, news, and dynamic content that changes frequently.
## Capabilities
The Web Search expert can:
* Perform real-time web searches across the internet
* Retrieve current information and recent updates
* Access news, research papers, and dynamic content
* Provide context from multiple online sources
## Use Cases
* Finding recent medical research and publications
* Accessing current news and updates
* Verifying information with multiple sources
* Retrieving information not available in static databases
## Detailed information
The Web Search expert connects AI agents to real-time web search capabilities, enabling them to query the internet and retrieve relevant information. This is particularly valuable for accessing information that changes frequently or is too recent to be included in static knowledge bases. The expert can aggregate results from multiple sources to provide comprehensive answers.
# FAQ
Source: https://docs.corti.ai/agentic/faq
Frequently asked questions about the Corti Agentic Framework
Common questions and answers to help you get the most out of the Corti Agentic Framework and the underlying A2A-based APIs.
The **Orchestrator** is the central coordinator of the Corti Agentic Framework. It receives user requests, reasons about what needs to be done, and delegates work to specialized Experts. The Orchestrator doesn't perform specialized work itself—instead, it plans, selects appropriate Experts, and coordinates their activities to accomplish complex workflows.
An **Expert** is a specialized sub-agent that performs domain-specific tasks. Experts are designed to complete small, discrete tasks efficiently, such as clinical reference lookups, medical coding, or document generation. The Orchestrator composes complex workflows by chaining multiple Experts together.
In summary: the Orchestrator coordinates and delegates; Experts execute specialized work.
For more details, see [Orchestrator](/agentic/orchestrator) and [Experts](/agentic/experts).
**A2A (Agent-to-Agent)** is the protocol used for accessing the Corti API and for communication between agents. It's the standard protocol that your application uses to interact with Corti agents, send messages, receive tasks, and manage the agent lifecycle. A2A enables secure, framework-agnostic communication between autonomous AI agents.
**MCP (Model Context Protocol)** is the way to connect additional Experts. When you create custom Experts by exposing an MCP server, Corti wraps it in a custom LLM agent. MCP handles agent-to-tool interactions, allowing Experts to interact with external systems and resources.
In the Corti Agentic Framework: A2A handles agent-to-agent communication (including your API calls to Corti), while MCP handles agent-to-tool interactions for Expert integrations.
For more information, see [A2A Protocol](/agentic/a2a-protocol) and [MCP Protocol](/agentic/mcp-protocol).
The Corti agent typically returns **Tasks** rather than Messages. A Task represents a stateful unit of work with a unique ID and defined lifecycle, which is ideal for most operations in the Corti Agentic Framework.
Tasks are used for:
* Long-running operations (for example, generating a full clinical document)
* Multi-step workflows that coordinate multiple Experts
* Operations that may need to wait on downstream systems
* Any work that benefits from tracking and monitoring
Messages (with immediate responses) are less common and typically used only for very quick operations like simple classifications or completions that can be resolved immediately without any asynchronous processing.
For more details, see [Core Concepts](/agentic/core-concepts).
Use **`TextPart`** for messages that will be directly exposed to the Orchestrator and the LLM. TextPart content is immediately available for reasoning and response generation.
Use **`DataPart`** for structured JSON data that will be stored in memory first and accessed through more indirect manipulation. DataPart content is automatically indexed and stored in the context's memory, enabling semantic retrieval when needed. DataPart is JSON-only and is useful for structured data like patient records, clinical facts, workflow parameters, or EHR identifiers.
You can combine both in a single message: use TextPart for the primary instruction or question, and DataPart to provide structured context that will be semantically retrieved when relevant.
For more details, see [Core Concepts](/agentic/core-concepts) and [Context & Memory](/agentic/context-memory).
Both `Message` and `Artifact` use the same underlying `Part` primitives, but they serve different roles:
* **`Message` (with `role: "agent"`)**
* Represents a **single turn of communication** from the agent to the client.
* Best for ephemeral conversational output, intermediate reasoning, clarifications, or status updates.
* Typically tied to a particular task step but not necessarily considered a durable business deliverable.
* **`Artifact`**
* Represents a **tangible, durable output** of a task (for example, a SOAP note, coding suggestions, a structured fact bundle, or a generated document).
* Has its own `artifactId`, name/metadata, and lifecycle; can be streamed, versioned, and reused by later tasks.
* Is what downstream systems, UIs, or audits usually consume as the final result.
A useful mental model is: **Messages are how agents "talk"; Artifacts are what they "produce".** You might see several `agent` messages during a task (status, intermediate commentary), but only a small number of artifacts that represent the completed work.
The Corti Agentic Framework provides automatic memory management through contexts. The `contextId` is always created on the server—send your first message without a `contextId`, and the server will return one in the response. Include that `contextId` in subsequent messages to maintain conversation history automatically.
You can also pass additional context in each request using `DataPart` objects to include structured data, summaries, or other specific context alongside the automatic memory.
For comprehensive guidance on context and memory management, see [Context & Memory](/agentic/context-memory).
No, you cannot share data between different contexts. Contexts provide strict data isolation—data can **never** leak across contexts. Each `contextId` creates a completely isolated conversation scope where messages, tasks, artifacts, and any data within one context are completely inaccessible to agents working in a different context.
This isolation ensures:
* **Privacy and security**: Patient data from one encounter cannot accidentally be exposed to another encounter
* **Data integrity**: Information from different workflows remains properly separated
* **Compliance**: You can confidently scope sensitive data to specific contexts without risk of cross-contamination
If you need to share information across contexts, you must explicitly pass it via `DataPart` objects in your messages—there is no automatic data sharing between contexts.
For more details, see [Context & Memory](/agentic/context-memory).
The current time-to-live (TTL) for context memory is **30 days**. After this period, the context and its associated memory are automatically cleaned up.
For more information about context lifecycle and memory management, see [Context & Memory](/agentic/context-memory).
The Orchestrator analyzes incoming requests and uses reasoning to determine which Expert(s) are needed to fulfill the task. It considers the nature of the request, the available Experts, and their capabilities.
You can control Expert selection by writing additional system prompts, both in the Orchestrator configuration and in individual Expert configurations. System prompts guide how the Orchestrator reasons about task decomposition and Expert selection, and how Experts interpret and execute their assigned work.
The Orchestrator can compose multiple Experts together, calling them in sequence or parallel as needed to accomplish complex workflows. For more information, see [Orchestrator](/agentic/orchestrator) and [Experts](/agentic/experts).
Please [contact us](https://help.corti.app/) if you need more information about the Corti Agentic Framework.
# Orchestrator
Source: https://docs.corti.ai/agentic/orchestrator
Learn about the Orchestration Agent at the center of the Agentic Framework
The **Orchestrator** is the central intelligence layer of the Corti Agentic Framework. It serves as the primary interface between users and the multi-agent system, coordinating the flow of conversations and tasks.
## Expert Registry
Corti maintains a **registry of experts** that includes both first-party experts built by Corti and third-party integrations. You can browse and discover available experts through the [Expert Registry API](/agentic/agents/list-agent) endpoint, which returns information about all available experts including their capabilities, descriptions, and configuration requirements.
The registry includes experts for various healthcare use cases such as:
* Clinical reference lookups
* Medical coding
* Document generation
* Data extraction
* And more
## Bring Your Own Expert
You can create custom experts by exposing an MCP (Model Context Protocol) server. When you register your MCP server, Corti wraps it in a custom LLM agent with a system prompt that you can control. This allows you to:
* Integrate your own tools and data sources
* Create domain-specific experts tailored to your workflows
* Maintain control over the expert's behavior through custom system prompts
* Leverage Corti's orchestration and memory management while using your own tools
### Expert Configuration
When creating a custom expert, you provide configuration that includes:
* **Expert metadata**: ID, name, and description
* **System prompt**: Controls how the LLM agent behaves and reasons about tasks
* **MCP server configuration**: Details about your MCP server including transport type, authorization, and connection details
```json Expert Configuration expandable theme={null}
[
{
"type": "expert",
"id": "ecg_interpreter",
"name": "ECG Interpreter",
"description": "Interprets 12 lead ECGs.",
"systemPrompt": "You are an expert ECG interpreter.",
"mcpServers": [
{
"id": "srv1",
"name": "ECG API Svc",
"transportType": "streamable_http",
"authorizationType": "none",
"url": "https://api.ecg.com/x"
}
]
}
]
```
### MCP Server Requirements
Your MCP server must:
* Implement the [Model Context Protocol](https://modelcontextprotocol.io/) specification
* Expose tools via the standard MCP `tools/list` and `tools/call` endpoints
* Handle authentication
Once registered, your custom expert becomes available to the Orchestrator and can be used alongside Corti's built-in experts in multi-expert workflows.
## Multi-Agent Composition
This feature is coming soon.
We're working on exposing A2A (Agent-to-Agent) endpoints that will allow you to attach multiple agents together, enabling more sophisticated multi-agent workflows. This will provide:
* Direct agent-to-agent communication using the A2A protocol
* Composition of complex workflows across multiple agents
* Fine-grained control over agent interactions and data flow
For now, the Orchestrator handles expert composition automatically. When A2A endpoints are available, you'll be able to build custom agent networks while still leveraging Corti's orchestration capabilities.
## Direct Expert Calls
This feature is coming soon.
We're also working on enabling direct calls to experts, allowing you to use them directly in your workflows rather than only through agents. This will provide:
* Direct API access to individual experts
* Integration of experts into custom workflows
* More flexible composition patterns beyond agent-based orchestration
**While AI chat is a useful mechanism, it's not the only option!**
The Corti Agentic Framework is API-first, enabling synchronous or async usage across a range of modalities: scheduled batch jobs, clinical event triggers, UI widgets, and direct EHR system calls.
[Let us know](https://help.corti.app) what types of use cases you're exploring, from doctor-facing chat bots to system-facing automation backends.
Please [contact us](https://help.corti.app/) if you need more information about Experts or creating custom experts in the Corti Agentic Framework.
# Amboss Researcher
Source: https://docs.corti.ai/agentic/experts/amboss-researcher
Learn about how the Amboss Researcher expert works
Agent framework and tools are currently `under development`. API details subject to change ahead of general release.
The **Amboss Researcher** expert provides access to Amboss's comprehensive medical knowledge base, enabling AI agents to retrieve evidence-based clinical information, medical concepts, and educational content.
Amboss Researcher is particularly useful for clinical decision support, medical education, and accessing up-to-date medical knowledge during patient care workflows.
## Capabilities
The Amboss Researcher expert can:
* Search and retrieve medical concepts and clinical information
* Access evidence-based medical content
* Provide structured medical knowledge for clinical workflows
* Support medical education and training scenarios
## Use Cases
* Clinical decision support during patient consultations
* Medical education and training
* Quick reference lookups for medical concepts
* Evidence-based practice support
## Detailed information
The Amboss Researcher expert integrates with Amboss's medical knowledge platform to provide reliable, evidence-based medical information. When invoked by an AI agent, it can search Amboss's database and return structured medical content that can be used to inform clinical decisions or provide educational context.
# ClinicalTrials.gov
Source: https://docs.corti.ai/agentic/experts/clinicaltrials-gov
Learn about how the ClinicalTrials.gov expert works
Agent framework and tools are currently `under development`. API details subject to change ahead of general release.
The **ClinicalTrials.gov** expert enables AI agents to search and retrieve information from ClinicalTrials.gov, the U.S. National Library of Medicine's database of privately and publicly funded clinical studies.
ClinicalTrials.gov is the primary resource for finding ongoing and completed clinical trials, helping connect patients with research opportunities.
## Capabilities
The ClinicalTrials.gov expert can:
* Search ClinicalTrials.gov's database of clinical studies
* Retrieve trial information including eligibility criteria, locations, and status
* Find relevant clinical trials based on medical conditions or interventions
* Access trial protocols and study details
## Use Cases
* Finding relevant clinical trials for patients
* Research study discovery
* Accessing trial protocols and eligibility criteria
* Clinical research support
## Detailed information
The ClinicalTrials.gov expert integrates with the ClinicalTrials.gov database, which contains information about clinical studies conducted around the world. When invoked by an AI agent, it can search for relevant trials based on medical conditions, interventions, or other criteria, helping healthcare providers identify research opportunities for their patients and access detailed trial information.
# DrugBank
Source: https://docs.corti.ai/agentic/experts/drugbank
Learn about how the DrugBank expert works
Agent framework and tools are currently `under development`. API details subject to change ahead of general release.
The **DrugBank** expert provides AI agents with access to DrugBank, a comprehensive database containing detailed drug and drug target information.
DrugBank is an essential resource for drug information, interactions, pharmacology, and medication-related queries.
## Capabilities
The DrugBank expert can:
* Search DrugBank's database for drug information
* Retrieve drug interactions, contraindications, and warnings
* Access pharmacological data and drug properties
* Find medication-related information and dosing guidelines
## Use Cases
* Drug interaction checking
* Medication information lookups
* Pharmacological research
* Clinical decision support for prescribing
## Detailed information
The DrugBank expert integrates with DrugBank's comprehensive pharmaceutical knowledge base, which contains detailed information about drugs, their mechanisms of action, interactions, pharmacokinetics, and pharmacodynamics. When invoked by an AI agent, it can retrieve critical medication information to support safe prescribing practices and clinical decision-making.
# Medical Calculator
Source: https://docs.corti.ai/agentic/experts/medical-calculator
Learn about how the Medical Calculator expert works
Agent framework and tools are currently `under development`. API details subject to change ahead of general release.
The **Medical Calculator** expert enables AI agents to perform medical calculations, including clinical scores, dosing calculations, risk assessments, and other healthcare-related computations.
Medical Calculator ensures accurate clinical calculations, reducing the risk of manual calculation errors in critical healthcare scenarios.
## Capabilities
The Medical Calculator expert can:
* Perform clinical scoring calculations (e.g., CHADS2-VASc, APACHE, etc.)
* Calculate medication dosages based on patient parameters
* Compute risk assessments and probability scores
* Execute various medical formulas and algorithms
## Use Cases
* Clinical risk scoring and assessment
* Medication dosing calculations
* Laboratory value interpretations
* Clinical decision support calculations
## Detailed information
The Medical Calculator expert provides a comprehensive set of medical calculation capabilities, including clinical scores, dosing formulas, risk assessments, and other healthcare computations. It ensures accuracy and consistency in calculations that are critical for patient care, reducing the risk of errors that can occur with manual calculations.
# Medical Coding
Source: https://docs.corti.ai/agentic/experts/medical-coding
Learn about how the Medical Coding expert works
Agent framework and tools are currently `under development`. API details subject to change ahead of general release.
The **Medical Coding** expert provides AI agents with the ability to assign appropriate medical codes (such as ICD-10, CPT, or other coding systems) based on clinical documentation and patient information.
Medical Coding is essential for billing, claims processing, and maintaining accurate medical records that comply with healthcare coding standards.
## Capabilities
The Medical Coding expert can:
* Assign appropriate medical codes from various coding systems
* Analyze clinical documentation to identify codeable conditions
* Suggest codes based on diagnoses, procedures, and clinical findings
* Ensure compliance with coding standards and guidelines
## Use Cases
* Automated medical coding for billing and claims
* Clinical documentation coding assistance
* Code validation and verification
* Revenue cycle management support
## Detailed information
The Medical Coding expert analyzes clinical documentation, patient records, and medical narratives to identify and assign appropriate medical codes. It supports various coding systems including ICD-10, CPT, HCPCS, and others. The expert can help ensure accurate coding, reduce manual coding errors, and improve efficiency in healthcare administrative workflows.
# Posos
Source: https://docs.corti.ai/agentic/experts/posos
Learn about how the Posos expert works
Agent framework and tools are currently `under development`. API details subject to change ahead of general release.
The **Posos** expert provides AI agents with access to Posos's medical knowledge platform, enabling retrieval of clinical information and medical reference data.
Posos offers comprehensive medical reference information that supports clinical decision-making and medical education.
## Capabilities
The Posos expert can:
* Access Posos's medical knowledge database
* Retrieve clinical reference information
* Provide medical content and educational materials
* Support clinical workflows with authoritative medical data
## Use Cases
* Clinical reference lookups
* Medical information retrieval
* Supporting clinical decision-making
* Medical education and training
## Detailed information
The Posos expert integrates with Posos's medical knowledge platform to provide access to their comprehensive database of medical information. When invoked by an AI agent, it can search and retrieve relevant clinical reference data, medical content, and educational materials that support healthcare workflows and clinical decision-making processes.
# PubMed
Source: https://docs.corti.ai/agentic/experts/pubmed
Learn about how the PubMed expert works
Agent framework and tools are currently `under development`. API details subject to change ahead of general release.
The **PubMed** expert provides AI agents with access to PubMed, the comprehensive database of biomedical literature maintained by the National Library of Medicine.
PubMed is the go-to resource for accessing peer-reviewed medical research, clinical studies, and scientific publications.
## Capabilities
The PubMed expert can:
* Search PubMed's database of biomedical literature
* Retrieve research papers, clinical studies, and scientific articles
* Access abstracts and metadata for publications
* Find relevant research based on medical queries
## Use Cases
* Literature reviews and research
* Evidence-based practice support
* Finding relevant clinical studies
* Accessing peer-reviewed medical research
## Detailed information
The PubMed expert integrates with PubMed's extensive database, which contains millions of citations from biomedical literature, life science journals, and online books. When invoked by an AI agent, it can search for relevant research papers, clinical studies, and scientific publications, providing access to the latest evidence-based medical research to support clinical decision-making.
# Questionnaire Interviewing Expert
Source: https://docs.corti.ai/agentic/experts/questionnaire-interviewing
Learn about how the Questionnaire Interviewing expert works
Agent framework and tools are currently `under development`. API details subject to change ahead of general release.
The **Questionnaire Interviewing** expert enables AI agents to conduct structured interviews and questionnaires, guiding conversations to collect specific information in a systematic manner.
This expert is ideal for patient intake, clinical assessments, and any scenario where structured data collection is required.
## Capabilities
The Questionnaire Interviewing expert can:
* Conduct structured interviews following predefined questionnaires
* Guide conversations to collect specific information
* Adapt questioning based on responses
* Ensure comprehensive data collection
## Use Cases
* Patient intake and history taking
* Clinical assessments and screenings
* Research data collection
* Structured information gathering workflows
## Detailed information
The Questionnaire Interviewing expert allows AI agents to conduct structured interviews by following predefined questionnaires or interview protocols. It can adapt its questioning based on patient responses, ensure all required information is collected, and maintain consistency across multiple interactions. This is particularly valuable for clinical workflows that require systematic data collection.
# Thieme
Source: https://docs.corti.ai/agentic/experts/thieme
Learn about how the Thieme expert works
Agent framework and tools are currently `under development`. API details subject to change ahead of general release.
The **Thieme** expert provides access to Thieme's medical reference materials and educational content, enabling AI agents to retrieve authoritative medical information from Thieme's publications.
Thieme is a trusted source for medical reference materials, textbooks, and educational content used by healthcare professionals worldwide.
## Capabilities
The Thieme expert can:
* Access Thieme's medical reference database
* Retrieve information from medical textbooks and publications
* Provide authoritative medical content
* Support clinical reference and education workflows
## Use Cases
* Clinical reference lookups
* Medical education and training
* Accessing authoritative medical information
* Supporting evidence-based practice
## Detailed information
The Thieme expert integrates with Thieme's medical knowledge platform, providing access to their extensive collection of medical reference materials, textbooks, and educational content. When invoked by an AI agent, it can search Thieme's database and return structured medical information that supports clinical decision-making and medical education.
# Web Search
Source: https://docs.corti.ai/agentic/experts/web-search
Learn about how the Web Search expert works
Agent framework and tools are currently `under development`. API details subject to change ahead of general release.
The **Web Search** expert enables AI agents to perform real-time web searches, allowing them to access current information from the internet that may not be available in static knowledge bases.
Web Search is essential for accessing the most up-to-date information, recent research, news, and dynamic content that changes frequently.
## Capabilities
The Web Search expert can:
* Perform real-time web searches across the internet
* Retrieve current information and recent updates
* Access news, research papers, and dynamic content
* Provide context from multiple online sources
## Use Cases
* Finding recent medical research and publications
* Accessing current news and updates
* Verifying information with multiple sources
* Retrieving information not available in static databases
## Detailed information
The Web Search expert connects AI agents to real-time web search capabilities, enabling them to query the internet and retrieve relevant information. This is particularly valuable for accessing information that changes frequently or is too recent to be included in static knowledge bases. The expert can aggregate results from multiple sources to provide comprehensive answers.
# FAQ
Source: https://docs.corti.ai/agentic/faq
Frequently asked questions about the Corti Agentic Framework
Common questions and answers to help you get the most out of the Corti Agentic Framework and the underlying A2A-based APIs.
The **Orchestrator** is the central coordinator of the Corti Agentic Framework. It receives user requests, reasons about what needs to be done, and delegates work to specialized Experts. The Orchestrator doesn't perform specialized work itself—instead, it plans, selects appropriate Experts, and coordinates their activities to accomplish complex workflows.
An **Expert** is a specialized sub-agent that performs domain-specific tasks. Experts are designed to complete small, discrete tasks efficiently, such as clinical reference lookups, medical coding, or document generation. The Orchestrator composes complex workflows by chaining multiple Experts together.
In summary: the Orchestrator coordinates and delegates; Experts execute specialized work.
For more details, see [Orchestrator](/agentic/orchestrator) and [Experts](/agentic/experts).
**A2A (Agent-to-Agent)** is the protocol used for accessing the Corti API and for communication between agents. It's the standard protocol that your application uses to interact with Corti agents, send messages, receive tasks, and manage the agent lifecycle. A2A enables secure, framework-agnostic communication between autonomous AI agents.
**MCP (Model Context Protocol)** is the way to connect additional Experts. When you create custom Experts by exposing an MCP server, Corti wraps it in a custom LLM agent. MCP handles agent-to-tool interactions, allowing Experts to interact with external systems and resources.
In the Corti Agentic Framework: A2A handles agent-to-agent communication (including your API calls to Corti), while MCP handles agent-to-tool interactions for Expert integrations.
For more information, see [A2A Protocol](/agentic/a2a-protocol) and [MCP Protocol](/agentic/mcp-protocol).
The Corti agent typically returns **Tasks** rather than Messages. A Task represents a stateful unit of work with a unique ID and defined lifecycle, which is ideal for most operations in the Corti Agentic Framework.
Tasks are used for:
* Long-running operations (for example, generating a full clinical document)
* Multi-step workflows that coordinate multiple Experts
* Operations that may need to wait on downstream systems
* Any work that benefits from tracking and monitoring
Messages (with immediate responses) are less common and typically used only for very quick operations like simple classifications or completions that can be resolved immediately without any asynchronous processing.
For more details, see [Core Concepts](/agentic/core-concepts).
Use **`TextPart`** for messages that will be directly exposed to the Orchestrator and the LLM. TextPart content is immediately available for reasoning and response generation.
Use **`DataPart`** for structured JSON data that will be stored in memory first and accessed through more indirect manipulation. DataPart content is automatically indexed and stored in the context's memory, enabling semantic retrieval when needed. DataPart is JSON-only and is useful for structured data like patient records, clinical facts, workflow parameters, or EHR identifiers.
You can combine both in a single message: use TextPart for the primary instruction or question, and DataPart to provide structured context that will be semantically retrieved when relevant.
For more details, see [Core Concepts](/agentic/core-concepts) and [Context & Memory](/agentic/context-memory).
Both `Message` and `Artifact` use the same underlying `Part` primitives, but they serve different roles:
* **`Message` (with `role: "agent"`)**
* Represents a **single turn of communication** from the agent to the client.
* Best for ephemeral conversational output, intermediate reasoning, clarifications, or status updates.
* Typically tied to a particular task step but not necessarily considered a durable business deliverable.
* **`Artifact`**
* Represents a **tangible, durable output** of a task (for example, a SOAP note, coding suggestions, a structured fact bundle, or a generated document).
* Has its own `artifactId`, name/metadata, and lifecycle; can be streamed, versioned, and reused by later tasks.
* Is what downstream systems, UIs, or audits usually consume as the final result.
A useful mental model is: **Messages are how agents "talk"; Artifacts are what they "produce".** You might see several `agent` messages during a task (status, intermediate commentary), but only a small number of artifacts that represent the completed work.
The Corti Agentic Framework provides automatic memory management through contexts. The `contextId` is always created on the server—send your first message without a `contextId`, and the server will return one in the response. Include that `contextId` in subsequent messages to maintain conversation history automatically.
You can also pass additional context in each request using `DataPart` objects to include structured data, summaries, or other specific context alongside the automatic memory.
For comprehensive guidance on context and memory management, see [Context & Memory](/agentic/context-memory).
No, you cannot share data between different contexts. Contexts provide strict data isolation—data can **never** leak across contexts. Each `contextId` creates a completely isolated conversation scope where messages, tasks, artifacts, and any data within one context are completely inaccessible to agents working in a different context.
This isolation ensures:
* **Privacy and security**: Patient data from one encounter cannot accidentally be exposed to another encounter
* **Data integrity**: Information from different workflows remains properly separated
* **Compliance**: You can confidently scope sensitive data to specific contexts without risk of cross-contamination
If you need to share information across contexts, you must explicitly pass it via `DataPart` objects in your messages—there is no automatic data sharing between contexts.
For more details, see [Context & Memory](/agentic/context-memory).
The current time-to-live (TTL) for context memory is **30 days**. After this period, the context and its associated memory are automatically cleaned up.
For more information about context lifecycle and memory management, see [Context & Memory](/agentic/context-memory).
The Orchestrator analyzes incoming requests and uses reasoning to determine which Expert(s) are needed to fulfill the task. It considers the nature of the request, the available Experts, and their capabilities.
You can control Expert selection by writing additional system prompts, both in the Orchestrator configuration and in individual Expert configurations. System prompts guide how the Orchestrator reasons about task decomposition and Expert selection, and how Experts interpret and execute their assigned work.
The Orchestrator can compose multiple Experts together, calling them in sequence or parallel as needed to accomplish complex workflows. For more information, see [Orchestrator](/agentic/orchestrator) and [Experts](/agentic/experts).
Please [contact us](https://help.corti.app/) if you need more information about the Corti Agentic Framework.
# Orchestrator
Source: https://docs.corti.ai/agentic/orchestrator
Learn about the Orchestration Agent at the center of the Agentic Framework
The **Orchestrator** is the central intelligence layer of the Corti Agentic Framework. It serves as the primary interface between users and the multi-agent system, coordinating the flow of conversations and tasks.
 ## What the Orchestrator Does
The Orchestrator reasons about incoming requests and determines how to fulfill them by coordinating with specialized [Experts](/agentic/experts). Its core responsibilities include:
* **Reasoning and planning**: Analyzes user requests and determines the necessary steps to complete them
* **Expert selection**: Decides which Expert(s) to call, in what order, and with what data
* **Task decomposition**: Breaks complex requests into discrete tasks that can be handled by individual Experts
* **Response generation**: Aggregates results from Experts and typically generates the final response to the user
* **Context management**: Has full access to the [context](/agentic/context-memory), while Experts typically only have scoped access to relevant portions
* **Safety enforcement**: Enforces guardrails, type validation, and policy-driven constraints to ensure safe operation in clinical environments
The Orchestrator does not perform specialized work itself—instead, it delegates to appropriate Experts and coordinates their activities to accomplish complex workflows.
***
For more information about how the Orchestrator fits into the overall architecture, see [Architecture](/agentic/architecture). To understand how context and memory work, see [Context & Memory](/agentic/context-memory).
Please [contact us](https://help.corti.app/) if you need more information about the Orchestrator in the Corti Agentic Framework.
# Overview to the Corti Agentic Framework
Source: https://docs.corti.ai/agentic/overview
AI for every healthcare app
The Corti Agentic Framework is a modular artificial intelligence system for software developers to build advanced AI agents that perform high-quality clinical and operational tasks, without having to spend months on complex architecture work.
The AI Agent is designed to support use cases across the healthcare spectrum, from chat-based assistants for doctors to automating EHR data entry and powering clinical decision support workflows.
## What Problems It Solves
Modern LLMs are powerful, but on their own they are insufficient and unsafe for clinical use.
The Corti Agent Platform addresses two fundamental gaps:
### 1. LLMs Do Not Have Reliable Access to Clinical Data
LLMs cannot be trusted to rely on internal knowledge alone. In healthcare, responses must be grounded in clinically validated reference sources, real-time patient and system data, and customer-owned systems and APIs. Without access to these sources at runtime, models are forced to infer or guess, which is unacceptable in clinical settings.
The Corti Agentic Framework addresses this by enabling agents to retrieve information directly from trusted external tools as part of their reasoning process. Instead of hallucinating answers, agents are designed to look things up, verify context, and base their outputs on authoritative data.
### 2. LLMs Cannot Safely Act on the World
Clinical workflows require more than generating text. They involve interacting with real systems: querying EHRs, drafting and updating documentation, preparing prescriptions, and triggering downstream processes.
The framework provides a controlled execution layer that allows agents to plan actions, invoke tools, and coordinate multi-step workflows while remaining within clearly defined safety boundaries. Where necessary, agents can pause execution, request human approval, and resume only once explicit consent is given. This ensures that automation enhances clinical workflows without bypassing governance or control.
***
## What You Can Build With It
Using the Corti Agent Platform, teams can build:
* **Clinician-facing assistants**
* Documentation editing
* Guideline and reference lookup
* Coding and administrative support
* **Programmatic agent endpoints**
* Embedded into existing clinical software
* Triggered by events, APIs, or workflows
* **Customer-embedded agents**
* Customers bring their own tools and systems
* Agents combine Corti, third-party, and customer capabilities
All of these share the same underlying agent runtime, safety model, and orchestration layer.
***
## Built for Healthcare by Design
Healthcare is not a general-purpose domain, and this platform reflects that reality.
**Key design principles include:**
Typed inputs and outputs, explicit tool schemas, and guardrails around action-taking ensure safe operation in clinical environments.
Every decision and tool call is observable with replayable traces and structured logs for transparency, compliance, and quality assurance.
Fine-tuned reasoning layers optimized for healthcare language, workflows, and compliance needs.
Corti Agentic Framework uses a state-of-the-art multi-agent architecture to enable greater scale, accuracy, and resilience in AI-driven workflows.
Maintain persistent, context-aware conversations and manage multiple active contexts (threads) without losing information throughout the session.
Access a library of prebuilt Experts: specialized agents that connect to data sources, tools, and services to execute clinical and operational tasks.
Plug directly into EHRs, clinical decision support systems, and medical knowledge bases with minimal setup.
Pass relevant context with each query, including structured data formats like FHIR resources, enabling Experts to work with rich, domain-specific information.
***
## Who It’s For
The Corti Agent Platform is built for teams working on healthcare software.
It is intended for:
* **Healthcare software companies** embedding intelligent automation directly into their products
* **Enterprise customers** building internal, AI-powered clinical workflows
* **Advanced engineering teams** that need flexibility, control, and strong safety guarantees without building bespoke agent infrastructure from scratch
The platform is not limited to simple prompt-based chatbots. It is designed to make it easy to go from demo to **production-grade clinical AI systems** that operate safely in real-world healthcare environments.
***
## Agents vs. Workflows
Understanding the difference between agents and workflows helps you choose the right approach for your use case:
**Agents** are autonomous systems that can think, reason, and adapt to new situations. They use AI to understand context, make decisions dynamically, and take actions based on the task at hand—even when encountering scenarios they haven't seen before. Like a chef who can create a meal based on what's available, agents excel at handling unpredictable, open-ended tasks that require flexibility and judgment.
**Workflows** are structured, step-by-step processes that follow predefined paths. They execute tasks in a fixed order, like following a recipe or checklist. Workflows are ideal for repeatable processes that require consistency and compliance, such as automated approval processes or scheduled maintenance tasks.
For workflow-oriented needs, you can leverage our toolkit of other APIs to orchestrate well-defined, repeatable flows throughout your solution.
In the Corti Agentic Framework, agents leverage the Orchestrator to compose experts dynamically, adapting their approach based on the situation. Workflows, on the other hand, provide deterministic execution paths for tasks with well-defined steps and requirements—supported by our robust library of workflow APIs and integrations.
Please [contact us](https://help.corti.app/) if you need more information about the Corti Agentic Framework.
# Quickstart & First Build
Source: https://docs.corti.ai/agentic/quickstart
Get started with the Corti Agentic Framework
This guide will walk you through setting up your first agent and getting it running end-to-end.
After completing this quickstart, you'll have a working agent and know where to go next based on your use case.
### Prerequisites
* API access credentials
* Development environment set up
* Basic understanding of REST APIs
Start by creating a project in the Corti console. This gives you a workspace and access to manage your clients and credentials. If you haven't set up authentication before, follow the Creating Clients and authentication quickstart guides.
Use the Corti Agentic API to create your first agent. You'll need an access token (obtained using your client credentials) and your tenant name.
```js JavaScript theme={null}
const myAgent = await client.agents.create({
name: "My First Agent",
description: "A simple agent to get started with the Corti Agentic Framework"
});
```
```py Python expandable theme={null}
import requests
BASE_URL = "https://api..corti.app/v2" # e.g. "https://api.eu.corti.app/v2"
HEADERS = {
"Authorization": "Bearer ",
"Tenant-Name": "", # e.g. "base"
"Content-Type": "application/json",
}
def create_agent():
"""Create a new agent using the Corti Agentic API."""
url = f"{BASE_URL}/agents"
payload = {
"name": "My First Agent",
"description": "A simple agent to get started with the Corti Agentic Framework",
}
response = requests.post(url, json=payload, headers=HEADERS)
response.raise_for_status()
return response.json()
```
Use your stored credentials to authenticate, then run your agent end-to-end and verify it processes input and returns the expected outputs.
```js JavaScript theme={null}
const agentResponse = await client.agents.messageSend(myAgent.id, {
message: {
role: "user",
parts: [{
kind: "text",
text: "Hello there. This is my first message."
}],
messageId: crypto.randomUUID(),
kind: "message"
}
});
console.log(agentResponse.task.status.message.parts[0].text)
```
```py Python expandable theme={null}
import uuid
import requests
BASE_URL = "https://api..corti.app/v2" # e.g. "https://api.eu.corti.app/v2"
HEADERS = {
"Authorization": "Bearer ",
"Tenant-Name": "", # e.g. "base"
"Content-Type": "application/json",
}
def send_message(agent_id: str):
"""Send a message to an existing agent and return the task response."""
url = f"{BASE_URL}/agents/{agent_id}/v1/message:send"
payload = {
"message": {
"role": "user",
"parts": [
{
"kind": "text",
"text": "Hello there. This is my first message.",
}
],
"messageId": str(uuid.uuid4()),
"kind": "message",
}
}
response = requests.post(url, json=payload, headers=HEADERS)
response.raise_for_status()
task_response = response.json()
# Print the task status message text (equivalent to agentResponse.task.status.message.parts[0].text)
print(task_response["task"]["status"]["message"]["parts"][0]["text"])
return task_response
# Assuming you created the agent in the previous step:
# my_agent = create_agent()
# send_message(my_agent["id"])
```
### Next Steps
Depending on your use case:
* **Building custom agents**: See [Core Concepts](/agentic/core-concepts)
* **Integrating with existing systems**: See [SDKs & Integrations](/agentic/sdks-integrations)
* **Understanding the architecture**: See [Architecture Overview](/agentic/architecture)
* **Working with protocols**: See [A2A Protocol](/agentic/a2a-protocol) and [MCP Protocol](/agentic/mcp-protocol)
Please [contact us](https://help.corti.app/) if you need more information about the Corti Agentic Framework.
# SDKs & Integrations
Source: https://docs.corti.ai/agentic/sdks-integrations
Official SDKs and integration options for the Corti Agentic Framework
The Corti Agentic Framework provides official SDKs and supports community integrations to help you build quickly.
## Official Corti SDK
Official Corti Agentic SDK for Node and browser environments.
## What the Orchestrator Does
The Orchestrator reasons about incoming requests and determines how to fulfill them by coordinating with specialized [Experts](/agentic/experts). Its core responsibilities include:
* **Reasoning and planning**: Analyzes user requests and determines the necessary steps to complete them
* **Expert selection**: Decides which Expert(s) to call, in what order, and with what data
* **Task decomposition**: Breaks complex requests into discrete tasks that can be handled by individual Experts
* **Response generation**: Aggregates results from Experts and typically generates the final response to the user
* **Context management**: Has full access to the [context](/agentic/context-memory), while Experts typically only have scoped access to relevant portions
* **Safety enforcement**: Enforces guardrails, type validation, and policy-driven constraints to ensure safe operation in clinical environments
The Orchestrator does not perform specialized work itself—instead, it delegates to appropriate Experts and coordinates their activities to accomplish complex workflows.
***
For more information about how the Orchestrator fits into the overall architecture, see [Architecture](/agentic/architecture). To understand how context and memory work, see [Context & Memory](/agentic/context-memory).
Please [contact us](https://help.corti.app/) if you need more information about the Orchestrator in the Corti Agentic Framework.
# Overview to the Corti Agentic Framework
Source: https://docs.corti.ai/agentic/overview
AI for every healthcare app
The Corti Agentic Framework is a modular artificial intelligence system for software developers to build advanced AI agents that perform high-quality clinical and operational tasks, without having to spend months on complex architecture work.
The AI Agent is designed to support use cases across the healthcare spectrum, from chat-based assistants for doctors to automating EHR data entry and powering clinical decision support workflows.
## What Problems It Solves
Modern LLMs are powerful, but on their own they are insufficient and unsafe for clinical use.
The Corti Agent Platform addresses two fundamental gaps:
### 1. LLMs Do Not Have Reliable Access to Clinical Data
LLMs cannot be trusted to rely on internal knowledge alone. In healthcare, responses must be grounded in clinically validated reference sources, real-time patient and system data, and customer-owned systems and APIs. Without access to these sources at runtime, models are forced to infer or guess, which is unacceptable in clinical settings.
The Corti Agentic Framework addresses this by enabling agents to retrieve information directly from trusted external tools as part of their reasoning process. Instead of hallucinating answers, agents are designed to look things up, verify context, and base their outputs on authoritative data.
### 2. LLMs Cannot Safely Act on the World
Clinical workflows require more than generating text. They involve interacting with real systems: querying EHRs, drafting and updating documentation, preparing prescriptions, and triggering downstream processes.
The framework provides a controlled execution layer that allows agents to plan actions, invoke tools, and coordinate multi-step workflows while remaining within clearly defined safety boundaries. Where necessary, agents can pause execution, request human approval, and resume only once explicit consent is given. This ensures that automation enhances clinical workflows without bypassing governance or control.
***
## What You Can Build With It
Using the Corti Agent Platform, teams can build:
* **Clinician-facing assistants**
* Documentation editing
* Guideline and reference lookup
* Coding and administrative support
* **Programmatic agent endpoints**
* Embedded into existing clinical software
* Triggered by events, APIs, or workflows
* **Customer-embedded agents**
* Customers bring their own tools and systems
* Agents combine Corti, third-party, and customer capabilities
All of these share the same underlying agent runtime, safety model, and orchestration layer.
***
## Built for Healthcare by Design
Healthcare is not a general-purpose domain, and this platform reflects that reality.
**Key design principles include:**
Typed inputs and outputs, explicit tool schemas, and guardrails around action-taking ensure safe operation in clinical environments.
Every decision and tool call is observable with replayable traces and structured logs for transparency, compliance, and quality assurance.
Fine-tuned reasoning layers optimized for healthcare language, workflows, and compliance needs.
Corti Agentic Framework uses a state-of-the-art multi-agent architecture to enable greater scale, accuracy, and resilience in AI-driven workflows.
Maintain persistent, context-aware conversations and manage multiple active contexts (threads) without losing information throughout the session.
Access a library of prebuilt Experts: specialized agents that connect to data sources, tools, and services to execute clinical and operational tasks.
Plug directly into EHRs, clinical decision support systems, and medical knowledge bases with minimal setup.
Pass relevant context with each query, including structured data formats like FHIR resources, enabling Experts to work with rich, domain-specific information.
***
## Who It’s For
The Corti Agent Platform is built for teams working on healthcare software.
It is intended for:
* **Healthcare software companies** embedding intelligent automation directly into their products
* **Enterprise customers** building internal, AI-powered clinical workflows
* **Advanced engineering teams** that need flexibility, control, and strong safety guarantees without building bespoke agent infrastructure from scratch
The platform is not limited to simple prompt-based chatbots. It is designed to make it easy to go from demo to **production-grade clinical AI systems** that operate safely in real-world healthcare environments.
***
## Agents vs. Workflows
Understanding the difference between agents and workflows helps you choose the right approach for your use case:
**Agents** are autonomous systems that can think, reason, and adapt to new situations. They use AI to understand context, make decisions dynamically, and take actions based on the task at hand—even when encountering scenarios they haven't seen before. Like a chef who can create a meal based on what's available, agents excel at handling unpredictable, open-ended tasks that require flexibility and judgment.
**Workflows** are structured, step-by-step processes that follow predefined paths. They execute tasks in a fixed order, like following a recipe or checklist. Workflows are ideal for repeatable processes that require consistency and compliance, such as automated approval processes or scheduled maintenance tasks.
For workflow-oriented needs, you can leverage our toolkit of other APIs to orchestrate well-defined, repeatable flows throughout your solution.
In the Corti Agentic Framework, agents leverage the Orchestrator to compose experts dynamically, adapting their approach based on the situation. Workflows, on the other hand, provide deterministic execution paths for tasks with well-defined steps and requirements—supported by our robust library of workflow APIs and integrations.
Please [contact us](https://help.corti.app/) if you need more information about the Corti Agentic Framework.
# Quickstart & First Build
Source: https://docs.corti.ai/agentic/quickstart
Get started with the Corti Agentic Framework
This guide will walk you through setting up your first agent and getting it running end-to-end.
After completing this quickstart, you'll have a working agent and know where to go next based on your use case.
### Prerequisites
* API access credentials
* Development environment set up
* Basic understanding of REST APIs
Start by creating a project in the Corti console. This gives you a workspace and access to manage your clients and credentials. If you haven't set up authentication before, follow the Creating Clients and authentication quickstart guides.
Use the Corti Agentic API to create your first agent. You'll need an access token (obtained using your client credentials) and your tenant name.
```js JavaScript theme={null}
const myAgent = await client.agents.create({
name: "My First Agent",
description: "A simple agent to get started with the Corti Agentic Framework"
});
```
```py Python expandable theme={null}
import requests
BASE_URL = "https://api..corti.app/v2" # e.g. "https://api.eu.corti.app/v2"
HEADERS = {
"Authorization": "Bearer ",
"Tenant-Name": "", # e.g. "base"
"Content-Type": "application/json",
}
def create_agent():
"""Create a new agent using the Corti Agentic API."""
url = f"{BASE_URL}/agents"
payload = {
"name": "My First Agent",
"description": "A simple agent to get started with the Corti Agentic Framework",
}
response = requests.post(url, json=payload, headers=HEADERS)
response.raise_for_status()
return response.json()
```
Use your stored credentials to authenticate, then run your agent end-to-end and verify it processes input and returns the expected outputs.
```js JavaScript theme={null}
const agentResponse = await client.agents.messageSend(myAgent.id, {
message: {
role: "user",
parts: [{
kind: "text",
text: "Hello there. This is my first message."
}],
messageId: crypto.randomUUID(),
kind: "message"
}
});
console.log(agentResponse.task.status.message.parts[0].text)
```
```py Python expandable theme={null}
import uuid
import requests
BASE_URL = "https://api..corti.app/v2" # e.g. "https://api.eu.corti.app/v2"
HEADERS = {
"Authorization": "Bearer ",
"Tenant-Name": "", # e.g. "base"
"Content-Type": "application/json",
}
def send_message(agent_id: str):
"""Send a message to an existing agent and return the task response."""
url = f"{BASE_URL}/agents/{agent_id}/v1/message:send"
payload = {
"message": {
"role": "user",
"parts": [
{
"kind": "text",
"text": "Hello there. This is my first message.",
}
],
"messageId": str(uuid.uuid4()),
"kind": "message",
}
}
response = requests.post(url, json=payload, headers=HEADERS)
response.raise_for_status()
task_response = response.json()
# Print the task status message text (equivalent to agentResponse.task.status.message.parts[0].text)
print(task_response["task"]["status"]["message"]["parts"][0]["text"])
return task_response
# Assuming you created the agent in the previous step:
# my_agent = create_agent()
# send_message(my_agent["id"])
```
### Next Steps
Depending on your use case:
* **Building custom agents**: See [Core Concepts](/agentic/core-concepts)
* **Integrating with existing systems**: See [SDKs & Integrations](/agentic/sdks-integrations)
* **Understanding the architecture**: See [Architecture Overview](/agentic/architecture)
* **Working with protocols**: See [A2A Protocol](/agentic/a2a-protocol) and [MCP Protocol](/agentic/mcp-protocol)
Please [contact us](https://help.corti.app/) if you need more information about the Corti Agentic Framework.
# SDKs & Integrations
Source: https://docs.corti.ai/agentic/sdks-integrations
Official SDKs and integration options for the Corti Agentic Framework
The Corti Agentic Framework provides official SDKs and supports community integrations to help you build quickly.
## Official Corti SDK
Official Corti Agentic SDK for Node and browser environments.
@corti/sdk on npm →
## Official A2A Project SDKs
Build A2A-compliant agents and servers in Python.
a2a-python (Stable) →
Official JavaScript/TypeScript SDK for A2A.
a2a-js (Stable) →
Build A2A-compliant agents and services in Java.
a2a-java (Stable) →
Implement A2A agents and servers in Go.
a2a-go (Stable) →
Build A2A-compatible agents in .NET ecosystems.
a2a-dotnet (Stable) →
## Other libraries
* **shadcn/ui component library for chatbots**: [`ai-elements` on npm](https://www.npmjs.com/package/ai-elements)
* **A2A Inspector**: [a2a-inspector on GitHub](https://github.com/a2aproject/a2a-inspector)
* **Awesome A2A**: [awesome-a2a on GitHub](https://github.com/ai-boost/awesome-a2a)
# Authenticate user and get access token
Source: https://docs.corti.ai/api-reference/admin/auth/authenticate-user-and-get-access-token
api-reference/admin/admin-openapi.yml post /auth/token
Authenticate using email and password to receive an access token.
This `Admin API` is separate from the `Corti API` used for speech recognition, text generation, and agentic workflows:
- Authentication and scope for the `Admin API` uses email-and-password to obtain a bearer token via `/auth/token`. This token is only used for API administration.
Please [contact us](https://help.corti.app) if you have interest in this functionality or further questions.
# Create a new customer
Source: https://docs.corti.ai/api-reference/admin/customers/create-a-new-customer
api-reference/admin/admin-openapi.yml post /projects/{projectId}/customers
# Delete a customer
Source: https://docs.corti.ai/api-reference/admin/customers/delete-a-customer
api-reference/admin/admin-openapi.yml delete /projects/{projectId}/customers/{customerId}
# Get quotas for a customer
Source: https://docs.corti.ai/api-reference/admin/customers/get-quotas-for-a-customer
api-reference/admin/admin-openapi.yml get /projects/{projectId}/customers/{customerId}/quotas
# List customers for a project
Source: https://docs.corti.ai/api-reference/admin/customers/list-customers-for-a-project
api-reference/admin/admin-openapi.yml get /projects/{projectId}/customers
# Update a customer
Source: https://docs.corti.ai/api-reference/admin/customers/update-a-customer
api-reference/admin/admin-openapi.yml patch /projects/{projectId}/customers/{customerId}
Update specific fields of a customer. Only provided fields will be updated.
# Get quotas for all tenants within a project
Source: https://docs.corti.ai/api-reference/admin/projects/get-quotas-for-all-tenants-within-a-project
api-reference/admin/admin-openapi.yml get /projects/{projectId}/quotas
# Create a new user and add it to the customer
Source: https://docs.corti.ai/api-reference/admin/users/create-a-new-user-and-add-it-to-the-customer
api-reference/admin/admin-openapi.yml post /projects/{projectId}/customers/{customerId}/users
# Delete a user
Source: https://docs.corti.ai/api-reference/admin/users/delete-a-user
api-reference/admin/admin-openapi.yml delete /projects/{projectId}/customers/{customerId}/users/{userId}
# List users for a customer
Source: https://docs.corti.ai/api-reference/admin/users/list-users-for-a-customer
api-reference/admin/admin-openapi.yml get /projects/{projectId}/customers/{customerId}/users
# Update a user
Source: https://docs.corti.ai/api-reference/admin/users/update-a-user
api-reference/admin/admin-openapi.yml patch /projects/{projectId}/customers/{customerId}/users/{userId}
# Generate Codes
Source: https://docs.corti.ai/api-reference/codes/generate-codes
api-reference/auto-generated-openapi.yml post /interactions/{id}/codes/
`Limited Access - Contact us for more information`
Generate codes within the context of an interaction.
This endpoint is only accessible within specific customer tenants. It is not available in the public API.
For stateless code prediction based on input text string or documentId, please refer to the [Predict Codes](/api-reference/codes/predict-codes) API, or [contact us](https://help.corti.app) for more information.
# List Codes
Source: https://docs.corti.ai/api-reference/codes/list-codes
api-reference/auto-generated-openapi.yml get /interactions/{id}/codes/
`Limited Access - Contact us for more information`
List predicted codes within the context of an interaction.
This endpoint is only accessible within specific customer tenants. It is not available in the public API.
For stateless code prediction based on input text string or documentId, please refer to the [Predict Codes](/api-reference/codes/predict-codes) API, or [contact us](https://help.corti.app) for more information.
# Predict Codes
Source: https://docs.corti.ai/api-reference/codes/predict-codes
api-reference/auto-generated-openapi.yml post /tools/coding/
Predict medical codes from provided context.
This is a stateless endpoint, designed to predict ICD-10-CM, ICD-10-PCS, and CPT codes based on input text string or documentId.
More than one code system may be defined in a single request, and the maximum number of codes to return per system can also be defined.
Code prediction requests have two possible values for context:
- `text`: One set of code prediction results will be returned based on all input text defined.
- `documentId`: Code prediction will be based on that defined document only.
The response includes two sets of results:
- `Codes`: Highest confidence bundle of codes, as selected by the code prediction model
- `Candidates`: Full list of candidate codes as predicted by the model, rank sorted by model confidence with maximum possible value of 50.
All predicted code results are based on input context defined in the request only (not other external data or assets associated with an interaction).
# Select Codes
Source: https://docs.corti.ai/api-reference/codes/select-codes
api-reference/auto-generated-openapi.yml put /interactions/{id}/codes/
`Limited Access - Contact us for more information`
Select predicted codes within the context of an interaction.
This endpoint is only accessible within specific customer tenants. It is not available in the public API.
For stateless code prediction based on input text string or documentId, please refer to the [Predict Codes](/api-reference/codes/predict-codes) API, or [contact us](https://help.corti.app) for more information.
# Delete Document
Source: https://docs.corti.ai/api-reference/documents/delete-document
api-reference/auto-generated-openapi.yml delete /interactions/{id}/documents/{documentId}
# Generate Document
Source: https://docs.corti.ai/api-reference/documents/generate-document
api-reference/auto-generated-openapi.yml post /interactions/{id}/documents/
Generate Document.
# Get Document
Source: https://docs.corti.ai/api-reference/documents/get-document
api-reference/auto-generated-openapi.yml get /interactions/{id}/documents/{documentId}
Get Document.
# List Documents
Source: https://docs.corti.ai/api-reference/documents/list-documents
api-reference/auto-generated-openapi.yml get /interactions/{id}/documents/
List Documents
# Update Document
Source: https://docs.corti.ai/api-reference/documents/update-document
api-reference/auto-generated-openapi.yml patch /interactions/{id}/documents/{documentId}
# Add Facts
Source: https://docs.corti.ai/api-reference/facts/add-facts
api-reference/auto-generated-openapi.yml post /interactions/{id}/facts/
Adds new facts to an interaction.
# Extract Facts
Source: https://docs.corti.ai/api-reference/facts/extract-facts
api-reference/auto-generated-openapi.yml post /tools/extract-facts
Extract facts from provided text, without storing them.
# List Fact Groups
Source: https://docs.corti.ai/api-reference/facts/list-fact-groups
api-reference/auto-generated-openapi.yml get /factgroups/
Returns a list of available fact groups, used to categorize facts associated with an interaction.
# List Facts
Source: https://docs.corti.ai/api-reference/facts/list-facts
api-reference/auto-generated-openapi.yml get /interactions/{id}/facts/
Retrieves a list of facts for a given interaction.
# Update Fact
Source: https://docs.corti.ai/api-reference/facts/update-fact
api-reference/auto-generated-openapi.yml patch /interactions/{id}/facts/{factId}
Updates an existing fact associated with a specific interaction.
# Update Facts
Source: https://docs.corti.ai/api-reference/facts/update-facts
api-reference/auto-generated-openapi.yml patch /interactions/{id}/facts/
Updates multiple facts associated with an interaction.
# Create Interaction
Source: https://docs.corti.ai/api-reference/interactions/create-interaction
api-reference/auto-generated-openapi.yml post /interactions/
Creates a new interaction.
# Delete Interaction
Source: https://docs.corti.ai/api-reference/interactions/delete-interaction
api-reference/auto-generated-openapi.yml delete /interactions/{id}
Deletes an existing interaction.
# Get Existing Interaction
Source: https://docs.corti.ai/api-reference/interactions/get-existing-interaction
api-reference/auto-generated-openapi.yml get /interactions/{id}
Retrieves a previously recorded interaction by its unique identifier (interaction ID).
# List All Interactions
Source: https://docs.corti.ai/api-reference/interactions/list-all-interactions
api-reference/auto-generated-openapi.yml get /interactions/
Lists all existing interactions. Results can be filtered by encounter status and patient identifier.
# Update Interaction
Source: https://docs.corti.ai/api-reference/interactions/update-interaction
api-reference/auto-generated-openapi.yml patch /interactions/{id}
Modifies an existing interaction by updating specific fields without overwriting the entire record.
# Delete Recording
Source: https://docs.corti.ai/api-reference/recordings/delete-recording
api-reference/auto-generated-openapi.yml delete /interactions/{id}/recordings/{recordingId}
Delete a specific recording for a given interaction.
# Get Recording
Source: https://docs.corti.ai/api-reference/recordings/get-recording
api-reference/auto-generated-openapi.yml get /interactions/{id}/recordings/{recordingId}
Retrieve a specific recording for a given interaction.
# List Recordings
Source: https://docs.corti.ai/api-reference/recordings/list-recordings
api-reference/auto-generated-openapi.yml get /interactions/{id}/recordings/
Retrieve a list of recordings for a given interaction.
# Upload Recording
Source: https://docs.corti.ai/api-reference/recordings/upload-recording
api-reference/auto-generated-openapi.yml post /interactions/{id}/recordings/
Upload a recording for a given interaction. There is a maximum limit of 60 minutes in length and 150MB in size for recordings.
# Real-time conversational transcript generation and fact extraction (FactsR™)
Source: https://docs.corti.ai/api-reference/stream
WebSocket Secure (WSS) API Documentation for /stream endpoint
## Overview
The WebSocket Secure (WSS) `/stream` API enables real-time, bidirectional communication with the Corti system for interaction streaming. Clients can send and receive structured data, including transcripts and fact updates. Learn more about [FactsR™ here](/textgen/factsr/).
This documentation provides a structured guide for integrating the Corti WSS API for real-time interaction streaming.
This `/stream` endpoint supports real-time ambient documentation interactions and clinical decision support workflows.
* If you are looking for a stateless endpoint that is geared towards front-end dictation workflows you should use the [/transcribe WSS](/api-reference/transcribe/)
* If you are looking for asynchronous ambient documentation interactions, then please refer to the [/documents endpoint](/api-reference/documents/generate-document/)
***
## 1. Establishing a Connection
Clients must initiate a WebSocket connection using the `wss://` scheme and provide a valid interaction ID in the URL.
When creating an interaction, the 200 response provides a `websocketUrl` for that interaction including the `tenant-name` as url parameter.
The authentication for the WSS stream requires in addition to the `tenant-name` parameter a `token` parameter to pass in the Bearer access token.
### Path Parameters
Unique interaction identifier
### Query Parameters
`eu` or `us`
Specifies the tenant context
Bearer \$token
#### Using SDK
You can use the Corti SDK (currently in "beta") to connect to a stream endpoint.
```ts title="JavaScript (Beta)" theme={null}
import { CortiClient, CortiEnvironment } from "@corti/sdk";
const cortiClient = new CortiClient({
tenantName: "YOUR_TENANT_NAME",
environment: CortiEnvironment.Eu,
auth: {
accessToken: "YOUR_ACCESS_TOKEN"
},
});
const streamSocket = await cortiClient.stream.connect({
id: ""
});
```
***
## 2. Handshake Responses
### 101 Switching Protocols
Indicates a successful WebSocket connection.
Once connected, the server streams data in the following formats:
### Transcripts Data Streams
| Property | Type | Description |
| :--------------------------- | :--------------- | :------------------------------------------------------- |
| `type` | string | "transcript" |
| `data` | array of objects | Transcript segments |
| `data[].id` | string | Unique identifier for the transcript |
| `data[].transcript` | string | The transcribed text |
| `data[].final` | boolean | Indicates whether the transcript is finalized or interim |
| `data[].speakerId` | integer | Speaker identifier (-1 if diarization is off) |
| `data[].participant.channel` | integer | Audio channel number (e.g. 0 or 1) |
| `data[].time.start` | number | Start time of the transcript segment |
| `data[].time.end` | number | End time of the transcript segment |
```json theme={null}
{
"type": "transcript",
"data": [
{
"id": "UUID",
"transcript": "Patient presents with fever and cough.",
"final": true,
"speakerId": -1,
"participant": { "channel": 0 },
"time": { "start": 1.71, "end": 11.296 }
}
]
}
```
### Facts Data Streams
| Property | Type | Description |
| :------------------- | :------------------------- | :--------------------------------------------------- |
| `type` | string | "facts" |
| `fact` | array of objects | Fact objects |
| `fact[].id` | string | Unique identifier for the fact |
| `fact[].text` | string | Text description of the fact |
| `fact[].group` | string | Categorization of the fact (e.g., "medical-history") |
| `fact[].groupId` | string | Unique identifier for the group |
| `fact[].isDiscarded` | boolean | Indicates if the fact was discarded |
| `fact[].source` | string | Source of the fact (e.g., "core") |
| `fact[].createdAt` | string (date-time) | Timestamp when the fact was created |
| `fact[].updatedAt` | string or null (date-time) | Timestamp when the fact was last updated |
```json theme={null}
{
"type": "facts",
"fact": [
{
"id": "UUID",
"text": "Patient has a history of hypertension.",
"group": "medical-history",
"groupId": "UUID",
"isDiscarded": false,
"source": "core",
"createdAt": "2024-02-28T12:34:56Z",
"updatedAt": "2024-02-28T12:35:56Z"
}
]
}
```
By default, incoming audio and returned data streams are persisted on the server, associated with the interactionId. You may query the interaction to retrieve the stored `recordings`, `transcripts`, and `facts` via the relevant REST endpoints. Audio recordings are saved as .webm format; transcripts and facts as json objects.
Data persistence can be disabled by Corti upon request when needed to support compliance with your applicable regulations and data handling preferences.
#### Using SDK
You can use the Corti SDK (currently in "beta") to subscribe to stream messages.
```ts title="JavaScript (Beta)" theme={null}
streamSocket.on("message", (message) => {
// Distinguish message types
switch (message.type) {
case "transcript":
// Handle transcript message
console.log("Transcript:", message);
break;
case "facts":
// Handle facts message
console.log("Facts:", message);
break;
case "error":
// Handle error message
console.error("Error:", message);
break;
default:
// Handle other message types
console.log("Other message:", message);
}
});
streamSocket.on("error", (error) => {
// Handle error
console.error(error);
});
streamSocket.on("close", () => {
// Handle socket close
console.log("Stream closed");
});
```
***
## 3. Sending Messages
Clients must send a stream configuration message and wait for a response of type `CONFIG_ACCEPTED` before transmitting other data.
Once the server responds with `{"type": "CONFIG_ACCEPTED"}` Clients can proceed with sending audio or controlling the stream status.
### Stream Configuration
| Property | Type | Required | Description |
| :--------------------------------------------------- | :------------ | :----------- | :---------------------------------------------------- |
| `type` | string | Yes | "config" |
| `configuration` | object | Yes | Configuration settings |
| `configuration.transcription.primaryLanguage` | string (enum) | Yes | Primary spoken language for transcription |
| `configuration.transcription.isDiarization` | boolean | No - `false` | Enable speaker diarization |
| `configuration.transcription.isMultichannel` | boolean | No - `false` | Enable multi-channel audio processing |
| `configuration.transcription.participants` | array | Yes | List of participants with roles assigned to a channel |
| `configuration.transcription.participants[].channel` | integer | Yes | Audio channel number (e.g. 0 or 1) |
| `configuration.transcription.participants[].role` | string (enum) | Yes | "doctor", "patient", or "multiple" |
| `configuration.mode.type` | string (enum) | Yes | "facts" or "transcription" |
| `configuration.mode.outputLocale` | string (enum) | No | Output language locale (required for `facts`) |
#### Example
```json wss:/stream configuration example theme={null}
{
"type": "config",
"configuration": {
"transcription": {
"primaryLanguage": "en",
"isDiarization": false,
"isMultichannel": false,
"participants": [
{
"channel": 0,
"role": "multiple"
}
]
},
"mode": {
"type": "facts",
"outputLocale": "en"
}
}
}
```
#### Using SDK
You can use the Corti SDK (currently in "beta") to send stream configuration.
You can provide the configuration either directly when connecting, or send it as a separate message after establishing the connection:
```ts title="JavaScript (Beta, recommended)" theme={null}
const configuration = {
transcription: {
primaryLanguage: "en",
isDiarization: false,
isMultichannel: false,
participants: [
{
channel: 0,
role: "multiple"
}
]
},
mode: {
type: "facts",
outputLocale: "en"
}
};
const streamSocket = await cortiClient.stream.connect({
id: "",
configuration
});
```
```ts title="JavaScript (Beta, handle configuration manually)" theme={null}
const streamSocket = await cortiClient.stream.connect({
id: ""
});
streamSocket.on("open", () => {
streamSocket.sendConfiguration({
type: "config",
configuration
});
});
```
### Sending Audio Data
Ensure that your configuration was accepted before starting to send audio and that your initial audio chunk is not too small as it needs to contain the headers to properly decode the audio.
We recommend sending audio in chunks of 500ms. In terms of buffering, the limit is 64000 bytes per chunk.
Audio data should be sent as raw binary without JSON wrapping.
For bandwidth and efficiency reasons, utilizing the webm/opus encoding is recommended; however, you can send a variety of common audio formats as the audio you send first passes through a transcoder. Similarly, you do not need to specify any sample rate, depth or other audio settings. See more details [here](/about/asr/audio).
### Channels, participants and speakers
In a typical **on-site setting** you should send mono-channel audio. If the microphone is a stereo-microphone, you can ensure to set `isMultichannel: false` and audio will be converted to mono-channel, ensuring no duplicate transcripts are being returned.
In a **virtual setting** such as telehealth, you would typically have the virtual audio on one channel from webRTC and mix in on a separate channel the microphone of the local client. In this scenario, define `isMultichannel: true` and assign each channel the relevant participant role (e.g., if the doctor is on the local client and channel 0, then you can set the role for channel 0 to `doctor`).
**Diarization** is independent of audio channels and participant roles. If you want transcript segments to be assigned to automatically identified speakers, set `isDiarization: true`. If `false`, transcript segments will be returned with `speakerId: -1`. If set to `true`, then diarization will try to identify speakers separately on each channel. The first identified speaker on each channel will have transcript segments with `speakerId: 0`, the second `speakerId: 1` and so forth.
SpeakerIds are not related or matched to participant roles.
#### Using SDK
You can use the Corti SDK (currently in "beta") to send audio data to the stream.
To send audio, use the sendAudio method on the stream socket. Audio should be sent as binary chunks (e.g., ArrayBuffer):
```ts title="JavaScript (Beta)" theme={null}
streamSocket.sendAudio(chunk); // method doesn't do the chunking
```
### Flush the Audio Buffer
To flush the audio buffer, forcing transcript segments to be returned over the web socket (e.g., when turning off or muting the microphone for the patient to share something private, not to be recorded, during the conversation), send a message -
```json theme={null}
{
"type":"flush"
}
```
The server will return text for audio sent before the `flush` message and then respond with message -
```json theme={null}
{
"type":"flushed"
}
```
The web socket will remain open so recording can continue.
FactsR generation (i.e., when working in `configuration.mode: facts`) is not impacted by the `flush` event and will continue to process as normal.
Client side considerations:
1 If you rely on a `flush` event to separate data (e.g., for different sections in an EHR template), then be sure to receive the `flushed` event before moving on to the next data field.
2 When using a web browser `MediaRecorder` API, audio is buffered and only emitted at the configured timeslice interval. Therefore, *before* sending a `flush` message, call `MediaRecorder.requestData()` to force any remaining buffered audio on the client to be transmitted to the server. This ensures all audio reaches the server before the `flush` is processed.
***
## 4. Ending the Session
To end the `/stream` session, send a message -
```json theme={null}
{
"type": "end"
}
```
This will signal the server to send any remaining transcript segments and facts (depending on `mode` configuration). Then, the server will send two messages -
```json theme={null}
{
"type":"usage",
"credits":0.1
}
```
```json theme={null}
{
"type":"ENDED"
}
```
Following the message type `ENDED`, the server will close the web socket.
You can at any time open the WebSocket again by sending the configuration.
#### Using SDK
You can use the Corti SDK (currently in "beta") to control the stream status.
When using automatic configuration (passing configuration to connect),
the socket will close itself without reconnecting when it receives an ENDED message.
When using manual configuration, the socket will attempt to reconnect after the server closes the connection. To prevent this,
you must subscribe to the ENDED message and manually close the connection.
```ts title="JavaScript (Beta, recommended)" theme={null}
const streamSocket = await cortiClient.stream.connect({
id: "",
configuration
});
streamSocket.sendEnd({ type: "end" });
streamSocket.on("message", (message) => {
if (message.type === "usage") {
console.log("Usage:", message);
}
// message is received, but connection closes automatically
if (message.type === "ENDED") {
console.log("ENDED:", message);
}
});
```
```ts title="JavaScript (Beta, manual configuration)" theme={null}
const streamSocket = await cortiClient.stream.connect({
id: ""
});
streamSocket.sendEnd({ type: "end" });
streamSocket.on("message", (message) => {
if (message.type === "usage") {
console.log("Usage:", message);
}
if (message.type === "ENDED") {
streamSocket.close(); // Prevents unwanted reconnection
}
});
```
***
## 5. Error Handling
In case of an invalid or missing interaction ID, the server will return an error before opening the WebSocket.
From opening the WebSocket, you need to commit the configuration within 15 seconds, else the WebSocket will close again
At the beginning of a WebSocket session the following messages related to configuration can be returned.
```json theme={null}
{"type": "CONFIG_DENIED"} // in case the configuration is not valid
{"type": "CONFIG_MISSING"}
{"type": "CONFIG_NOT_PROVIDED"}
{"type": "CONFIG_ALREADY_RECEIVED"}
```
In addition, a reason will be supplied, e.g. `reason: language unavailable`
Once configuration has been accepted and the session is running, you may encounter runtime or application-level errors.
These are sent as JSON objects with the following structure:
```json theme={null}
{
"type": "error",
"error": {
"id": "error id",
"title": "error title",
"status": 400,
"details": "error details",
"doc":"link to documentation"
}
}
```
In some cases, receiving an "error" type message will cause the stream to end and send a message of type `usage` and type `ENDED`.
#### Using SDK
You can use the Corti SDK (currently in "beta") to handle error messages.
With recommended configuration, configuration errors (e.g., CONFIG\_DENIED, CONFIG\_MISSING, etc.) and runtime errors will both trigger the error event and automatically close the socket. You can also inspect the original message in the message handler. With manual configuration, configuration errors are only received as messages (not as error events), and you must close the socket manually to avoid reconnection.
```ts title="JavaScript (Beta, recommended)" theme={null}
const streamSocket = await cortiClient.stream.connect({
id: "",
configuration
});
streamSocket.on("error", (error) => {
// Emitted for both configuration and runtime errors
console.error("Error event:", error);
// The socket will close itself automatically
});
// still can be accessed with normal "message" subscription
streamSocket.on("message", (message) => {
if (
message.type === "CONFIG_DENIED" ||
message.type === "CONFIG_MISSING" ||
message.type === "CONFIG_NOT_PROVIDED" ||
message.type === "CONFIG_ALREADY_RECEIVED" ||
message.type === "CONFIG_TIMEOUT"
) {
console.log("Configuration error (message):", message);
}
if (message.type === "error") {
console.log("Runtime error (message):", message);
}
});
```
```ts title="JavaScript (Beta, manual configuration)" theme={null}
const streamSocket = await cortiClient.stream.connect({
id: ""
});
streamSocket.on("message", (message) => {
if (
message.type === "CONFIG_DENIED" ||
message.type === "CONFIG_MISSING" ||
message.type === "CONFIG_NOT_PROVIDED" ||
message.type === "CONFIG_ALREADY_RECEIVED" ||
message.type === "CONFIG_TIMEOUT"
) {
console.error("Configuration error (message):", message);
streamSocket.close(); // Must close manually to avoid reconnection
}
if (message.type === "error") {
console.error("Runtime error (message):", message);
streamSocket.close(); // Must close manually to avoid reconnection
}
});
```
# Get Template
Source: https://docs.corti.ai/api-reference/templates/get-template
api-reference/auto-generated-openapi.yml get /templates/{key}
Retrieves template by key.
# List Template Sections
Source: https://docs.corti.ai/api-reference/templates/list-template-sections
api-reference/auto-generated-openapi.yml get /templateSections/
Retrieves a list of template sections with optional filters for organization and language.
# List Templates
Source: https://docs.corti.ai/api-reference/templates/list-templates
api-reference/auto-generated-openapi.yml get /templates/
Retrieves a list of templates with optional filters for organization, language, and status.
# Real-time stateless dictation
Source: https://docs.corti.ai/api-reference/transcribe
WebSocket Secure (WSS) API Documentation for /transcribe endpoint
## Overview
The WebSocket Secure (WSS) `/transcribe` API enables real-time, bidirectional communication with the Corti system for stateless speech to text. Clients can send and receive structured data, including transcripts and detected commands.
This documentation provides a comprehensive guide for integrating these capabilities.
This `/transcribe` endpoint supports real-time stateless dictation.
* If you are looking for real-time ambient documentation interactions, you should use the [/stream WSS](/api-reference/stream/)
* If you are looking for transcript generation based on a pre-recorded audio file, then please refer to the [/transcripts endpoint](/api-reference/transcripts/create-transcript/)
***
## 1. Establishing a Connection
Clients must initiate a WebSocket connection using the `wss://` scheme.
The authentication for the WSS stream requires in addition to the `tenant-name` parameter a `token` parameter to pass in the Bearer access token.
### Query Parameters
`eu` or `us`
Specifies the tenant context
Bearer \$token
```bash Example wss:/transcribe request theme={null}
curl --request GET \
--url wss://api.${environment}.corti.app/audio-bridge/v2/transcribe?tenant-name=${tenant}&token=Bearer%20${accessToken}
```
#### Using SDK
You can use the Corti SDK (currently in "beta") to connect to the /transcribe endpoint.
```ts title="JavaScript (Beta)" theme={null}
import { CortiClient, CortiEnvironment } from "@corti/sdk";
const cortiClient = new CortiClient({
tenantName: "YOUR_TENANT_NAME",
environment: CortiEnvironment.Eu,
auth: {
accessToken: "YOUR_ACCESS_TOKEN"
},
});
const transcribeSocket = await cortiClient.transcribe.connect();
```
***
## 2. Handshake Response
### 101 Switching Protocols
Indicates a successful WebSocket connection.
Upon successful connection, send a `config` message to define the configuration: Specify the input language and expected output preferences.
The config message must be sent within 10 seconds of the web socket being opened to prevent `CONFIG-TIMEOUT`, which will require establishing a new wss connection.
***
## 3. Sending Messages
### Configuration
Declare your `/transcribe` configuration using the message `"type": "config"` followed by defining the `"configuration": {""}`.
Defining the type is required along with the `primaryLanguage` configuration parameter. The other parameters are optional for use, depending on your need and workflow.
Configuration notes:
* Clients must send a stream configuration message and wait for a response of type `CONFIG_ACCEPTED` before transmitting other data.
* If the configuration is not valid it will return `CONFIG_DENIED`.
* The configuration must be committed within 10 seconds of opening the WebSocket, else it will time-out with `CONFIG_TIMEOUT`.
The locale of the primary spoken language. See supported languages codes and more information [here](/about/languages).
When true, converts spoken punctuation such as `period` or `slash` into `.`or `/`. Read more about supported punctuation [here](/stt/punctuation).
When true, automatically punctuates and capitalizes in the final transcript.
Spoken and Automatic Punctuation are mutually exclusive - only one should be set to true in a given configuration request. If both are included and set to `true`, then `spokenPunctuation` will take precedence and override `automaticPunctuation`.
Provide the commands that should be registered and detected - Read more about commands [here](/stt/commands).
Unique value to identify the command. This, along with the command phrase, will be returned by the API when the command is recognized during dictation.
One or more word sequence(s) that can be spoken to trigger the command. At least one phrase is required per command.
Placeholders that can (optionally) be added in `phrases` to define multiple words that should trigger the command.
Define the variable used in command phrase here.
The only variable type supported at this time is `enum`.
List of values that should be recognized for the defined variable.
Define each type of formatting preferences using the `enum` options described below. Read more about formatting [here](/stt/formatting).
Formatting is currently `beta` status. API details subject to change ahead of general release.
Defining formatting configuration is `optional`. When these preferences are not configured, the `default` values listed below will be applied automatically.
| Option | Format | Example |
| :------------ | :------------------------- | :--------------------------------------------------------- |
| `as_dictated` | Preserve spoken phrasing | "February third twenty twenty five" -> "February 3rd 2025" |
| `long_text` | Long date (default) | "3 February 2025" |
| `eu_slash` | Short date (EU) | "03/02/2025" |
| `us_slash` | Short date (US) | "02/03/2025" |
| `iso_compact` | ISO (basic, no separators) | "20250302" |
| Option | Format | Example |
| :------------ | :---------------- | :-------------------------------------------------------- |
| `as_dictated` | As dictated | "Four o'clock" or "four thirty five" or "sixteen hundred" |
| `h12` | 12-hour | "4:00 PM" |
| `h24` | 24-hour (default) | "16:00" |
| Option | Format | Example |
| :-------------------- | :----------------------------------------------------- | :--------------------------------------- |
| `as_dictated` | As dictated | "one, two, ... nine, ten, eleven, twelve |
| `numerals_above_nine` | Single digit as words, multi-digit as number (default) | "One, two ... nine, 10, 11, 12" |
| `numerals` | Numbers only | "1, 2, ... 9, 10, 11, 12" |
| Option | Format | Example |
| :------------ | :-------------------- | :------------------------------------------------------------------------ |
| `as_dictated` | As dictated | "Millimeters, centimeters, inches; Blood pressure one twenty over eighty" |
| `abbreviated` | Abbreviated (default) | "mm, cm, in; BP 120/80" |
[Click here](/stt/formatting#list-of-supported-units) to see a full list of supported units
[Click here](/stt/formatting#list-of-supported-measurements) to see a full list of supported measurements
| Option | Format | Example |
| :------------ | :------------------- | :----------- |
| `as_dictated` | As dictated | "one to ten" |
| `numerals` | As numbers (default) | "1-10" |
| Option | Format | Example |
| :------------ | :-------------------- | :--------------------- |
| `as_dictated` | As dictated | "First, second, third" |
| `numerals` | Abbreviated (default) | "1st, 2nd, 3rd" |
#### Example
Here is an example configuration for transcription of dictated audio in English with spoken punctuation enabled, two commands defined, and (default) formatting options defined:
```json wss:/transcribe configuration example theme={null}
{
"type": "config",
"configuration":{
"primaryLanguage": "en",
"spokenPunctuation": true,
"commands": [
{
"id": "next_section",
"phrases": [
"next section", "go to next section"
]
},
{
"id": "insert_template",
"phrases": [
"insert my {template_name} template", "insert {template_name} template"
],
"variables": [
{
"key": "template_name",
"type": "enum",
"enum": [
"soap", "radiology", "referral"
]
}
]
}
],
"formatting": {
"dates": "long_text",
"times": "h24",
"numbers": "numerals_above_nine",
"measurements": "abbreviated",
"numericRanges": "numerals",
"ordinals": "numerals"
}
}
}
```
#### Using SDK
You can use the Corti SDK (currently in "beta") to send configuration.
You can provide the configuration either directly when connecting, or send it as a separate message after establishing the connection:
```ts title="JavaScript (Beta, recommended)" theme={null}
const configuration = {
primaryLanguage: "en",
spokenPunctuation: true,
commands: [
{
id: "next_section",
phrases: ["next section", "go to next section"]
},
]
};
const transcribeSocket = await cortiClient.transcribe.connect(
{ configuration }
);
```
```ts title="JavaScript (Beta, handle configuration manually)" theme={null}
const transcribeSocket = await cortiClient.transcribe.connect();
transcribeSocket.on("open", () => {
transcribeSocket.sendConfiguration({
type: "config",
configuration: config
});
});
```
### Sending audio
Audio data chunks, sent as binary, to be transcribed. See more details on audio formats and best practices for audio streaming [here](/stt/audio).
#### Using SDK
You can use the Corti SDK (currently in "beta") to send audio data.
```ts title="JavaScript (Beta)" theme={null}
transcribeSocket.sendAudio(audioChunk); // method doesn't do the chunking
```
### Flush the Audio Buffer
To flush the audio buffer, forcing transcript segments and detected commands to be returned over the web socket (e.g., when turning off or muting the microphone in a "hold-to-talk" dictation workflow, or in applications that support mic "go to sleep"), send a message -
```json theme={null}
{
"type":"flush"
}
```
The server will return text/commands for audio sent before the `flush` message and then respond with message -
```json theme={null}
{
"type":"flushed"
}
```
The web socket will remain open so dictation can continue.
Client side considerations:
1 If you rely on a `flush` event to separate data (e.g., for different sections in an EHR template), then be sure to receive the `flushed` event before moving on to the next data field.
2 When using a web browser `MediaRecorder` API, audio is buffered and only emitted at the configured timeslice interval. Therefore, *before* sending a `flush` message, call `MediaRecorder.requestData()` to force any remaining buffered audio on the client to be transmitted to the server. This ensures all audio reaches the server before the `flush` is processed.
### Ending the Session
To end the `/transcribe` session, send a message -
```json theme={null}
{
"type": "end"
}
```
This will signal the server to send any remaining transcript segments and/or detected commands. Then, the server will send two messages -
```json theme={null}
{
"type":"usage",
"credits":0.1
}
```
```json theme={null}
{
"type":"ended"
}
```
Following the message type `ended`, the server will close the web socket.
#### Using SDK
You can use the Corti SDK (currently in "beta") to end the /transcribe session.
When using automatic configuration (passing configuration to connect),
the socket will close itself without reconnecting when it receives an ended message.
When using manual configuration, the socket will attempt to reconnect after the server closes the connection. To prevent this,
you must subscribe to the ended message and manually close the connection.
```ts title="JavaScript (Beta, recommended)" theme={null}
const transcribeSocket = await cortiClient.transcribe.connect({
configuration
});
transcribeSocket.sendEnd({ type: "end" });
```
```ts title="JavaScript (Beta, manual configuration)" theme={null}
const transcribeSocket = await cortiClient.transcribe.connect();
transcribeSocket.sendEnd({ type: "end" });
transcribeSocket.on("message", (message) => {
if (message.type === "ended") {
transcribeSocket.close(); // Prevents unwanted reconnection
}
});
```
***
## 4. Responses
### Configuration
Returned when sending a valid configuration.
Returned when sending a valid configuration.
### Transcripts
Transcript segment with punctuations applied and command phrases removed
The raw transcript without spoken punctuation applied and without command phrases removed
Start time of the transcript segment in seconds
End time of the transcript segment in seconds
If false, then interim transcript result
```jsx Transcript response theme={null}
{
"type": "transcript",
"data": {
"text": "patient reports mild chest pain.",
"rawTranscriptText": "patient reports mild chest pain period",
"start": 0.0,
"end": 3.2,
"isFinal": true
}
}
```
### Commands
To identify the command when it gets detected and returned over the WebSocket
The variables identified
The raw transcript without spoken punctuation applied and without command phrases removed
Start time of the transcript segment in seconds
End time of the transcript segment in seconds
```jsx Command response theme={null}
{
"type": "command",
"data": {
"id": "insert_template",
"variables": {
"template_name": "radiology"
},
"rawTranscriptText": "insert my radiology template",
"start": 2.3,
"end": 2.9,
}
}
```
### Flushed
Returned by server after processing `flush` event from client and returning transcript segments/ detected commands
```json theme={null}
{
"type":"flushed"
}
```
### Ended
Returned by server after processing `end` event from client to convey amount of credits consumed
```json theme={null}
{
"type":"usage",
"credits":0.1
}
```
Returned by server after processing `end` event from client before closing the web socket
```json theme={null}
{
"type":"ended"
}
```
#### Using SDK
You can use the Corti SDK (currently in "beta") to subscribe to responses from the /transcribe endpoint.
```ts title="JavaScript (Beta)" theme={null}
transcribeSocket.on("message", (message) => {
switch (message.type) {
case "transcript":
console.log("Transcript:", message.data.text);
break;
case "command":
console.log("Command detected:", message.data.id, message.data.variables);
break;
case "error":
console.error("Error:", message.error);
break;
case "usage":
console.log("Usage credits:", message.credits);
break;
default:
// handle other messages
break;
}
});
```
***
## 5. Error Responses
Returned when sending an invalid configuration.
Possible errors `CONFIG_DENIED`, `CONFIG_TIMEOUT`
The reason the configuration is invalid.
The session ID.
Once configuration has been accepted and the session is running, you may encounter runtime or application-level errors.
These are sent as JSON objects with the following structure:
```json theme={null}
{
"type": "error",
"error": {
"id": "error id",
"title": "error title",
"status": 400,
"details": "error details",
"doc":"link to documentation"
}
}
```
In some cases, receiving an "error" type message will cause the stream to end and send a message of type `usage` and type `ENDED`.
#### Using SDK
You can use the Corti SDK (currently in "beta") to handle error messages.
With recommended configuration, configuration errors (e.g., `CONFIG_DENIED`, etc.) and runtime errors will both trigger the error event and automatically close the socket. You can also inspect the original message in the message handler. With manual configuration, configuration errors are only received as messages (not as error events), and you must close the socket manually to avoid reconnection.
```ts title="JavaScript (Beta, recommended)" theme={null}
const transcribeSocket = await cortiClient.transcribe.connect({
configuration
});
transcribeSocket.on("error", (error) => {
// Emitted for both configuration and runtime errors
console.error("Error event:", error);
// The socket will close itself automatically
});
// still can be accessed with normal "message" subscription
transcribeSocket.on("message", (message) => {
if (
message.type === "CONFIG_DENIED" ||
message.type === "CONFIG_TIMEOUT"
) {
console.log("Configuration error (message):", message);
}
if (message.type === "error") {
console.log("Runtime error (message):", message);
}
});
```
```ts title="JavaScript (Beta, manual configuration)" theme={null}
const transcribeSocket = await cortiClient.transcribe.connect();
transcribeSocket.on("message", (message) => {
if (
message.type === "CONFIG_DENIED" ||
message.type === "CONFIG_TIMEOUT"
) {
console.error("Configuration error (message):", message);
transcribeSocket.close(); // Must close manually to avoid reconnection
}
if (message.type === "error") {
console.error("Runtime error (message):", message);
transcribeSocket.close(); // Must close manually to avoid reconnection
}
});
```
# Create Transcript
Source: https://docs.corti.ai/api-reference/transcripts/create-transcript
api-reference/auto-generated-openapi.yml post /interactions/{id}/transcripts/
Create a transcript from an audio file attached, via `/recordings` endpoint, to the interaction.
Each interaction may have more than one audio file and transcript associated with it. While audio files up to 60min in total duration, or 150MB in total size, may be attached to an interaction, synchronous processing is only supported for audio files less than ~2min in duration.
If an audio file takes longer to transcribe than the 25sec synchronous processing timeout, then it will continue to process asynchronously. In this scenario, an empty transcript will be returned with a location header that can be used to retrieve the final transcript.
The client can poll the Get Transcript endpoint (`GET /interactions/{id}/transcripts/{transcriptId}/status`) for transcript status changes:
- `200 OK` with status `processing`, `completed`, or `failed`
- `404 Not Found` if the `interactionId` or `transcriptId` are invalid
The completed transcript can be retrieved via the Get Transcript endpoint (`GET /interactions/{id}/transcripts/{transcriptId}/`).
# Delete Transcript
Source: https://docs.corti.ai/api-reference/transcripts/delete-transcript
api-reference/auto-generated-openapi.yml delete /interactions/{id}/transcripts/{transcriptId}
Deletes a specific transcript associated with an interaction.
# Get Transcript
Source: https://docs.corti.ai/api-reference/transcripts/get-transcript
api-reference/auto-generated-openapi.yml get /interactions/{id}/transcripts/{transcriptId}
Retrieve a transcript from a specific interaction.
Each interaction may have more than one transcript associated with it. Use the List Transcript request (`GET /interactions/{id}/transcripts/`) to see all transcriptIds available for the interaction.
The client can poll this Get Transcript endpoint (`GET /interactions/{id}/transcripts/{transcriptId}/status`) for transcript status changes:
- `200 OK` with status `processing`, `completed`, or `failed`
- `404 Not Found` if the `interactionId` or `transcriptId` are invalid
Status of `completed` indicates the transcript is finalized. If the transcript is retrieved while status is `processing`, then it will be incomplete.
# List Transcripts
Source: https://docs.corti.ai/api-reference/transcripts/list-transcripts
api-reference/auto-generated-openapi.yml get /interactions/{id}/transcripts/
Retrieves a list of transcripts for a given interaction.
# Welcome to the Corti API Reference
Source: https://docs.corti.ai/api-reference/welcome
AI platform for healthcare developers
This API Reference provides detailed specifications for integrating with the Corti API, enabling organizations to build bespoke healthcare AI solutions that meet their specific needs.
Walkthrough and link to the repo for the Javascript SDK
Download the Corti API Postman collection to start building
***
#### Most Popular
Detailed spec for real-time dictation and voice commands
Detailed spec for real-time conversational intelligence
Start here for opening a contextual messaging thread
Detailed spec for creating an interaction and setting appropriate context
Attach an audio file to the interaction
Start or continue your contextual chat and agentic tasks
Convert audio files to text
Create one to many documents for an interaction
Retrieve information about all available experts for use with your agents
***
### Resources
Learn about upcoming changes and recent API, language models, and app updates
View help articles and documentation, contact the Corti team, and manage support tickets
Learn about how to use OAuth based on your workflow needs
Review detailed compliance standards and security certifications
Please [contact us](https://help.corti.app/) if you need more information about the Corti API
# Embedded Assistant API
Source: https://docs.corti.ai/assistant/embedded-api
Access an API for embedding Corti Assistant in your workflow today
The Corti Embedded Assistant API enables seamless integration of [Corti Assistant](https://assistant.corti.ai) into host applications, such as Electronic Health Record (EHR) systems, web-based clinical portals, or native applications using embedded WebViews. The implementation provides a robust, consistent, and secure interface for parent applications to control and interact with embedded Corti Assistant.
The details outlined below are for you to embed the Corti Assistant "AI scribe
solution" natively within your application. To lean more about the full Corti
API, please see more [here](/api-reference/welcome)
***
## Overview
This implementation provides a robust, consistent, and secure interface for parent applications to control and interact with the embedded Corti Assistant. The API supports both asynchronous (postMessage) and synchronous (window object) integration modes.
## Integration Modes
### 1. PostMessage API
This method is recommended for iFrame/WebView integration
* Secure cross-origin communication
* Works with any iframe or WebView implementation
* Fully asynchronous with request/response pattern
Available regions:
* EU: [https://assistant.eu.corti.app](https://assistant.eu.corti.app)
* EU MD: [https://assistantmd.eu.corti.app](https://assistantmd.eu.corti.app) (medical device compliant)
* US: [https://assistant.us.corti.app](https://assistant.us.corti.app)
The code block below has an example per region:
```javascript PostMessage EU example expandable theme={null}
// Your desired environment to use
```
```javascript PostMessage EU MD example expandable theme={null}
// Your desired environment to use
```
```javascript PostMessage US example expandable theme={null}
// Your desired environment to use
```
### 2. Window API
This method is recommended for direct integration
* Synchronous typescript API via `window.CortiEmbedded`
* Promise-based methods
* Ideal for same-origin integrations
```javascript Window API expandable theme={null}
// Wait for the embedded app to be ready
window.addEventListener("message", async (event) => {
if (
event.data?.type === "CORTI_EMBEDDED_EVENT" &&
event.data.event === "ready"
) {
// Use the window API directly
const api = window.CortiEmbedded.v1;
const user = await api.auth({
mode: "stateful",
accessToken: "your-access-token",
refreshToken: "your-refresh-token",
});
console.log("Authenticated user:", user);
}
});
```
## Authentication
Authenticate the user session with the embedded app:
```javascript PostMessage expandable theme={null}
iframe.contentWindow.postMessage({
type: 'CORTI_EMBEDDED',
version: 'v1',
action: 'auth',
requestId: 'unique-id',
payload: {
mode: 'stateless' | 'stateful', // we currently do not take this value into account and will always refresh the token internally
access_token: string,
refresh_token?: string,
id_token?: string,
expires_in?: number,
token_type?: string
}
}, '*');
```
```javascript Window API theme={null}
const api = window.CortiEmbedded.v1;
const user = await api.auth({
mode: "stateful",
access_token: "token",
refresh_token: "refresh-token",
});
```
## Configure interface
The configure command allows you to configure the Assistant interface for the current session, include toggling which UI features are visible, the visual appearance of assistant, and locale settings.
```javascript PostMessage expandable theme={null}
iframe.contentWindow.postMessage(
{
type: "CORTI_EMBEDDED",
version: "v1",
action: "configure",
payload: {
features: {
interactionTitle: false,
aiChat: false,
documentFeedback: false,
navigation: true,
virtualMode: true,
syncDocumentAction: false,
},
appearance: {
primaryColor: "#00a6ff",
},
locale: {
interfaceLanguage: "de-DE",
dictationLanguage: "da-DK",
overrides: {
key: "value",
}
},
},
},
"*"
);
```
```javascript Window API expandable theme={null}
const api = window.CortiEmbedded.v1;
await api.configure({
features: {
interactionTitle: false,
aiChat: false,
documentFeedback: false,
navigation: true,
virtualMode: true,
syncDocumentAction: false,
},
appearance: {
primaryColor: "#00a6ff",
},
locale: {
interfaceLanguage: "de-DE",
dictationLanguage: "da-DK",
overrides: {
key: "value",
},
},
});
```
The defaults are as follows:
* `features.interactionTitle: true`
* `features.aiChat: true`
* `features.documentFeedback: true`
* `features.navigation: false`
* `features.virtualMode: true` (regardless of user preferences, the option can be hidden and "disabled", which means it won't show up on the UI and even if the session is configured to be virtual, it won't be if this is toggled after the session configuration message)
* `features.syncDocumentAction: false` (show a sync button in toolbar when a document is focused. if `false`, a simple copy button is displayed)
* `appearance.primaryColor: null` (uses built-in styles, which is blue-ish)
* `locale.interfaceLanguage: null` (uses the current user's specified default language or determined by browser setting if not specified)
* `locale.dictationLanguage: "en"`
* `locale.overrides: {}` (override translation by specifying the key to override and label to replace with)
The `configure` command can be invoked at any time and will take effect instantly.
The command can be invoked with a partial object, and only the specified properties will take effect.
The command returns the full currently applied configuration object.
Note that if `appearance.primaryColor` has not been set, it will always return as `null` indicating default colors will be used, unlike `locale.interfaceLanguage` or `locale.dictationLanguage` which will return whatever actual language is currently used for the given setting.
### Appearance
Disclaimer - always ensure WCAG 2.2 AA conformance
Corti Assistant’s default theme has been evaluated against WCAG 2.2 Level AA and meets applicable success criteria in our supported browsers.
This conformance claim applies only to the default configuration. Customer changes (e.g., color palettes, CSS overrides, third-party widgets, or content) are outside the scope of this claim. Customers are responsible for ensuring their customizations continue to meet WCAG 2.2 AA (including color contrast and focus visibility).
When supplying a custom accent or theme, Customers must ensure WCAG 2.2 AA conformance, including:
* 1.4.3 Contrast (Minimum): normal text ≥ 4.5:1; large text ≥ 3:1
* 1.4.11 Non-text Contrast: UI boundaries, focus rings, and selected states ≥ 3:1
* 2.4.11 Focus Not Obscured (Minimum): focus indicators remain visible and unobstructed
Corti provides accessible defaults. If you override them, verify contrast for all states (default, hover, active, disabled, focus) and on all backgrounds you use.
### Available interface languages
Updated as per November 2025
| Language code | Language |
| ------------- | --------- |
| `en` | English |
| `de-DE` | German |
| `fr-FR` | French |
| `it-IT` | Italian |
| `sv-SE` | Swedish |
| `da-DK` | Danish |
### Available dictation languages
Updated as per November 2025
#### EU
| Language code | Language |
| ------------- | --------------- |
| `en` | English |
| `en-GB` | British English |
| `de` | German |
| `fr` | French |
| `sv` | Swedish |
| `da` | Danish |
| `nl` | Dutch |
| `no` | Norwegian |
#### US
| Language code | Language |
| ------------- | --------- |
| `en` | English |
### Known strings to override
Currently, only the following keys are exposed for override:
| Key | Default value | Purpose |
| --------------------------------------- | ------------------------ | ------------------------------------------------------------------- |
| `interview.document.syncDocument.label` | *"Synchronize document"* | The button text for the *"synchronize document"* button if enabled. |
## Create interaction
```javascript PostMessage expandable theme={null}
iframe.contentWindow.postMessage({
type: 'CORTI_EMBEDDED',
version: 'v1',
action: 'createInteraction',
payload: {
assignedUserId: null,
encounter: {
identifier: `encounter-${Date.now()}`,
status: "planned",
type: "first_consultation",
period: {
startedAt: new Date().toISOString(),
},
title: "Initial Consultation",
},
}
}, '*');
```
```javascript Window API expandable theme={null}
const api = window.CortiEmbedded.v1;
await api.createInteraction({
assignedUserId: null,
encounter: {
identifier: `encounter-${Date.now()}`,
status: "planned",
type: "first_consultation",
period: {
startedAt: new Date().toISOString(),
},
title: "Initial Consultation",
},
});
```
## Add Facts
Add contextual facts to the current interaction:
```javascript PostMessage expandable theme={null}
iframe.contentWindow.postMessage({
type: 'CORTI_EMBEDDED',
version: 'v1',
action: 'addFacts',
requestId: 'unique-id',
payload: {
facts: [
{ text: "Chest pain", group: "other" },
{ text: "Shortness of breath", group: "other" },
{ text: "Fatigue", group: "other" },
{ text: "Dizziness", group: "other" },
{ text: "Nausea", group: "other" },
]
}
}, '*');
```
```javascript Window API theme={null}
const api = window.CortiEmbedded.v1;
await api.addFacts({
facts: [
{ text: "Chest pain", group: "other" },
{ text: "Shortness of breath", group: "other" },
{ text: "Fatigue", group: "other" },
],
});
```
## Configure Session
Set session-level defaults and preferences:
```javascript PostMessage expandable theme={null}
iframe.contentWindow.postMessage({
type: 'CORTI_EMBEDDED',
version: 'v1',
action: 'configureSession',
requestId: 'unique-id',
payload: {
defaultLanguage: 'en',
defaultOutputLanguage: 'en',
defaultTemplateKey: 'corti-soap',
defaultMode: 'virtual'
}
}, '*');
```
```javascript Window API expandable theme={null}
const api = window.CortiEmbedded.v1;
await api.configureSession({
defaultLanguage: "en",
defaultOutputLanguage: "en",
defaultTemplateKey: "corti-soap",
defaultMode: "virtual",
});
```
## Navigate
Navigate to a specific path within the embedded app:
```javascript PostMessage expandable theme={null}
iframe.contentWindow.postMessage({
type: 'CORTI_EMBEDDED',
version: 'v1',
action: 'navigate',
requestId: 'unique-id',
payload: {
path: '/session/interaction-123'
}
}, '*');
```
```javascript Window API theme={null}
const api = window.CortiEmbedded.v1;
await api.navigate({
path: "/session/interaction-123",
});
```
Navigable URL's include:
* `/` – start a new session
* `/session/` - go to an existing session identified by ``
* `/templates` - browse and create templates
* `/settings/preferences` - edit defaults like languages and default session settings
* `/settings/input` - edit dictation input settings
* `/settings/account` - edit general account settings
* `/settings/archive` - view items in and restore from archive (only relevant if navigation is visible)
## Set credentials
Change the credentials of the currently authenticated user. This can be used both to set the credentials for a user without a password (if only authenticated via identity provider) or to change the password of a user with an existing password.
The current password policy must be followed:
* At least 1 uppercase, 1 lowercase, 1 numerical and 1 special character
* At least 8 characters long
```javascript PostMessage expandable theme={null}
iframe.contentWindow.postMessage({
type: 'CORTI_EMBEDDED',
version: 'v1',
action: 'setCredentials',
requestId: 'unique-id',
payload: { password: 'new-password' }
}, '*');
```
```javascript Window API theme={null}
const api = window.CortiEmbedded.v1;
await api.setCredentials({ password: "new-password" });
```
## Recording controls
Start and stop recording within the embedded session:
```javascript PostMessage expandable theme={null}
// Start recording
iframe.contentWindow.postMessage({
type: 'CORTI_EMBEDDED',
version: 'v1',
action: 'startRecording',
requestId: 'unique-id'
}, '*');
// Stop recording
iframe.contentWindow.postMessage({
type: 'CORTI_EMBEDDED',
version: 'v1',
action: 'stopRecording',
requestId: 'unique-id'
}, '\*');
```
```javascript Window API theme={null}
const api = window.CortiEmbedded.v1;
await api.startRecording();
await api.stopRecording();
```
## Get status
The `getStatus` method allows you to request information about the current state of the application, including: authentication status, current user, current URL and interaction details.
```javascript PostMessage theme={null}
iframe.contentWindow.postMessage(
{
type: "CORTI_EMBEDDED",
version: "v1",
action: "getStatus"
},
"*"
);
```
```javascript Window API theme={null}
const api = window.CortiEmbedded.v1;
await api.getStatus();
```
The response is an object containing information about the current state of the application. The `interaction` in particular contains a list of resources combined with their respective metadata.
```json Response object expandable theme={null}
{
"auth": {
"isAuthenticated": "",
"user": {
"id": "",
"email": ""
}, // User OR null if not authenticated
},
"currentUrl": "",
"interaction": {
"id": "",
"title": "",
"state": "",
"startedAt": "",
"endedAt": "",
"endsAt": "",
"transcripts": [{
"utterances": [{
"id": "",
"start": "",
"duration": "",
"text": "",
"isFinal": "",
"participantId": "",
}],
"participants": [{
"id": "",
"channel": "",
"role": ""
}],
"isMultiChannel": ""
}],
"documents": [{
"id": "",
"name": "",
"templateRef": "",
"isStream": "",
"sections": [{
"key": "",
"name": "",
"text": "",
"sort": "",
"createdAt": "",
"updatedAt": "",
"markdown": "",
"htmlText": "",
"plainText": "",
}],
"outputLanguage": "",
}],
"facts": [{
"id": "",
"text": "",
"group": "",
"isDiscarded": "",
"source": "",
"createdAt": "",
"updatedAt": "",
"isNew": "",
"isDraft": "",
}],
"websocketUrl": ""
}
}
```
## Events
The embedded app sends events to notify the parent application of important state changes:
### Event Types
| | |
| :------------------ | :-------------------------------------- |
| `ready` | Embedded app is loaded and ready |
| `loaded` | Navigation to a specific path completed |
| `recordingStarted` | Recording has started |
| `recordingStopped` | Recording has stopped |
| `documentGenerated` | A document has been generated |
| `documentUpdated ` | A document has been updated |
| `documentSynced` | A document has been synced to EHR |
### Listening for Events
```javascript Listening for Events expandable theme={null}
window.addEventListener("message", (event) => {
if (event.data?.type === "CORTI_EMBEDDED_EVENT") {
switch (event.data.event) {
case "ready":
console.log("Embedded app ready");
break;
case "documentGenerated":
console.log("Document generated:", event.data.payload.document);
break;
case "recordingStarted":
console.log("Recording started");
break;
// ... handle other events
}
}
});
```
## Complete Integration Flow
Here's a complete example showing the recommended integration steps:
```javascript Example Embedded Integration expandable theme={null}
// State management
let iframe = null;
let isReady = false;
let currentInteractionId = null;
let pendingRequests = new Map();
// Initialize the integration
function initializeCortiEmbeddedIntegration(iframeElement) {
iframe = iframeElement;
isReady = false;
currentInteractionId = null;
setupEventListeners();
}
function setupEventListeners() {
window.addEventListener('message', (event) => {
if (event.data?.type === 'CORTI_EMBEDDED_EVENT') {
handleEvent(event.data);
}
});
}
function handleEvent(eventData) {
switch (eventData.event) {
case 'ready':
isReady = true;
startIntegrationFlow();
break;
case 'documentGenerated':
onDocumentGenerated(eventData.payload.document);
break;
// ... handle other events
}
}
async function startIntegrationFlow() {
try {
// 1. Authenticate
await authenticate();
// 2. Configure session
await configureSession();
// 3. Create interaction
const interaction = await createInteraction();
// 4. Add relevant facts
await addFacts();
// 5. Navigate to interaction UI
await navigateToSession(interaction.id);
console.log('Integration flow completed successfully');
} catch (error) {
console.error('Integration flow failed:', error);
}
}
async function authenticate() {
return new Promise((resolve, reject) => {
const requestId = generateRequestId();
pendingRequests.set(requestId, { resolve, reject });
iframe.contentWindow.postMessage({
type: 'CORTI_EMBEDDED',
version: 'v1',
action: 'auth',
requestId,
payload: {
mode: 'stateful',
accessToken: 'your-accesstoken',
refreshToken: 'your-refreshtoken',
...
}
}, '*');
});
}
// Usage example:
const iframeElement = document.getElementById('corti-iframe');
initializeCortiEmbeddedIntegration(iframeElement);
```
## Error Handling
All API methods can throw errors. Always wrap calls in try-catch blocks:
```javascript Error Handling expandable theme={null}
try {
const api = window.CortiEmbedded.v1;
const user = await api.auth(authPayload);
console.log("Authentication successful:", user);
} catch (error) {
console.error("Authentication failed:", error.message);
// Handle authentication failure
}
```
Please [contact us](https://help.corti.app) for help or questions.
# What is Corti Assistant?
Source: https://docs.corti.ai/assistant/how_it_works
The AI scribe for healthcare that listens, understands, and writes your documentation
**Corti Assistant is the next-generation ambient AI solution that transforms clinical conversations into structured facts and flexible documentation — putting healthcare professionals back in control.**
Unlike traditional ambient tools that go directly from audio to a single note, Corti Assistant introduces a **fact-first workflow**, where clinicians can review, edit, and expand upon AI-generated facts before generating one or more clinical documents — such as SOAP notes, patient summaries, or referral letters.
This gives clinicians greater accuracy, flexibility, and trust in their documentation, all while drastically reducing manual effort.
**Corti Assistant can be embedded directly into the care navigation workflow** or accessed via web, desktop, mobile (iOS/Android), or even Apple Watch — providing seamless ambient documentation wherever and however clinicians work.
***
## Why Corti Assistant?
Clinicians today are overwhelmed by administrative tasks, spending up to a third of their time on documentation. Corti Assistant helps reclaim that time by enabling fast, accurate documentation — but without compromising clinician oversight.
This new version of Corti Assistant is designed around a core belief: AI should support, not replace, clinical expertise. By surfacing editable, structured facts from each patient encounter, it allows clinicians to:
* Stay in control of what gets documented
* Quickly produce high-quality notes across multiple formats
* Save time without sacrificing quality or accuracy
### Key Features
#### 🧠 Fact-Based Documentation
Instead of jumping directly to a note, Corti Assistant extracts structured medical facts from the interaction. These can be reviewed, edited, or supplemented by the clinician before any documentation is generated.
#### 📄 Multi-Note Generation
From a single set of curated facts and notes, clinicians can generate multiple types of documentation — SOAP notes, referral letters, discharge summaries, patient instructions, and more.
#### 🤖 Interactive AI Assistant
Corti offers real-time, contextual prompts during or after the consultation. Clinicians can ask questions or request summaries, guidance, or resources — making it a true co-pilot, not just a scribe.
#### 💬 Ambient Documentation
Automatically transcribes, summarizes, and organizes the conversation in real time — reducing manual effort while improving clarity and consistency.
#### 🏥 Medical Coding Assistance
Tags documentation with relevant ICD/CPT codes to support accurate billing and compliance.
#### 📱 Cross-Platform Convenience
Use Corti Assistant on desktop, web, mobile (iOS, Android), or even Apple Watch — ideal for consultations on the go or in varied clinical environments.
### Seamless Integration
Corti Assistant is API-driven and designed for fast integration into EHR systems and clinical workflows. Whether as a standalone product or embedded widget, implementation is smooth and scalable — with minimal disruption to provider operations.
### Use Cases
#### 🏥 Primary Care Clinics
Document consultations effortlessly while maintaining high standards of care and clinical detail.
#### 🧬 Specialist Consultations
Capture detailed and nuanced patient histories in complex specialties, with support for multi-document needs.
#### 📞 Telemedicine
Automatically document virtual consultations in real time, streamlining remote workflows.
#### 🏃 On-the-Go Care
Record and manage documentation conveniently via mobile or Apple Watch — ideal for home visits or emergency settings.
## Conclusion
With its fact-first, clinician-centered design, Corti Assistant represents a step-change in ambient AI. It not only automates documentation — it elevates it, making it safer, more flexible, and more intuitive. For organizations aiming to improve care quality while reducing administrative burden, Corti Assistant is the AI healthcare deserves.
Please [contact us](https://help.corti.app) for more information on Corti Assistant or to get started today.
# Welcome to Corti Assistant
Source: https://docs.corti.ai/assistant/welcome
The AI scribe for healthcare that listens, understands, and writes your documentation
Designed for healthcare teams with no time to waste. Start a session in seconds; Corti Assistant listens, captures the transcript, and extracts clinical facts as you speak. This documentation site provides some overview information about Corti Assistant, an AI scribe that can be used as a standalone application or embedded directly into your native solution.
 Learn more about Corti Assistant [here](https://assistant.corti.ai) and sign up for a free trial, or [contact us](https://help.corti.app) to get started with embedding Corti Assistant in to your workflow today.
***
Learn more about Corti Assistant [here](https://assistant.corti.ai) and sign up for a free trial, or [contact us](https://help.corti.app) to get started with embedding Corti Assistant in to your workflow today.
***
# Creating Clients
Source: https://docs.corti.ai/authentication/creating_clients
Quick steps to creating your first client on the Corti Developer Console.
export const Button = ({href, children, variant = "secondary", external = false}) => {
const sharedStyles = "inline-flex items-center gap-1.5 px-3 py-1.5 text-sm rounded-xl";
const isPrimary = variant === "primary";
const primaryStyles = "bg-primary-dark text-white border-0";
const secondaryStyles = "text-gray-700 dark:text-gray-300 border border-gray-200 dark:border-white/[0.07] bg-background-light dark:bg-background-dark hover:bg-gray-600/5 dark:hover:bg-gray-200/5";
const className = `${sharedStyles} ${isPrimary ? primaryStyles : secondaryStyles}`;
return
{children}
{external && }
;
};
Start by creating a project. This gives you a workspace and a \$50 trial credit.
1. Inside your project, create a new client. Choose a clear name such as `test`, `staging`, or `prod`.
2. Select the correct data residency region, EU or US, based on your deployment requirements.
After creating the client, you will receive credentials that allow your backend to request OAuth access tokens. Store these securely and never expose them to browsers or mobile apps.
* `client_id`
* `client_secret`
* `tenant-name` (usually `base`)
* `environment` (`eu` or `us`)
Use the client credentials to fetch an access token, then call the Corti API with a Bearer token and the correct `Tenant-Name` header.
# Environments & Tenants
Source: https://docs.corti.ai/authentication/environments_tenants
Learn how Corti environments and tenants work, and how they affect authentication and data residency.
## Environments
Corti operates separate regional environments. Your environment determines where data is stored and which API endpoints you use. It also defines which identity provider you authenticate against.
Available environments:
| Environment | Region | Base API URL | Auth Base URL |
| ----------- | ----------------- | -------------------------- | --------------------------- |
| `eu` | Azure West Europe | `https://api.eu.corti.app` | `https://auth.eu.corti.app` |
| `us` | Azure US East | `https://api.us.corti.app` | `https://auth.us.corti.app` |
Your API client must authenticate against the correct environment. Tokens from one region cannot be used in another. When you create a client in the console, you can pick your preferred environment.
## Tenants
A tenant represents a shared identity realm for Corti API customers. All API customers operate inside the shared tenant named `base`. This keeps authentication consistent while maintaining strict segregation of customer data at the application layer.
You include the tenant name in the authentication URL or in headers when interacting with certain APIs. For most customers, this will always be: `Tenant-Name: "base"`
Bespoke private tenants are available only for specific enterprise or regulatory scenarios that require full isolation at the identity realm level. These cases are rare and need a dedicated review. If you believe your organisation needs its own tenant, speak with your Corti representative.
# Overview
Source: https://docs.corti.ai/authentication/overview
Learn how to authenticate with client credentials for use with the Corti API.
This guide covers authentication for use with the Corti API. If you are looking for authenticating users with Corti Assistant Embedded, then see more [here](/assistant/embedded-api#authentication).
## Authenticating with Corti Auth
Corti uses OAuth 2.0 client credentials for server-to-server authentication. This flow requires that you fetch a short-lived access token based on a `client_id` and `client_secret` from the Corti Auth Server before calling the API.
```mermaid theme={null}
%%{init: {
"sequence": {
"mirrorActors": false,
"boxTextMargin": 20
}
}}%%
sequenceDiagram
participant Service as Your Backend
participant OAuth as Corti Auth
participant Corti as Corti API
Service->>OAuth: POST /token
grant_type=client_credentials
client_id, client_secret
OAuth-->>Service: 200 OK
access_token (short-lived)
Service->>Corti: API Request
Authorization: Bearer {{access_token}}
Tenant-Name: base
Corti-->>Service: API Response
```
Note that both the client secret and the access tokens generated have full access to the API. They should never be shared or exposed to the client. For best practices on keeping your credentials secure, read [our guide](/authentication/security_best_practices).
### Fetching an Access Token with OAuth 2.0 client-credentials
```curl Standard theme={null}
curl
'https://auth.{environment}.corti.app/realms/base/protocol/openid-connect/token'
-d 'client_id=xxx' -d 'client_secret=xxx'
-d 'grant_type=client_credentials' -d 'scope=openid'
```
```curl Custom Tenant theme={null}
curl
'https://auth.{environment}.corti.app/realms/{tenant-name}/protocol/openid-connect/token'
-d 'client_id=xxx' -d 'client_secret=xxx'
-d 'grant_type=client_credentials' -d 'scope=openid'
```
```json Response theme={null}
{
"access_token": "eyJhbGciOi...",
"expires_in": 300,
"token_type": "Bearer",
"scope": "profile openid email"
}
```
For more detailed instructions on how to get an access token in various languages, see our guide here: [Authentication Quickstart](/authentication/quickstart)
### Using the access token in API requests
Once you have an access token, include it in the Authorization header. You must also provide the Tenant-Name header to specify which tenant context the request operates in.
```curl Example Request theme={null}
curl -X GET 'https://api.{environment}.corti.app/v2/interactions' \
-H "Authorization: Bearer {{access_token}}" \
-H "Tenant-Name: base"
```
Must contain the bearer token returned from the OAuth server.
The tenant identifier where the request is executed. Default tenants typically use `base`, but enterprise setups may use a custom tenant name.
## Why we use client credentials instead of an API key
API keys are simple, but they are static. If one leaks, whoever has it can call your APIs until you rotate it. Client credentials solve this by issuing short-lived tokens that expire automatically, which limits the blast radius of a leak and improves auditability.
Key differences:
* API keys are long-lived, client credentials produce short-lived tokens (5 minutes).
* API keys cannot express scopes or granular permissions, OAuth tokens can.
* OAuth flows integrate with identity providers and tenancy models, which makes them safer and easier to govern in enterprise environments.
# Quickstart - Authenticating to the Corti API
Source: https://docs.corti.ai/authentication/quickstart
Learn how to authenticate with client credentials.
This guide shows how to authenticate with the Corti API using OAuth 2.0 client credentials.
## Authenticate using code examples
For **JavaScript**, we recommend using the [Corti JavaScript SDK](/sdk/js-sdk), which handles authentication automatically. If you need to implement OAuth manually, see the examples below for other languages.
### Code examples
```js JavaScript expandable theme={null}
// Replace these with your values
const CLIENT_ID = "";
const CLIENT_SECRET = "";
const ENV = ""; // "eu" or "us"
const TENANT = ""; // for example "base"
async function getAccessToken() {
const tokenUrl = `https://auth.${ENV}.corti.app/realms/${TENANT}/protocol/openid-connect/token`;
const params = new URLSearchParams();
params.append("client_id", CLIENT_ID);
params.append("client_secret", CLIENT_SECRET);
params.append("grant_type", "client_credentials");
params.append("scope", "openid");
const res = await fetch(tokenUrl, {
method: "POST",
headers: { "Content-Type": "application/x-www-form-urlencoded" },
body: params
});
if (!res.ok) {
throw new Error(`Failed to get token, status ${res.status}`);
}
const data = await res.json();
return data.access_token;
}
// Example usage
getAccessToken().then(token => {
console.log("Access token:", token);
}).catch(err => {
console.error("Error:", err);
});
```
```py Python expandable theme={null}
import requests
# Replace these with your values
CLIENT_ID = ""
CLIENT_SECRET = ""
ENV = "" # e.g. "eu" or "us"
TENANT = "" # e.g. "base"
def get_access_token():
"""Request an OAuth2 client-credentials access token from Corti."""
url = f"https://auth.{ENV}.corti.app/realms/{TENANT}/protocol/openid-connect/token"
data = {
"client_id": CLIENT_ID,
"client_secret": CLIENT_SECRET,
"grant_type": "client_credentials",
"scope": "openid",
}
res = requests.post(url, data=data, headers={"Content-Type": "application/x-www-form-urlencoded"})
res.raise_for_status()
return res.json()["access_token"]
# Example usage
if __name__ == "__main__":
token = get_access_token()
print("Access token:", token)
```
```csharp C# expandable theme={null}
using System;
using System.Net.Http;
using System.Text.Json;
using System.Threading.Tasks;
class Program
{
private const string ClientId = "";
private const string ClientSecret = "";
private const string Env = ""; // "eu" or "us"
private const string Tenant = "";
private static async Task GetAccessTokenAsync()
{
var tokenUrl = $"https://auth.{Env}.corti.app/realms/{Tenant}/protocol/openid-connect/token";
using var http = new HttpClient();
var content = new FormUrlEncodedContent(new[]
{
new KeyValuePair("client_id", ClientId),
new KeyValuePair("client_secret", ClientSecret),
new KeyValuePair("grant_type", "client_credentials"),
new KeyValuePair("scope", "openid")
});
var response = await http.PostAsync(tokenUrl, content);
response.EnsureSuccessStatusCode();
var payload = await response.Content.ReadAsStringAsync();
using var json = JsonDocument.Parse(payload);
return json.RootElement.GetProperty("access_token").GetString()!;
}
static async Task Main()
{
var token = await GetAccessTokenAsync();
Console.WriteLine($"Access token: {token}");
}
}
```
Tokens expire after **300 seconds** (5 minutes), refresh as needed.
# Security Best Practices
Source: https://docs.corti.ai/authentication/security_best_practices
Five essential steps for keeping your client credentials and access tokens secure.
Client credentials act as a powerful service account. Anyone holding them can act on your behalf and access your tenant. Protect them as you would any internal system password.
## How to keep your tokens safe
### 1. Use environment variables and a proper secret store
Never hardcode your `client_secret` in source files. Use environment variables and a secure secret manager provided by your cloud platform or infrastructure. Rotate secrets if exposure is suspected.
### 2. Never expose credentials in frontend or untrusted environments
Client credentials must only live on trusted servers. Do not embed them in browser code, mobile apps, desktop apps, or any environment you cannot fully control. Instead, your backend should request access tokens, validate requests, and decide what your users can do.
### 3. Use a backend proxy to handle all Corti API calls from frontends
When you need a frontend to be able to call the Corti API, it is advised to use a proxy. This means all requests are through a proxy that you control. The proxy injects authentication, performs validation, and enforces user-level rules.
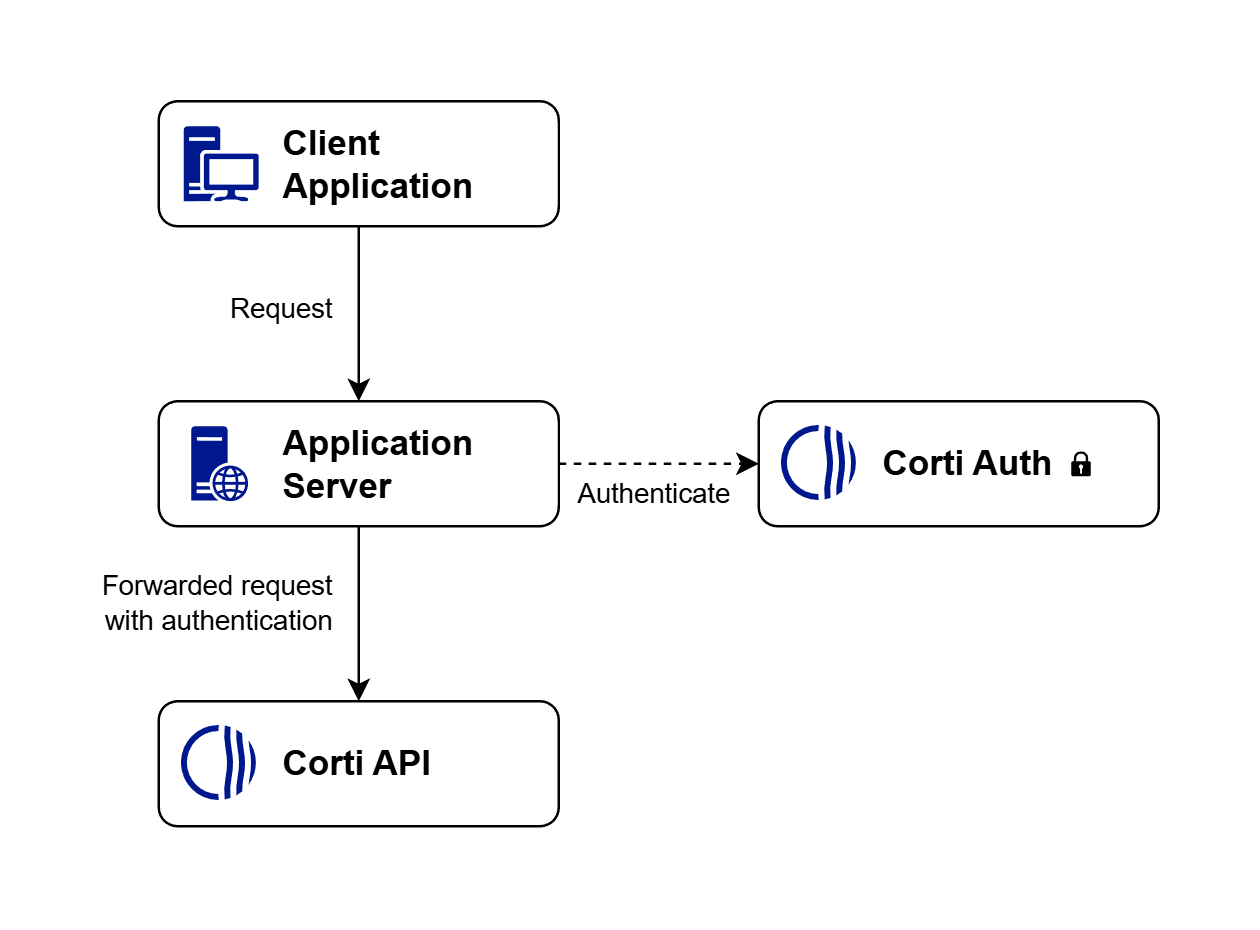
 ### 4. If you must use tokens in special cases, use limited-scope credentials
Some scenarios may require more narrowly scoped access. We are introducing support for limited scope tokens that reduce risk if exposed.
# Corti API Console
Source: https://docs.corti.ai/get_started/getaccess
Self-service portal to sign up and start your free trial today
Initiate projects
### 4. If you must use tokens in special cases, use limited-scope credentials
Some scenarios may require more narrowly scoped access. We are introducing support for limited scope tokens that reduce risk if exposed.
# Corti API Console
Source: https://docs.corti.ai/get_started/getaccess
Self-service portal to sign up and start your free trial today
Initiate projects
Create client credentials
Monitor token utilization
Collaborate with your project team
Studio playground for testing and code samples
Manage billing - View available credit balance and purchase additional token credits
Looking for Administration API? See details [here](/about/admin-api).
For support or questions, please reach out via [help.corti.app](https://help.corti.app).
# Welcome to the Corti API
Source: https://docs.corti.ai/get_started/welcome
AI for every healthcare app
Overview of the Corti API and underlying tech stack designed for healthcare
Walkthrough and examples for building your Corti AI-powered solution
### Core Capabilities
with industry leading medical term accuracy
for reliable LLM integration with your application
to build advanced AI agents and workflow automation
### Start Building
for all web socket, REST, Agentic, and Admin API specifications
to get started with AI scribing workflows in your application *today*
to API credentials, playground environment, and account management
***
### Resources
Learn about upcoming changes and recent API, language models, and app updates
View help articles and documentation, contact the Corti team, and manage support tickets
Learn about how to use OAuth based on your workflow needs
Review detailed compliance standards and security certifications
Please [contact us](https://help.corti.app/) if you need more information about the Corti API
# Quickstart - AI Coding Tools & LLMs
Source: https://docs.corti.ai/quickstart/ai-coding-tools
Use AI coding assistants and LLMs to build with Corti APIs faster
Modern AI coding tools like Cursor, GitHub Copilot, Claude Code, and other LLM-powered assistants can dramatically accelerate your development with Corti APIs. This guide shows you how to leverage these tools effectively.
AI coding assistants excel at generating boilerplate code, understanding API patterns, and helping you iterate quickly. Use them to scaffold integrations, generate SDK wrappers, and explore the API surface.
## Why Use AI Coding Tools with Corti?
Generate working code examples from natural language descriptions of your use case
Quickly understand endpoint patterns, request/response structures, and authentication flows
Generate robust error handling and retry logic based on Corti's error codes
Create SDK wrappers, test suites, and integration examples tailored to your stack
## Corti API Documentation for LLMs
Corti provides machine-readable documentation specifically formatted for LLMs and AI coding tools:
Concise API reference optimized for LLM context windows. Perfect for quick lookups and code generation.
Comprehensive documentation including guides, examples, and detailed specifications. Use when you need full context.
These files are updated automatically and contain the complete Corti API documentation in a format optimized for AI tools. Reference them directly in your prompts or configure your AI coding assistant to use them as context.
## Getting Started
Most AI coding assistants can be configured to use external documentation sources. Here are common approaches:
Cursor can access web URLs directly. Reference the llms.txt files in your prompts:
```markdown theme={null}
Using the Corti API documentation at https://docs.corti.ai/llms.txt,
generate a Python function to create an interaction and upload a recording.
```
Copilot works best when you provide context in comments. Reference the documentation:
```python theme={null}
# Using Corti API (docs: https://docs.corti.ai/llms.txt)
# Create a function to authenticate and get an access token
def get_corti_access_token():
...
```
Include the documentation URL in your system prompt or initial message:
```
I'm building with Corti API. Reference: https://docs.corti.ai/llms-full.txt
Generate a complete example for real-time transcription...
```
Ask your AI assistant to generate authentication code based on Corti's OAuth 2.0 client credentials flow. Here's a prompt you can use:
```
Using Corti API documentation (https://docs.corti.ai/llms.txt),
generate a [Python/JavaScript/TypeScript] function that:
1. Authenticates using OAuth 2.0 client credentials
2. Handles token refresh automatically when tokens expire (they expire after 300 seconds)
3. Returns a reusable client object with methods for API calls
4. Includes proper error handling for authentication failures
```
The AI should generate code that constructs the auth URL as:
`https://auth.{environment}.corti.app/realms/{tenant-name}/protocol/openid-connect/token`
And includes the required form parameters: `client_id`, `client_secret`, `grant_type: "client_credentials"`, and `scope: "openid"`.
Once authentication is working, generate code to create an interaction:
```
Using Corti API documentation (https://docs.corti.ai/llms.txt),
create a function that:
1. Makes a POST request to /v2/interactions
2. Includes the Authorization header with Bearer token
3. Includes the Tenant-Name header
4. Creates an interaction with encounter details:
- identifier (UUID)
- status: "planned"
- type: "first_consultation"
- period with startedAt timestamp
5. Returns the interactionId and websocketUrl from the response
6. Handles errors according to Corti error codes
```
The response will include an `interactionId` (UUID) and a `websocketUrl` that you'll need for streaming endpoints.
For real-time features, generate WebSocket client code:
```
Using Corti API documentation (https://docs.corti.ai/llms.txt),
create a WebSocket client for the /stream endpoint that:
1. Connects to the websocketUrl from the interaction response
2. Appends the access token as a query parameter: &token=Bearer {token}
3. Sends a configuration message with:
- transcription settings (primaryLanguage, isDiarization, participants)
- mode settings (type: "facts" or "transcription", outputLocale)
4. Waits for CONFIG_ACCEPTED before sending audio
5. Handles incoming messages (transcript, facts, error types)
6. Implements reconnection logic for dropped connections
7. Properly closes the connection with an "end" message
```
For `/transcribe` endpoint, the configuration is simpler - just include `primaryLanguage` and optional `spokenPunctuation` or `commands`.
Generate robust error handling based on Corti's error codes:
```
Using Corti API documentation (https://docs.corti.ai/llms.txt),
add comprehensive error handling that:
1. Maps HTTP status codes to Corti error codes (A0001-A0022)
2. Handles 403 errors (A0001, A0004, A0005) with clear messages
3. Handles 404 errors (A0007, A0009, A0011, A0012) appropriately
4. Implements retry logic for 500 errors (A0010) with exponential backoff
5. Handles 429 errors (A0021) with rate limiting
6. Validates request parameters before sending (A0003, A0006, A0008)
7. Provides user-friendly error messages with links to documentation
```
Reference the [complete error code list](/about/errors) in your prompt to ensure all error scenarios are covered.
Use AI assistants to:
* Add error handling based on [Corti error codes](/about/errors)
* Generate unit tests for your integration
* Create mock responses for development
* Document your code with examples
## Best Practices
Include details about:
* Your programming language and framework
* Specific endpoints you want to use
* Expected behavior and error handling
* Authentication requirements
Always mention the llms.txt or llms-full.txt URLs in your prompts to ensure the AI uses current, accurate API information.
Start with simple examples, then ask the AI to extend them. For example:
1. "Create a function to authenticate"
2. "Now add a function to create an interaction"
3. "Add error handling and retry logic"
Always review and test AI-generated code. Check that it:
* Uses correct endpoint URLs and parameters
* Handles authentication properly
* Follows Corti API patterns
* Includes appropriate error handling
## Common Use Cases
Generate language-specific SDK wrappers around Corti REST APIs. Ask your AI assistant to create classes and methods that match your preferred patterns.
Create WebSocket clients for `/transcribe` and `/stream` endpoints with proper connection management, reconnection logic, and message handling.
Generate complete integration examples for common workflows like ambient documentation, dictation, or agentic automation.
Create comprehensive test suites with mocked API responses, error scenarios, and integration tests.
## Step-by-Step Examples
### Example 1: Generate Document from Transcript
```
Using Corti API documentation (https://docs.corti.ai/llms.txt),
create a function that:
1. Takes an interactionId and transcript text as input
2. Makes a POST request to /v2/interactions/{id}/documents
3. Uses context type "transcript" with the transcript text
4. Specifies templateKey: "corti-soap"
5. Sets outputLanguage to "en"
6. Returns the generated document sections
7. Handles the response structure with sections array
```
### Example 2: Upload Recording and Create Transcript
```
Using Corti API documentation (https://docs.corti.ai/llms.txt),
create a workflow function that:
1. Uploads an audio file to /v2/interactions/{id}/recordings
2. Uses multipart/form-data with the audio file
3. Extracts recordingId from the response
4. Creates a transcript via POST /v2/interactions/{id}/transcripts
5. Polls the transcript status endpoint if processing is async
6. Retrieves the final transcript when status is "completed"
7. Handles the 25-second synchronous timeout scenario
```
### Example 3: Extract Facts from Text
```
Using Corti API documentation (https://docs.corti.ai/llms.txt),
create a function for the /tools/extract-facts endpoint that:
1. Takes unstructured text as input
2. Makes a POST request with context type "text"
3. Parses the response to extract facts with their groups
4. Returns structured fact objects with id, text, group, source
5. Handles the stateless nature (no interaction required)
```
### Example 4: Create Agent with Custom Expert
```
Using Corti Agentic Framework documentation (https://docs.corti.ai/llms.txt),
create code that:
1. Creates an agent via POST /agents
2. Defines a custom expert with:
- name and description
- systemPrompt
- mcpServers configuration (transportType, authorizationType, url)
3. Sends a message to the agent via POST /agents/{id}/v1/message:send
4. Handles the task response structure
5. Processes artifacts if returned
```
## Resources
Browse the complete API reference with interactive examples
Reference implementation showing best practices
Step-by-step guides for common workflows
Complete list of error codes and solutions
## Next Steps
* Explore the [Agentic Framework](/agentic/overview) for building AI agents
* Check out [SDK examples](https://github.com/corticph/sdk-typescript-examples) for real-world patterns
* Review [authentication best practices](/authentication/security_best_practices)
* Join the [Corti community](https://help.corti.app) for support
AI-generated code should always be reviewed and tested before use in production. While AI tools can accelerate development, human oversight ensures correctness, security, and compliance with healthcare regulations.
# Quickstart - Asynchronous AI Scribe
Source: https://docs.corti.ai/quickstart/ambient-async
Learn how to build an ambient scribe application on the Corti API
Follow these steps to get access and start building:
The [Corti API Console](https://corti-api-console.web.app/) is where you can create an account to access Corti AI
Create an account
Create a project
Create API clients
Use the client ID and client secret in your app
Develop against the API and collaborate with your project team
Monitor usage, manage billing and more
Authentication to the API on all environments is governed by OAuth 2.0. This authentication protocol offers enhanced security measures, ensuring that access to patient data and medical documentation is securely managed and compliant with healthcare regulations.
By default, you will receive a client-id and client-secret to authenticate via `client credentials` grant type.
To acquire an access token, make a request to the authURL provided to you:
```bash auth URL theme={null}
https://auth.{environment}.corti.app/realms/{tenant-name}/protocol/openid-connect/token
```
Create your account and client credentials in the API Console - in addition to client ID and client secret you'll see the tenant name and environment.
The full request body that needs to be of `Content-Type: "application/x-www-form-urlencoded"` looks like this:
```jsx Client Credentials request body theme={null}
grant_type: "client_credentials"
scope: "openid"
client_id: ""
client_secret: "********"
```
It will return you an `access_token`:
```jsx Access token theme={null}
{"access_token":"ey...","expires_in":300,"refresh_expires_in":0,"token_type":"Bearer","id_token":"e...","not-before-policy":0,"scope":"openid email profile"}
```
As you can see, the access token expires after 300 seconds (5 minutes). By default as per oAuth standards, no refresh token is used in this flow. There are many available modules to manage monitoring expiry and acquiring a new access token. However, a refresh token can be enabled if needed.
Example **authentication code snippets** for the Corti API in Python, JavaScript, and .NET:
```py Python [expandable] theme={null}
import requests
CLIENT_ID, CLIENT_SECRET, ENV, TENANT = (
"",
"",
"",
"",
)
URL = (
f"https://auth.{ENV}.corti.app"
f"/realms/{TENANT}/protocol/openid-connect/token"
)
def get_access_token():
r = requests.post(
URL,
data={
"client_id": CLIENT_ID,
"client_secret": CLIENT_SECRET,
"grant_type": "client_credentials",
"scope": "openid"
},
)
r.raise_for_status()
return r.json()["access_token"]
if __name__ == "__main__":
token = get_access_token()
print(token)
```
```js JavaScript [expandable] theme={null}
const CLIENT_ID = "";
const CLIENT_SECRET = "";
const ENVIRONMENT = "";
const TENANT_NAME = "";
const TOKEN_URL = `https://auth.${ENVIRONMENT}.corti.app/realms/${TENANT_NAME}/protocol/openid-connect/token`;
export async function getAccessToken() {
const res = await fetch(TOKEN_URL, {
method: 'POST',
headers: { 'Content-Type': 'application/x-www-form-urlencoded' },
body: new URLSearchParams({
client_id: CLIENT_ID,
client_secret: CLIENT_SECRET,
grant_type: 'client_credentials',
})
});
if (!res.ok) throw new Error(`Token request failed (${res.status})`);
const { access_token } = await res.json();
return access_token;
}
// example
getAccessToken()
.then(token => console.log(token))
.catch(err => console.error(err.message));
```
```dotnet .NET [expandable] theme={null}
using System;
using System.Net.Http;
using System.Text.Json;
// ─── CONFIG ────────────────────────────────────────────
const string CLIENT_ID = "";
const string CLIENT_SECRET = "";
const string ENV = "";
const string TENANT = "";
// ─── TOKEN ENDPOINT ────────────────────────────────────
var url =
$"https://auth.{ENV}.corti.app" +
$"/realms/{TENANT}/protocol/openid-connect/token";
using var client = new HttpClient();
// ─── FETCH TOKEN ──────────────────────────────────────
var payload = new FormUrlEncodedContent(new[]
{
KeyValuePair.Create("client_id", CLIENT_ID),
KeyValuePair.Create("client_secret", CLIENT_SECRET),
KeyValuePair.Create("grant_type", "client_credentials"),
KeyValuePair.Create("scope", "openid")
});
var resp = await client.PostAsync(url, payload);
resp.EnsureSuccessStatusCode();
using var doc =
await JsonDocument.ParseAsync(await resp.Content.ReadAsStreamAsync());
var token = doc.RootElement.GetProperty("access_token").GetString();
Console.WriteLine(token);
```
Once you're authenticated, make requests against the API. Below is a basic example for creating an Interaction. See all API requests and specifications [here](/api-reference/).
Subsequently you use the `access_token` to authenticate any API request. The baseURL is dependent on the environment:
```bash baseURL API theme={null}
api.{environment}.corti.app/v2
```
Create your account and client credentials in the API Console - in addition to client ID and client secret you'll see the tenant name and environment.
If, for example, you are on the eu environment and want to create an interaction as the starting point for any other workflow operations your URL will look like this:
```bash URL to create an interaction theme={null}
POST https://api.eu.corti.app/v2/interactions/
```
For **REST API requests**, your `access_token` should be passed as part of the `Request Header`. Additionally you need to include the `Tenant-Name` parameter:
```jsx API call request header theme={null}
Tenant-Name:
Authorization: Bearer
```
Create your account and client credentials in the API Console - in addition to client ID and client secret you'll see the tenant name and environment.
For **WebSocket** connections, the `access_token` should be passed in as URL parameter. The `Tenant-Name` is already part of the WebSocket url returned with the create interaction request:
```javascript wss url with access_token appended theme={null}
wss://{stream-url}&token=Bearer {access_token}
```
Find the full specification for create interaction request in the [API Reference](api-reference/interactions/create-interaction)
**Goal:** Integrate with Corti SDK to enable an ambient documentation, AI scribe workflow application
| | Decision | Integration Planning |
| :-: | :------------------------------------------------------------------------------------------------------------------------------------------------------------------------ | :------------------------------------------------------------------------------------------------------------------------------------------------------------------------------------------------------ |
| 1 | How will audio be processed - real-time web socket connection, via `/stream` API (**recommended**) or asynchronous processing, via `/recordings` and \`/transcripts APIs? | To use the `/stream` API, follow the path for **real-time ambient documentation**; to use the `/recordings` and `/transcripts` APIs, follow the path of asynchronous ambient documentation. |
| 2 | What template(s) will be used in document generation workflow? | Use the `GET/templates` request to see available templates. In addition to accessing Corti-default templates, you can add the `?org=` filter to find templates available to your specific organization. |
| 3 | Will document be generated based on `Facts` (**recommended**), `transcript`, or `string`? | Designing around `Facts`, `transcript`, or `string` will determine how to use the `context` variable in the Generate Document request. |
| 4 | Will EHR context or other data be used as `Facts` in document generation? | If yes, then use the `Add Facts` request to support the context updates. |
| 5 | How will the output be integrated into EHR or other target systems? | Document output will be a json object that can be saved as a full note, or parsed by section so that text can be directed to appropriate fields in the target system. |
The first step will be to create an interaction, as shown [above](/sdk/javascript-sdk#interaction-example). Once you've created your interaction, the interaction ID can be used for the steps that follow below.
See more details about this workflow [here](/workflows/ambient-async) and the full API specifications [here](/api-reference).
Here is where you use the `interaction ID`.
```ts upload recording theme={null}
await client.recordings.upload(file, "INTERACTION ID");
```
Create a helper function to upload a recording:
```ts full function theme={null}
import { createReadStream } from "fs";
async function uploadRecording(client, interactionId, filePath){
const file = createReadStream(filePath, {autoClose: true});
return client.recordings.upload(file, interactionId);
}
```
The createReadStream import is used to create a readable stream from a file path.
Find the full specification for uploading a recording [in the API reference](/api-reference/recordings/upload-recording).
Here you’ll need the `interactionId` as well as the `recordingId` returned from the upload response.
```ts Generate a transcript theme={null}
const { recordingId } = await uploadRecording(client, interactionId, "sample.mp3")
const transcript = await client.transcripts.create(interactionId, {
recordingId: recordingId,
primaryLanguage: "en"
});
```
Find the full specification for generating a transcript [in the API reference](/api-reference/transcripts/create-transcript)
Here you need the interactionId and transcript text (`transcript`) from the previous step.
```ts Generate a Document theme={null}
const document = await client.documents.create(interactionId, {
context: [{
type: "string",
data: transcript.transcripts.map(t => t.text).join(" "),
}],
templateKey: "soap",
outputLanguage: "en",
});
```
Find the full specification for generating a document [in the API reference](/api-reference/documents/generate-document#option-2)
If you need to retrieve a generated document again or at a later time (since the `create` call already returns the document), you can do so using the `interactionId` and `documentId` from the previous step.
```ts Get a Document theme={null}
await client.documents.get("INTERACTION ID", "DOCUMENT ID");
```
Find the full specification for retrieving a document in the API reference [here](/api-reference/documents/get-document)
```ts theme={null}
import { CortiEnvironment, CortiClient } from "@corti/sdk";
import dotenv from "dotenv";
import fs from "fs";
dotenv.config();
const { CLIENT_ID, CLIENT_SECRET, TENANT_NAME: TENANT } = process.env;
const client = new CortiClient({
environment: CortiEnvironment.Eu,
auth: { clientId: CLIENT_ID, clientSecret: CLIENT_SECRET },
tenantName: TENANT,
});
const { interactionId } = await client.interactions.create({
encounter: {
identifier: "GUID OF YOUR CHOOSING",
status: "planned",
type: "first_consultation",
},
});
const { recordingId } = await client.recordings.upload(
fs.createReadStream("sample.mp3", { autoClose: true }),
interactionId
);
const transcript = await client.transcripts.create(interactionId, {
recordingId,
primaryLanguage: "en"
});
const document = await client.documents.create(interactionId, {
context: [{
type: "string",
data: transcript.transcripts.map(t => t.text).join(" "),
}],
templateKey: "soap",
outputLanguage: "en",
});
console.log(document.name);
```
The `dotenv` import loads environment variables from a `.env` file. This keeps sensitive values like your client ID and client secret out of your source code, which is considered best practice.
# Quickstart - Real-Time AI Scribe
Source: https://docs.corti.ai/quickstart/ambient-rt
Learn how to build an ambient scribe application on the Corti API
Follow these steps to get access and start building:
The [Corti API Console](https://corti-api-console.web.app/) is where you can create an account to access Corti AI
Create an account
Create a project
Create API clients
Use the client ID and client secret in your app
Develop against the API and collaborate with your project team
Monitor usage, manage billing and more
Authentication to the API on all environments is governed by OAuth 2.0. This authentication protocol offers enhanced security measures, ensuring that access to patient data and medical documentation is securely managed and compliant with healthcare regulations.
By default, you will receive a client-id and client-secret to authenticate via `client credentials` grant type.
To acquire an access token, make a request to the authURL provided to you:
```bash auth URL theme={null}
https://auth.{environment}.corti.app/realms/{tenant-name}/protocol/openid-connect/token
```
Create your account and client credentials in the API Console - in addition to client ID and client secret you'll see the tenant name and environment.
The full request body that needs to be of `Content-Type: "application/x-www-form-urlencoded"` looks like this:
```jsx Client Credentials request body theme={null}
grant_type: "client_credentials"
scope: "openid"
client_id: ""
client_secret: "********"
```
It will return you an `access_token`:
```jsx Access token theme={null}
{"access_token":"ey...","expires_in":300,"refresh_expires_in":0,"token_type":"Bearer","id_token":"e...","not-before-policy":0,"scope":"openid email profile"}
```
As you can see, the access token expires after 300 seconds (5 minutes). By default as per oAuth standards, no refresh token is used in this flow. There are many available modules to manage monitoring expiry and acquiring a new access token. However, a refresh token can be enabled if needed.
Example **authentication code snippets** for the Corti API in Python, JavaScript, and .NET:
```py Python [expandable] theme={null}
import requests
CLIENT_ID, CLIENT_SECRET, ENV, TENANT = (
"",
"",
"",
"",
)
URL = (
f"https://auth.{ENV}.corti.app"
f"/realms/{TENANT}/protocol/openid-connect/token"
)
def get_access_token():
r = requests.post(
URL,
data={
"client_id": CLIENT_ID,
"client_secret": CLIENT_SECRET,
"grant_type": "client_credentials",
"scope": "openid"
},
)
r.raise_for_status()
return r.json()["access_token"]
if __name__ == "__main__":
token = get_access_token()
print(token)
```
```js JavaScript [expandable] theme={null}
const CLIENT_ID = "";
const CLIENT_SECRET = "";
const ENVIRONMENT = "";
const TENANT_NAME = "";
const TOKEN_URL = `https://auth.${ENVIRONMENT}.corti.app/realms/${TENANT_NAME}/protocol/openid-connect/token`;
export async function getAccessToken() {
const res = await fetch(TOKEN_URL, {
method: 'POST',
headers: { 'Content-Type': 'application/x-www-form-urlencoded' },
body: new URLSearchParams({
client_id: CLIENT_ID,
client_secret: CLIENT_SECRET,
grant_type: 'client_credentials',
})
});
if (!res.ok) throw new Error(`Token request failed (${res.status})`);
const { access_token } = await res.json();
return access_token;
}
// example
getAccessToken()
.then(token => console.log(token))
.catch(err => console.error(err.message));
```
```dotnet .NET [expandable] theme={null}
using System;
using System.Net.Http;
using System.Text.Json;
// ─── CONFIG ────────────────────────────────────────────
const string CLIENT_ID = "";
const string CLIENT_SECRET = "";
const string ENV = "";
const string TENANT = "";
// ─── TOKEN ENDPOINT ────────────────────────────────────
var url =
$"https://auth.{ENV}.corti.app" +
$"/realms/{TENANT}/protocol/openid-connect/token";
using var client = new HttpClient();
// ─── FETCH TOKEN ──────────────────────────────────────
var payload = new FormUrlEncodedContent(new[]
{
KeyValuePair.Create("client_id", CLIENT_ID),
KeyValuePair.Create("client_secret", CLIENT_SECRET),
KeyValuePair.Create("grant_type", "client_credentials"),
KeyValuePair.Create("scope", "openid")
});
var resp = await client.PostAsync(url, payload);
resp.EnsureSuccessStatusCode();
using var doc =
await JsonDocument.ParseAsync(await resp.Content.ReadAsStreamAsync());
var token = doc.RootElement.GetProperty("access_token").GetString();
Console.WriteLine(token);
```
Once you're authenticated, make requests against the API. Below is a basic example for creating an Interaction. See all API requests and specifications [here](/api-reference/).
Subsequently you use the `access_token` to authenticate any API request. The baseURL is dependent on the environment:
```bash baseURL API theme={null}
api.{environment}.corti.app/v2
```
Create your account and client credentials in the API Console - in addition to client ID and client secret you'll see the tenant name and environment.
If, for example, you are on the eu environment and want to create an interaction as the starting point for any other workflow operations your URL will look like this:
```bash URL to create an interaction theme={null}
POST https://api.eu.corti.app/v2/interactions/
```
For **REST API requests**, your `access_token` should be passed as part of the `Request Header`. Additionally you need to include the `Tenant-Name` parameter:
```jsx API call request header theme={null}
Tenant-Name:
Authorization: Bearer
```
Create your account and client credentials in the API Console - in addition to client ID and client secret you'll see the tenant name and environment.
For **WebSocket** connections, the `access_token` should be passed in as URL parameter. The `Tenant-Name` is already part of the WebSocket url returned with the create interaction request:
```javascript wss url with access_token appended theme={null}
wss://{stream-url}&token=Bearer {access_token}
```
Find the full specification for create interaction request in the [API Reference](api-reference/interactions/create-interaction)
```py Python app - Corti API - Stream interaction [expandable] theme={null}
import os
import json
import time
import uuid
import requests
import websocket
from urllib.parse import quote
from datetime import datetime, timezone
from dotenv import load_dotenv
# Load environment variables from .env file
load_dotenv()
CLIENT_ID = os.getenv("CLIENT_ID")
CLIENT_SECRET = os.getenv("CLIENT_SECRET")
TENANT_NAME = os.getenv("TENANT_NAME")
ENVIRONMENT = os.getenv("ENVIRONMENT")
def get_access_token():
print("🔐 Step 1 — Authenticating...")
url = f"https://auth.{ENVIRONMENT}.corti.app/realms/{TENANT_NAME}/protocol/openid-connect/token"
payload = {
"grant_type": "client_credentials",
"client_id": CLIENT_ID,
"client_secret": CLIENT_SECRET,
"scope": "openid"
}
headers = {"Content-Type": "application/x-www-form-urlencoded"}
response = requests.post(url, data=payload, headers=headers)
if response.ok:
print("✅ Authenticated")
return response.json()["access_token"]
raise Exception(f"Authentication failed: {response.status_code} - {response.text}")
def create_interaction(token):
print("🔗 Step 2 — Creating interaction session...")
url = f"https://api.{ENVIRONMENT}.corti.app/v2/interactions"
headers = {
"Authorization": f"Bearer {token}",
"Content-Type": "application/json",
"Tenant-Name": TENANT_NAME
}
now = datetime.now(timezone.utc).strftime("%Y-%m-%dT%H:%M:%SZ")
payload = {
"assignedUserId": str(uuid.uuid4()),
"encounter": {
"identifier": str(uuid.uuid4()),
"status": "planned",
"type": "first_consultation",
"period": {
"startedAt": now,
"startedAtTzoffset": "+00:00",
"endedAt": now,
"endedAtTzoffset": "+00:00"
},
"title": "Consultation"
}
}
response = requests.post(url, json=payload, headers=headers)
if response.ok:
print("✅ Interaction session created")
return response.json()
raise Exception(f"Interaction creation failed: {response.status_code} - {response.text}")
def stream_audio(ws, path):
print("🎧 Step 4 — Streaming audio...")
chunk_size = 32000
with open(path, "rb") as f:
while chunk := f.read(chunk_size):
ws.send(chunk, opcode=websocket.ABNF.OPCODE_BINARY)
time.sleep(0.5)
ws.send(json.dumps({"type": "end"}))
print("✅ Audio stream completed")
def connect_and_stream_audio(ws_url, audio_path):
print("🌐 Step 3 — Connecting to WebSocket and sending config...")
transcript_lines = []
def on_open(ws):
config = {
"type": "config",
"configuration": {
"transcription": {
"primaryLanguage": "en",
"isDiarization": False,
"isMultichannel": False,
"participants": [{"channel": 0, "role": "multiple"}]
},
"mode": {"type": "facts", "outputLocale": "en"}
}
}
ws.send(json.dumps(config))
print("✅ Configuration sent")
def on_message(ws, message):
msg = json.loads(message)
msg_type = msg.get("type").upper()
if msg_type == "CONFIG_ACCEPTED":
print("🟢 Config accepted by server")
stream_audio(ws, audio_path)
elif msg_type == "TRANSCRIPT":
print("📄Step 5 -Transcript received:")
content = " ".join([x["transcript"] for x in msg["data"]])
if content:
transcript_lines.append(content)
elif msg_type == "FACTS":
print("📄Step 5 - Facts received:")
print(json.dumps(msg, indent=2))
elif msg_type == "ENDED":
print("📌 Step 6 — Session ended by server")
if transcript_lines:
print("\n📝 Final Transcript:")
for line in transcript_lines:
print(line)
else:
print("⚠️ No transcript received.")
ws.close()
def on_close(ws, code, reason):
print("✅ WebSocket closed")
websocket.enableTrace(False)
ws = websocket.WebSocketApp(
ws_url,
on_open=on_open,
on_message=on_message,
on_error=lambda ws, err: print(f"[ERROR] {err}"),
on_close=on_close
)
ws.run_forever()
def main(audio_path):
if not os.path.isfile(audio_path):
raise FileNotFoundError(f"Missing file: {audio_path}")
token = get_access_token()
interaction = create_interaction(token)
print("\n📦 Final interaction response:")
print(json.dumps(interaction, indent=2))
ws_url = interaction.get("websocketUrl")
if not ws_url:
raise ValueError("Missing WebSocket URL in response")
ws_url += f"&token={quote(f'Bearer {token}')}"
connect_and_stream_audio(ws_url, audio_path)
if __name__ == "__main__":
audio_file_path = "PATH_TO_FILE.wav"
main(audio_file_path)
```
For support or questions, please reach out via [help.corti.app](https://help.corti.app).
To get access to Corti API [click here to sign up](https://corti-api-console.web.app/signup)
# Quickstart - Code Prediction
Source: https://docs.corti.ai/quickstart/code-prediction
LLM prediction of ICD-10 codes based on input text string
Use this endpoint to predict structured medical codes (e.g., ICD-10-CM) from free-text input such as transcripts, summaries, or encounter notes.
See details [here](/quickstart/authentication)
**Endpoint:**
```bash theme={null}
POST https://api.{environment}.corti.app/v2/tools/coding/
```
**Headers:**
* Authorization: `Bearer `
* Tenant-Name: ``
* Content-Type: `application/json`
**Request Example:**
```js theme={null}
{
"system": [
"icd10cm"
],
"context": [
{
"type": "text",
"text": "Patient is a 58-year-old male with history of T2DM, controlled with metformin 1000 mg BID, low-carbohydrate diet, and regular exercise (walks 5x/week). Home glucose readings 90–110 mg/dL fasting, occasional postprandial up to 130 mg/dL. No hypoglycemic symptoms.\nReview of Systems (ROS):\nConstitutional: No fatigue or weight changes\nCardiovascular: No chest pain, palpitations, or edema\nRespiratory: No cough or dyspnea\nGI: No nausea or abdominal pain\nGU: No polyuria or dysuria\nEndocrine: No polydipsia, polyphagia, or heat/cold intolerance\n\nObjective:\nVital Signs: BP 124/76 mmHg, HR 72 bpm, BMI 26.1 kg/m²\nPhysical Exam:\nGeneral: Well-appearing, no distress\nHEENT: Normal\nNeck: No thyromegaly\nCardiac: RRR, no murmurs\nLungs: Clear bilaterally\nAbdomen: Soft, non-tender\nExtremities: No edema; monofilament sensation intact\nLabs (today): A1C 6.4%; LDL 82 mg/dL; eGFR 92 mL/min/1.73m²; microalbumin/Cr ratio normal\n\nAssessment:\n1. Type 2 Diabetes Mellitus, well controlled – Excellent control with current regimen. No complications.\n2. Preventive Health Maintenance – Colonoscopy up to date; influenza vaccine today; pneumococcal and COVID-19 boosters current.\n\nPlan:\nContinue metformin 1000 mg BID, maintain diet/exercise routine.\nRepeat labs in 6 months.\nAnnual retinal and foot exams.\nFollow-up in 1 year for wellness or sooner if issues arise."
}
],
"maxCandidates": 5
}
```
```js expandable theme={null}
{
"codes": [
{
"system": "icd10cm",
"code": "E119",
"display": "Type 2 diabetes mellitus without complications",
"evidences": [
{
"contextIndex": 0,
"text": "Type 2 Diabetes Mellitus, well controlled – Excellent control with current regimen."
},
{
"contextIndex": 0,
"text": "No complications."
}
]
},
{
"system": "icd10cm",
"code": "Z6826",
"display": "Body mass index (BMI) 26.0-26.9, adult",
"evidences": [
{
"contextIndex": 0,
"text": "Vital Signs: BP 124/76 mmHg, HR 72 bpm, BMI 26."
},
{
"contextIndex": 0,
"text": "1 kg/m²"
},
{
"contextIndex": 0,
"text": "Physical Exam:"
},
{
"contextIndex": 0,
"text": "4%; LDL 82 mg/dL; eGFR 92 mL/min/1."
}
]
},
{
"system": "icd10cm",
"code": "Z0000",
"display": "Encounter for general adult medical examination without abnormal findings",
"evidences": [
{
"contextIndex": 0,
"text": "Reason for Visit: Annual wellness examination and follow-up for Type 2 Diabetes Mellitus (T2DM)"
},
{
"contextIndex": 0,
"text": "Date: 10/24/2025"
},
{
"contextIndex": 0,
"text": "”"
},
{
"contextIndex": 0,
"text": "Feeling well."
}
]
}
],
"candidates": [
{
"system": "icd10cm",
"code": "E782",
"display": "Mixed hyperlipidemia",
"evidences": [
{
"contextIndex": 0,
"text": "”"
},
{
"contextIndex": 0,
"text": "Patient with 8-year history of T2DM, controlled with metformin 1000 mg BID, low-carbohydrate diet, and regular exercise (walks 5x/week)."
},
{
"contextIndex": 0,
"text": "Clinical Note 0"
},
{
"contextIndex": 0,
"text": "History of Present Illness (HPI):"
}
]
},
{
"system": "icd10cm",
"code": "Z794",
"display": "Long term (current) use of insulin",
"evidences": [
{
"contextIndex": 0,
"text": "Reason for Visit: Annual wellness examination and follow-up for Type 2 Diabetes Mellitus (T2DM)"
},
{
"contextIndex": 0,
"text": "Type 2 Diabetes Mellitus, well controlled – Excellent control with current regimen."
}
]
},
{
"system": "icd10cm",
"code": "E1165",
"display": "Type 2 diabetes mellitus with hyperglycemia",
"evidences": [
{
"contextIndex": 0,
"text": "Reason for Visit: Annual wellness examination and follow-up for Type 2 Diabetes Mellitus (T2DM)"
},
{
"contextIndex": 0,
"text": "Type 2 Diabetes Mellitus, well controlled – Excellent control with current regimen."
}
]
},
{
"system": "icd10cm",
"code": "E1142",
"display": "Type 2 diabetes mellitus with diabetic polyneuropathy",
"evidences": [
{
"contextIndex": 0,
"text": "Reason for Visit: Annual wellness examination and follow-up for Type 2 Diabetes Mellitus (T2DM)"
},
{
"contextIndex": 0,
"text": "Type 2 Diabetes Mellitus, well controlled – Excellent control with current regimen."
}
]
},
{
"system": "icd10cm",
"code": "E1122",
"display": "Type 2 diabetes mellitus with diabetic chronic kidney disease",
"evidences": [
{
"contextIndex": 0,
"text": "Type 2 Diabetes Mellitus, well controlled – Excellent control with current regimen."
},
{
"contextIndex": 0,
"text": "No complications."
},
{
"contextIndex": 0,
"text": "Clinical Note 0"
}
]
}
],
"usageInfo": {
"creditsConsumed": 0.05576
}
}
```
1. Present code predictions to user for validation or next step in the EHR workflow.
2. Store predicted codes with interaction results.
3. Optionally re-rank or filter predictions based on local clinical rules or billing guidelines.
# Quickstart - Real-Time Stateless Dictation
Source: https://docs.corti.ai/quickstart/dictation
Walkthrough for building an dictation app using the `/transcribe` API
This guide shows how to authenticate with Corti and run your first real-time dictation session using the `/transcribe` WebSocket endpoint.
See details [here](/quickstart/authentication)
**Base URL**: `wss://api.{environment}.corti.app/audio-bridge/v2/transcribe`
**Required query parameters:**
* `tenant-name`
* `token` (URL-encoded `Bearer `)
**Full URL template:**
```curl theme={null}
wss://api.{environment}.corti.app/audio-bridge/v2/transcribe?tenant-name={tenant-name}&token=Bearer%20{access_token}
```
**Example:**
```js JavaScript expandable theme={null}
import WebSocket from "ws";
const env = "eu"; // or "us"
const tenant = "";
const token = "";
const wsUrl =
`wss://api.${env}.corti.app/audio-bridge/v2/transcribe` +
`?tenant-name=${encodeURIComponent(tenant)}` +
`&token=${encodeURIComponent(`Bearer ${token}`)}`;
const ws = new WebSocket(wsUrl);
```
After the wss connection is opened, send a `config` message **within 10 seconds** or the server closes the socket with `CONFIG_TIMEOUT`.
**Example configuration message:**
```js expandable theme={null}
const configurationMessage = {
primaryLanguage: "en",
spokenPunctuation: true,
commands: [
{
id: "next_section",
phrases: ["next section", "go to next section"],
},
{
id: "insert_template",
phrases: [
"insert my {template_name} template",
"insert {template_name} template",
],
variables: [
{
key: "template_name",
type: "enum",
enum: ["soap", "radiology", "referral"],
},
],
},
],
formatting: {
dates: "long_text",
times: "h24",
numbers: "numerals_above_nine",
measurements: "abbreviated",
numericRanges: "numerals",
ordinals: "numerals",
},
};
```
Send the configuration as soon as the socket opens:
```js JavaScript theme={null}
ws.on("open", () => {
ws.send(JSON.stringify(configurationMessage));
});
```
Wait for a message with `{"type": "CONFIG_ACCEPTED"}` before sending audio. If you receive `CONFIG_DENIED` or `CONFIG_TIMEOUT`, close the socket and fix the configuration.
### Send audio frames
Send audio as **binary WebSocket messages**. See details on supported audio formats [here](/stt/audio).
```js theme={null}
// audioChunk: Buffer or Uint8Array containing raw audio
ws.send(audioChunk);
```
Send continuous stream of 250ms audio chunks while recording is active - no overlapping frames.
### Handle responses
The server sends messages with different `type` values, for example:
```json Transcript theme={null}
{
"type": "transcript",
"data": {
"text": "Patient reports mild chest pain.",
"rawTranscriptText": "patient reports mild chest pain period",
"start": 0.0,
"end": 3.2,
"isFinal": true
}
}
```
```json Command theme={null}
{
"type": "command",
"data": {
"id": "insert_template",
"variables": {
"template_name": "radiology"
},
"rawTranscriptText": "insert my radiology template",
"start": 2.3,
"end": 2.9
}
}
```
**Basic message handler:**
```js JavaScript expandable theme={null}
ws.on("message", (raw) => {
const msg = JSON.parse(raw.toString());
switch (msg.type) {
case "transcript":
console.log("Transcript:", msg.data.text);
break;
case "command":
console.log("Command:", msg.data.id, msg.data.variables);
break;
case "usage":
console.log("Usage credits:", msg.credits);
break;
case "error":
console.error("Error:", msg.error);
break;
default:
console.log("Other message:", msg);
}
});
```
Use `flush` to force pending transcript segments and/or dictation commands to be returned, without closing the session. This is useful to separate dictation into logical sections.
```js Request theme={null}
ws.send(JSON.stringify({ type: "flush" }));
```
```json Response theme={null}
{ "type": "flushed" }
```
Wait for `type: "flushed"` before treating the section as complete.
Send `end` when you are done sending audio:
```js theme={null}
ws.send(JSON.stringify({ type: "end" }));
```
The server then:
1. Emits any remaining `transcript` or `command` messages.
2. Sends usage info, for example:
```json theme={null}
{ "type": "usage", "credits": 0.1 }
```
3. Sends:
```json theme={null}
{ "type": "ended" }
```
4. Closes the WebSocket.
You can also close the client socket explicitly after receiving `ended`:
```js theme={null}
ws.on("message", (raw) => {
const msg = JSON.parse(raw.toString());
if (msg.type === "ended") {
ws.close();
}
});
```
```js theme={null}
import WebSocket from "ws";
import fetch from "node-fetch";
const CLIENT_ID = "";
const CLIENT_SECRET = "";
const TENANT = "";
const ENV = "eu"; // or "us"
async function getAccessToken() {
const res = await fetch(
`https://auth.${ENV}.corti.app/realms/${TENANT}/protocol/openid-connect/token`,
{
method: "POST",
headers: { "Content-Type": "application/x-www-form-urlencoded" },
body: new URLSearchParams({
client_id: CLIENT_ID,
client_secret: CLIENT_SECRET,
grant_type: "client_credentials",
scope: "openid",
}),
}
);
if (!res.ok) throw new Error(`Token error: ${res.status}`);
const json = await res.json();
return json.access_token;
}
async function run() {
const token = await getAccessToken();
const wsUrl =
`wss://api.${ENV}.corti.app/audio-bridge/v2/transcribe` +
`?tenant-name=${encodeURIComponent(TENANT)}` +
`&token=${encodeURIComponent(`Bearer ${token}`)}`;
const ws = new WebSocket(wsUrl);
ws.on("open", () => {
const config = {
primaryLanguage: "en",
spokenPunctuation: true,
automaticPunctuation: false,
commands: [
{
id: "next_section",
phrases: ["next section", "go to next section"],
},
],
formatting: {
dates: "long_text",
times: "h24",
numbers: "numerals_above_nine",
measurements: "abbreviated",
numericRanges: "numerals",
ordinals: "numerals",
},
};
ws.send(JSON.stringify(config));
});
ws.on("message", (raw) => {
const msg = JSON.parse(raw.toString());
if (msg.type === "transcript") {
console.log("Transcript:", msg.data.text);
} else if (msg.type === "command") {
console.log("Command:", msg.data.id, msg.data.variables);
} else if (msg.type === "error") {
console.error("Error:", msg.error);
} else if (msg.type === "ended") {
ws.close();
}
});
ws.on("error", (err) => {
console.error("Socket error:", err);
});
// Example: close the session after 30 seconds if you are not streaming real audio
setTimeout(() => {
ws.send(JSON.stringify({ type: "end" }));
}, 30000);
}
run().catch((err) => {
console.error("Fatal error:", err);
});
```
# Quickstart - Transcription
Source: https://docs.corti.ai/quickstart/transcription
Speech to text from a pre-recorded audio file
## Introduction
The **Transcription Workflow** is defined by processing a complete audio file to return a text document. In scenarios where real-time speech-to-text is not required or feasible, the transcription workflow provides functional and cost effective means for creating verbatim, conversational or dictation-style transcripts.
### Endpoints and capabilities
| Endpoint | Capability | Use |
| :----------- | :------------------------------------------------------------------------------------------------------ | :------- |
| Interactions | The foundational unit that ties together all related data and operations, enabling a cohesive workflow. | Required |
| Recordings | Upload audio file(s) that can be used for transcript generation. | Required |
| Transcripts | Generate transcripts for audio files that are associated with the interaction. | Required |
See audio format requirements [here](/stt/audio)
***
## Workflow
1. The workflow begins with the client initiating an interaction by sending a `POST` request to the `/interactions` endpoint.
2. The API responds with a unique `id` for the interaction and a WebSocket URL (`wssUrl`). The identifier will be used to manage the subsequent steps of the workflow. The WebSocket URL will not be required for this workflow.
3. Once the interaction is initialized, the client uploads an audio file associated with that interaction by sending a `POST` request to `/interactions/:id/recording`.
4. The API responds with a `200` status and returns a `recordingId`, confirming that the audio file has been successfully uploaded and linked to the interaction.
5. After the recording is uploaded, the client initiates the transcription process by sending a `POST` request to `/interactions/:id/transcripts`.
6. The API processes the audio and returns a `200` status with the generated transcript. This transcript contains the text version of the recorded interaction, extracted and formatted for review.
```mermaid theme={null}
sequenceDiagram
Client ->> Public API: POST /interactions
Public API -->> Client: 200, interactionId, wssUrl
Client ->> Public API: POST /interactions/:id/recording
Public API -->> Client: 200, recordingId
Client ->> Public API: POST /interactions/:id/transcripts
Public API -->> Client: 200, transcript
```
See details on transcription configuration options [here](/api-reference/transcripts/create-transcript/)
# Changes Policy
Source: https://docs.corti.ai/release-notes/change-policy
Learn how Corti approaches changes to the API
## Overview
As an infrastructure provider to some of the leading healthcare software providers, Corti is as focused on maintaining long-term stability as on delivering rapid improvements and innovative functionalities.
The following guidelines serve to communicate how we approach changes, what we consider breaking changes and how we communicate those.
We will list deprecations and upcoming breaking changes on [Upcoming Changes](/release-notes/changelog-upcoming)
## Response and Schema Changes
When a change to a response or API schema is **additive**, i.e. adding new optional fields to a response or a new optional request property, we do **not** consider this a breaking change.
When integrating with the Corti API, your API client is thus required to ignore fields that the client does not recognize and to not have strict typing checks for API responses.
### Breaking changes
* The change removes an existing response field.
* The change modifies the structure of the existing responses.
* The change adds a new required request property.
* The change turns an optional into a required property.
## Parameter Changes
When a change is **adding an optional** parameter, we do **not** consider this a breaking change.
### Breaking changes
* The change turns an optional parameter into a required parameter.
* The change adds a required parameter.
* The change alters the type or format of the parameter.
## Endpoint and Path Changes
## Communication of Changes
For non-breaking changes, we do not pro-actively communicate changes but will at irregular intervals post key changes in the Release Notes and Change Log.
For breaking changes, we will do three things:
Communicate the upcoming change in response headers for the affected endpoint
The header will reference a URL where we communicate the change here on docs.corti.ai
A message will be shown when signed into [Corti Console](https://console.corti.app/)
When relevant, we will temporarily accept or return both old and new properties until deprecating the old one.
# Upcoming Changes
Source: https://docs.corti.ai/release-notes/changelog-upcoming
Learn about deprecations and upcoming breaking changes
## Overview
As detailed in our [Changes Policy](/release-notes/change-policy), we from time to time are forced to introduce breaking changes as we evolve our API.
Similarly, we might once in a while deprecate existing functionalities when newer functionalities serve a similar purpose in a better way.
This page lists all upcoming deprecations and their potential breaking change impact details.
The update date on this page indicates the release date where we announce the deprecation. It is immediately in effect, while the shutdown (sunset) date is the date where only the new API behaviour or model is available anymore.
### Property name changes for GET template(s), GET sections
| Property | Description |
| ------------------ | ------------------------------------------------------------------------------------------------------------------------------------------------------------------------------------------------------------------ |
| Change | To align with our API conventions, we are changing from snake\_case to camelCase property naming. Some properties are renamed: `date_updated` -> `updatedAt`, `section_type` -> `type`, `sections_id` -> `section` |
| Affected endpoints | [List templates](/api-reference/templates/list-templates), [List template sections](/api-reference/templates/list-template-sections), [Get template](/api-reference/templates/get-template) |
| Impact | Both snake\_case and camelCase or slightly renamed properties are being returned until the shutdown date. |
| Shutdown date | **January 6th, 2026**: We will not return snake\_case properties anymore, please ensure you have adopted any necessary changes before that date. |
| Related Guide | [Retrieving available templates](/templates/templates#retrieving-available-templates) |
### Property name change for additionalInstructions
| Property | Description |
| ------------------ | ------------------------------------------------------------------------------------------------------------------------------------------------------------------------------------------ |
| Change | As we evolve the documents endpoint, we are renaming the `additionalInstructions` property to `additionalInstructionsOverride` for clarity that this field overrides any existing default. |
| Affected endpoints | [POST documents from dynamic template](/api-reference/documents/generate-document#dynamic-template) |
| Impact | Until shutdown, both the now deprecated `additionalInstructions` as well as the new `additionalInstructionsOverride` are accepted in the request. |
| Shutdown date | **January 6th, 2026**: We will not accept `additionalInstructions` anymore, please ensure you have adopted any necessary changes before. |
| Related Guide | [Advanced Document Generation](/templates/documents-advanced) |
### Request schema change for POST documents template object
| Property | Description |
| ------------------ | ------------------------------------------------------------------------------------------------------------------------------------------------------------------------------------------------------------------------------------------------------------------------------------------------------------------------------------------------------------------------------------------------------------------------------------------------------------------------------------------------------------------------------------ |
| Change | As we evolve the documents endpoint, we are changing the request schema when assembling sections into a template at the request. We are deprecating the `sectionKeys` property of type string\[] in favour of the new `sections` property of type object\[]. The new property requires at minimum a `key` with the sectionKey as value and can be optionally extended to customize several section fields with overrides. As previously and unchanged: the sorting of sections is implicit as set by the order of keys in the array. |
| Affected endpoints | [POST documents from dynamic template](/api-reference/documents/generate-document#dynamic-template) |
| Impact | Until shutdown, both the now deprecated `sectionKeys` string\[] as well as the new `sections` object\[] can be passed in the request. |
| Shutdown date | **January 6th, 2026**: We will not accept `sectionKeys` anymore, please ensure you have adopted any necessary changes before. |
| Related Guide | [Advanced Document Generation](/templates/documents-advanced) |
# Corti Assistant
Source: https://docs.corti.ai/release-notes/corti-assistant
Updates and improvements to Corti AI scribe applications
Detailed documentation about Corti Assistant is available [here](/assistant/welcome).
#### Improvements:
* Added the ability to configure the presence and label of a *"Synchronize Document"* button for embedded flows
#### Fixes:
* Fixed a bug where application unintentionally discarded recently dictated notes
#### Fixes:
* Rolled out a critical security update
#### Fixes:
* Rolled out a critical security update
#### Fixes:
* Rolled out a critical security update
#### Improvements:
* Added caching to improve application loading speed
* Updated MediaRecorder settings to provide more optimal audio configuration for ambient scribing
* Enabled users to change their default template directly from the template picker
#### Fixes:
* Rolled out a critical security update
#### Fixes:
* Fixed an occasional mix-up in speaker identification within the transcript, during virtual sessions
#### Fixes:
* Fixed an issue where the default template did not appear in the template picker
#### New:
* Added the ability to [configure the application interface through the Embedded API](/assistant/embedded-api#configure-interface-limited-access)
* Added support for [setting credentials via the Embedded API](/assistant/embedded-api#set-credentials-limited-access)
#### Improvements:
* Improved the authentication flow with a new [getStatus method](/assistant/embedded-api#get-status-limited-access) to retrieve the application's current state, including authentication status, user info, URL, and interaction details
* Enhanced the template picker by sorting templates alphabetically within each language
* Updated the template picker to prioritize templates that match the language of the active user's default template
#### Fixes:
* Fixed reloading the window on re-authentication attempt when the session was already initialized
#### Fixes:
* Resolved a configuration error that caused German dictation to malfunction
#### Improvements:
* Facts headings now consistently display in the user's chosen UI language, ensuring a clearer and more predictable experience for those working across multiple languages
#### Fixes:
* Fixed Fact headings in new sessions rendering in a code-like format in the Context tab
* Fixed Fact headings occasionally appearing in the user's default spoken language
#### Improvements:
* Added temporal grouping in transcripts, in languages that previously didn’t support it
* The microphone volume indicator has returned with an improved, WCAG-aligned design to support clearer and more accessible audio setup
#### Fixes:
* Fixed scrolling behavior to ensure documents scroll correctly again
* Resolved an issue where session language defaulted to English in embedded mode
#### Improvements:
* Disabled the sound associated with muted-microphone alerts to reduce disruptive prominence in specific setups
#### Improvements:
* Lowered the threshold for silence detection in streams, to reduce the sensitivity of muted-microphone alerts
#### New:
* Dutch and Norwegian available as selectable dictation language
#### Improvements:
* Added a microphone mute alert to notify users when their microphone is muted
* Added support for selecting the current tab as a virtual input source when using the embedded applications
#### Fixes:
* Fixed an issue where requests to the AI Chat were rejected due to consultations not being registered as ended
* Fixed a race condition that prevented the `?language=` parameter from reliably setting the session language
#### Improvements:
* Assistant MD: Added the UDI number to the settings page for easier access and reference
#### New:
* Italian is now available as a selectable interface language
# Corti Releases
Source: https://docs.corti.ai/release-notes/overview
Find the latest updates across Corti AI products
The release notes pages will detail updates to the Corti AI Platform, which includes the following:
Learn about the latest capabilities for speech to text (STT) language models.
Learn about the latest capabilities for text generation LLMs.
Learn about the latest capabilities for Corti AI scribe applications.
The following pages detail how changes are made and upcoming changes to be aware of:
Learn about how changes to the APIs and models are carried out.
Details about upcoming breaking changes.
# Speech to Text
Source: https://docs.corti.ai/release-notes/stt
Updates and improvements to Corti speech to text
Detailed documentation about Speech to Text is available [here](/stt/overview), and supported languages [here](/about/languages/).
### Dictation Formatting now supported in more languages
Dictation formatting is now available in **English, German, and French**. There is also limited support in **Danish** with additional improvements in progress.
See detailed API specification [here](/api-reference/transcribe#param-formatting) and documentation of all available formatting options [here](/stt/formatting).
### Improved handling of initialisms in German dictation
An updated version of the German (`de`) language model was released with improved handling of dictated initialisms: spoken letters, numbers, and abbreviations. Over 800 additional medical abbreviations were introduced to the system, with focused improvement on dental tooth exams, adding support for ICD-10 codes, and ability to have individual letters/numbers returned from the model.
### Audio input validation
Improved server-side validation of streamed audio - if audio does not meet requirements outlined [here](/stt/audio#supported-audio-formats), then an [Invalid Audio](/about/errors#provided-audio-is-invalid-400) `400 error` will be returned.
### Addition of new web socket event: `flush`
Provide clients the ability to force clear the audio buffer without closing the connection. In response to a `"type": "flush"` message from the client, the server will return recognized text and/or commands and respond with `"type": "flushed"`, and keep the web socket connection open.
See more details on `/transcribe` [here](/api-reference/transcribe#flush-the-audio-buffer) and `/stream` [here](/api-reference/stream#flush-the-audio-buffer).
### Update to Swiss German language codes
There are now two different language codes that may be used for Swiss German use cases:
* **Swiss German** (language code `gsw-CH`), where dialectical Swiss German is spoken (recommended for AI scribe use cases)
* **Swiss High German** (language code `de-CH`), where Swiss High German is spoken (recommended for dictation use cases)
See more details [here](/about/languages), or please [contact us](https://help.corti.app) if you need further assistant in selecting the best language code.
### Updated Danish language model
Updated Danish (`da`) language model is now available for dictation (`/transcribe`) and ambient (`/stream`) use cases. The language is rated as `premier` tier as over 158,000 medical terms were included in the training and validation data sets.
Fixed an issue that prevented `automaticPunctuation` parameter from working as expected. Furthermore, `spokenPunctuation` and `automaticPunctuation` are mutually exclusive: Only one of these parameters should be set to `true` in a given `/transcribe` configuration, and if both settings are present and set to true, then `spokenPunctuation` will take precedence. See more detail [here](/asr/punctuation).
### Updated French language model
Updated French (`fr`) language model is now available for dictation (`/transcribe`) and ambient (`/stream`) use cases. The language is rated as `premier` since over 170,000 medical terms were included in the training and validation data sets.
### Dictation now supported in Dutch and Norwegian
Norwegian (`no`) and Dutch (`nl`) are now available for use on the `/transcribe` endpoint for dictation use cases. As a result they have been moved to the `enhanced` language tier. Additionally, Hungarian (`hu`) medical terminology has been expanded and improved.
See more information about supported functionality for dictation [here](/stt/transcribe) and language tiers [here](/about/languages).
Some of the recent `/transcripts` endpoint language model updates (`de`, `en`, `en-GB`, `fr`) have been rolled back so that performance of asynchronous audio file processing can be improved. An update is expected November 2025 to improve performance.
Until such time, speech-to-text accuracy from `/transcripts` asynchronous audio file processing may be degraded as compared to real-time audio processing via the `/stream` and `/transcribe` APIs, which are not impacted by this issue.
### Updated English language model
Updated English (`en`) language model is now available for dictation (`/transcribe`), ambient (`/stream`), and transcription (`/transcripts`) use cases. This version is rated as `premier` tier as over 170,000 medical terms were included in the training and validation data sets.
### Improved transcoding support in speech-to-text APIs
Update to both streaming and asynchronous audio file processing so that **transcoding is supported**. Previously audio files were required to conform to 16-bit, 16kHz formatting. Now, assuming proper file types are used, any precision and sample rate are accepted. See more details [here](/stt/audio).
Definition of the parameter `modelName` is no longer required in `/transcripts` API requests. The latest and greatest model available per language will be applied automatically.
If the argument is included in the request, then it will be ignored. If the configuration is otherwise valid, then the request will process as expected. See full specification [here](/api-reference/transcripts/create-transcript/).
The preview (interim) results feature of the `transcribe` API is not performing as expected. As a result, it is being disabled for most languages to prevent issues with speech lag, speech-to-text accuracy, or web socket connectivity. Please [reach out to us directly](https://help.corti.app) if you have questions or concerns about this dictation feature.
### Conversational transcripts now supported in Arabic
Arabic (language code `ar`) is now available for ambient documentation workflow - Capture conversations spoken in Arabic via the `/stream` API.
### New dictation functionality available: `Formatting`
New dictation functionality available: **Formatting**. Take control over how dates, time, units, and numbers should be transcribed in the streaming speech to text output.
See detailed API specification [here](/api-reference/transcribe#param-formatting) and documentation of all available formatting options [here](/stt/formatting).
### Updated German language model
Updated German (de) language model is now available for dictation (`/transcribe`), ambient (`/stream`), and transcription (`/transcripts`) use cases. This version is rated `premier` tier as over 150,000 medical terms were included in the training and validation data sets.
### Dictation now supported in Hungarian
Hungarian (hu) Enhanced language model is now available for dictation (`/transcribe`).
Swedish (sv) Enhanced language model is now available for dictation (`/transcribe`).
Updated Norwegian (no) and Swedish (sv) Base language models are now available for ambient documentation (`/stream`) and transcription (`/transcripts`) workflows.
Danish (da), German (de), and French (fr) Enhanced language models now available for dictation (`/transcribe`) workflows.
New API endpoint, `/transcribe` now available! Use this endpoint for stateless, real-time streaming dictation workflows. See more details [here](/api-reference/transcribe/) in the API reference and [here](/stt/dictation-web/) for access to the Corti Dictation Web Component.
Swiss German (de-CH) Enhanced language model now available for ambient documentation (`/stream`) workflows.
French (fr) Enhanced language model now available for ambient documentation (`/stream`) workflows.
Introducing a new tier system for defining functionality and performance of speech to text language models. Read more about it [here](/about/languages/).
Updated German (de) and Swiss German (de-CH) language models available.
Updated Danish (da) and Swedish (sv) language models available.
Announcing the launch of Corti AI Platform. Read more about it [here](https://www.corti.ai/).
The following languages are supported by Corti speech to text: English (en for US English, and en-GB for UK English), Danish (da), German (de), Swiss German (de-CH), French (fr), Swedish (sv), Spanish (es), Norwegian (nl), Dutch (no), Italian (it), and Portuguese (pt)
# Text Generation
Source: https://docs.corti.ai/release-notes/textgen
Updates and improvements to Corti AI Text Generation functionality
#### New: Customize existing sections
Empower your customers and end-user clinicians to combine and tailor the Corti provided template sections for custom templating needs. Built atop the ability to reference section keys dynamically in the API request, you can now directly in the request override section names, writing styles, formatting rules and additional instructions, ensuring documentation perfectly fits organizational standards and clinician preferences.
Read more in the [guide to customize sections](/textgen/documents-customize) or see the [API reference](api-reference/documents/generate-document#sections-overridable)
#### Changes and deprecations to document and template endpoints
As we evolve the document generation endpoint and related GET templates/sections, we are announcing several changes and deprecations.
Find the full details including impact and timeline to shutdown in the [breaking changes changelog](/release-notes/changelog-upcoming)
#### New, improved documentation guardrails!
* We have re-architected our documentation guardrails to be faster and more accurate.
* Documentation guardrails are the by default automatic step that quality-controls the generated document to correct outputs ungrounded in the source input.
* In this re-architected, new approach, we in parallel for each section identify hallucinations and provide targeted fixes by reference (sentence/segment index), preventing mismatched edits and skipping ambiguous duplicates. The result is format-preserving precise, auditable corrections that deliver safer, more trustworthy clinical summaries.
Additionally, you can now at request level [disable documentation guardrails](/api-reference/documents/generate-document#body-disable-guardrails) if you want to better understand their impact on quality, processing time and token usage.
#### Reduced token usage for text generation
We are now leveraging cached input tokens when generating documents or facts. This is part of a continuous effort to provide text gen capabilities by Corti's LLMs at even more competitive token consumption behaviour.
*Note: We plan to expose cached tokens as separate usage info response in the future.*
#### New endpoint to [extract facts](/api-reference/facts/extract-facts) from a provided text string input now available!
* so far [FactsR™](/about/factsr) was dependent on streaming audio over WSS to extract facts
* this new endpoint facilitates a REST endpoint as alternative to extract facts
The endpoint lives under the new /tools/ route:
* atomic endpoint, not part of interaction collection
* output is not stored into Corti database (zeroRetention is the only default)
Read more about the behaviour and use cases of this endpoint in our [guide](/textgen/extractfacts).
Update to [Generate Document](/api-reference/documents/generate-document) functionality, including the following:
* Improve handling of sections that do not have content generated so that an empty string is returned instead of a placeholder (e.g., ``).
* Fix to issue causing json text to be included in note output.
* nfc: Improve logging and exception handling in LLM hallucination guardrails service.
New: Set a [zeroRetention header](/api-reference/documents/generate-document#parameter-x-corti-retention-policy) in the request to disable storing of the generated document to the DB.
Updated endpoint tags in [API Reference](/api-reference/welcome) page to indicate those with limited availability (codes, alignment, classification, contextual, explainability). Endpoints labeled as `limited availability` are *not available* for public use at this time. Please [contact us](https://help.corti.app) to learn more about these expert models and expected functionality to be generally released as AI tools.
#### Introducing a new foundation for clinical AI, built not just to document care, but to support it: FactsR™.
FactsR listens in real time, extracts clinical facts as the conversation unfolds, and helps clinicians stay in control, refining and approving facts, not sifting through hallucinated paragraphs.
Read the full announcement [here](https://www.corti.ai/stories/introducing-factsr-the-thinking-engine-behind-better-clinical-ai)!
#### New: Corti default templates
Leverage default, out-of-the-box templates and sections to accelerate launching ambient documentation flows.
The templates and sections cover a broad range of frequently used clinical note formats and are available in all languages Corti offers.
New [API endpoints](/api-reference/documents/list-documents) to both list templates, sections and retrieve individual templates and sections are launched.
Learn more how to leverage those templates [here](/textgen/templates-standard)!
Announcing the launch of Corti AI Platform. Read more about it [here](https://www.corti.ai/)
# Javascript SDK
Source: https://docs.corti.ai/sdk/js-sdk
Get started quickly with the JavaScript SDK
Follow these steps to get access and start building:
To install the Corti SDK you can use Node Package Manager (npm) in a terminal of your choosing:
1. Install Node.js and npm (detailed instructions available [here](https://docs.npmjs.com/downloading-and-installing-node-js-and-npm))
2. Open a terminal and run `npm install @corti/sdk`
3. Start using the JavaScript SDK!
View the package details and latest version on [npm](https://www.npmjs.com/package/@corti/sdk).
To check if you have npm installed, run `npm -v` and a version number should be returned. If it fails, then reinstall npm from the link above or try restarting your computer.
Before making requests, you’ll need to set up a CortiClient. This handles authentication with the Corti API.
If you already have client credentials for your API project, you can initialize the client like this:
```ts theme={null}
import { CortiEnvironment, CortiClient } from "@corti/sdk";
new CortiClient({
environment: CortiEnvironment.Eu,
auth: {
clientId: CLIENT_ID,
clientSecret: CLIENT_SECRET
},
tenantName: TENANT
});
```
Still need to create an API project and client credentials? Learn more [here](/get_started/getaccess)!
Authentication is governed by OAuth 2.0 using `client credentials` grant type. This authentication protocol offers enhanced security measures, ensuring that access to patient data and medical documentation is securely managed and compliant with healthcare regulations.
The client credentials flow shown below is intended for **backend/server-side applications only**. For frontend applications, you should use access tokens instead of exposing client secrets. See the [Authentication Guide](https://github.com/corticph/corti-sdk-javascript/blob/master/AUTHENTICATION.md) for frontend authentication patterns.
1. Obtain your API client credentials from the [Corti API Console](https://console.corti.app/).
2. Add the client\_id and client\_secret to your project.
```ts theme={null}
import { CortiEnvironment, CortiClient } from "@corti/sdk";
new CortiClient({
environment: CortiEnvironment.Eu,
auth: {
clientId: CLIENT_ID,
clientSecret: CLIENT_SECRET
},
tenantName: TENANT
});
```
3. Start making API calls and requests from this client!
For best performance, create a single CortiClient instance and reuse it throughout your application. Avoid re-initializing a new client for every request.
[Click here](/authentication/security_best_practices) to read more about how to appropriately use OAuth for your workflow needs and proper handling of client\_secret.
For comprehensive authentication examples and advanced configuration options, see the [Authentication Guide](https://github.com/corticph/corti-sdk-javascript/blob/master/AUTHENTICATION.md) in the SDK repository.
JavaScript code example of using the client to authenticate and create an interaction:
```ts Creating an interaction [expandable] theme={null}
import { CortiEnvironment, CortiClient } from "@corti/sdk";
const client = new CortiClient({
environment: CortiEnvironment.Eu,
auth: {
clientId: CLIENT_ID,
clientSecret: CLIENT_SECRET
},
tenantName: TENANT
});
const { interactionId } = await client.interactions.create({
encounter: {
identifier: "YOUR_IDENTIFIER",
status: "planned",
type: "first_consultation"
}
});
```
Find the full specification for create interaction request in the [API Reference](/api-reference/interactions/create-interaction)
* **[npm Package](https://www.npmjs.com/package/@corti/sdk)** - Package details, version history, and installation information
* **[SDK Source Code](https://github.com/corticph/corti-sdk-javascript)** - View the complete JavaScript SDK implementation
* **[Authentication Guide](https://github.com/corticph/corti-sdk-javascript/blob/master/AUTHENTICATION.md)** - Comprehensive authentication documentation and examples
* **[SDK Examples Repository](https://github.com/corticph/sdk-typescript-examples)** - Working examples for various use cases and authentication patterns
* **[API Reference](/api-reference)** - Complete API endpoint specifications
To get access to Corti API [click here to start building](https://console.corti.app/signup)
For support or questions, please reach out through [help.corti.app](https://help.corti.app)
# Quickstart - Postman
Source: https://docs.corti.ai/sdk/postman
Get started with our pre-built Postman collection
The Corti API Postman collection will guide you through all endpoints of our REST API, allowing you to try out the API and prototype your app.
[Get your API credentials](/get_started/getaccess/) from the Corti API Console.
***
Ready to get started?
In your console project, navigate to "API Clients", on the left panel and select the client you would like to use.
Access your console project [here](corti.console.app).
If you haven't already, make a Postman account [here](https://identity.getpostman.com/signup)
[  ](https://www.postman.com/cortiai/corti-api/collection/4mh6o8i/corti-rest-api)
1. In the Postman Collection, click the "Corti REST API" collection header and navigate to the "Variables" tab
2. Add your environment, tenant, client ID, and client secret found in your console to the values column.
Keep these credentials secure, do not share them with anyone.
Navigate to the "Authorization" tab two options to the left from "Variables". All your variables should be blue. Click "Get New Access Token" to authenticate.
If you are having trouble, click the Corti logo on the bottom left of this page to get help.
](https://www.postman.com/cortiai/corti-api/collection/4mh6o8i/corti-rest-api)
1. In the Postman Collection, click the "Corti REST API" collection header and navigate to the "Variables" tab
2. Add your environment, tenant, client ID, and client secret found in your console to the values column.
Keep these credentials secure, do not share them with anyone.
Navigate to the "Authorization" tab two options to the left from "Variables". All your variables should be blue. Click "Get New Access Token" to authenticate.
If you are having trouble, click the Corti logo on the bottom left of this page to get help.
Build your healthcare app with Corti's advanced AI. Please reach out if you have any questions.
Please [contact us](https://help.corti.app/) if you need more information about the Corti's Postman Collection.
# Audio Configuration
Source: https://docs.corti.ai/stt/audio
Learn about file types and codecs supported by the Corti API
Audio files must be encoded and packaged in formats that balance quality, size, and compatibility. Consistent encoding parameters ensure accurate recognition and low latency across both synchronous and asynchronous workflows.
Please ensure your audio files conform to the specifications listed below. Let us know if you need [help](https://help.corti.app) with audio formatting or API request configuration.
***
## Supported Audio Formats
The following audio containers and their associated codecs are supported by the Corti API:
| Container | Supported Encodings | Comments |
| :-------- | :------------------ | :-------------------------------------------- |
| Ogg | Opus, Vorbis | Excellent quality at low bandwidth |
| WebM | Opus, Vorbis | Excellent quality at low bandwidth |
| MP4/M4A | AAC, MP3 | Compression may degrade transcription quality |
| MP3 | MP3 | Compression may degrade transcription quality |
In addition to the formats defined above, **WAV files are supported** for upload to the `/recordings` endpoint.
We recommend a sample rate of 16 kHz to capture the full range of human speech frequencies, with higher rates offering negligible recognition benefit but increasing computational cost.
Raw audio streams are not supported at this time.
***
## Microphone Configuration
### Dictation
| Setting | Recommendation | Rationale |
| :--------------- | :------------- | :-------------------------------------------------------------------------------------------------------------------------------------------------------------------------------------------------------------------------------------------------------------------------------------------------------------------------------------------------------------------------------- |
| echoCancellation | Off | Ensure clear, unfiltered audio from near-field recording. |
| autoGainControl | Off | Manual calibration of microphone gain level provides optimal support for consistent dictation patterns (i.e., microphone placement and speaking pattern). Recalibrate when dictation environments change (e.g., moving from a quiet to noisy environment). Recommend setting input gain with average loudness around –12 dBFS RMS (peaks near –3 dBFS) to prevent audio clipping. |
| noiseSuppression | Mild (-15dB) | Removes background noise (e.g., HVAC); adjust as needed to optimize for your environment. |
### Ambient Conversation
| Setting | Recommendation | Rationale |
| :--------------- | :------------- | :------------------------------------------------------------------------------------------------------------------------------- |
| echoCancellation | On | Suppresses "echo" audio that is being played by your device speaker, e.g. remote call participant's voice + system alert sounds. |
| autoGainControl | On | Adaptive correction of input gain to support varying loudness and speaking patterns of conversational audio. |
| noiseSuppression | Mild (-15dB) | Removes background noise (e.g., HVAC); adjust as needed to optimize for your environment. |
Maintain average loudness around –12 dBFS RMS with peaks near –3 dBFS for optimal speech-to-text normalization.
***
## Channel Configuration
Choosing the right channel configuration ensures accurate transcription, speaker separation, and diarization across different use cases.
| Audio type | Workflow | Rationale |
| :--------------------------------- | :------------------------------------------------ | :------------------------------------------------------------------------------------------------------------------------------------------------------------------------------------------------------------------------------------------------- |
| Mono | Dictation or in-room doctor/patient conversation | Speech to text models expect a single coherent input source. Using one channel avoids phase cancellation and ensures consistent amplitude. Mono also reduces bandwidth and file size without affecting accuracy. |
| Multichannel (stereo or dual mono) | Telehealth or remote doctor/patient conversations | Assigns each participant to a dedicated channel, allowing the speech to text system to perform accurate diarization (speaker attribution). Provides better control over noise suppression and improves transcription accuracy when voices overlap. |
Mono input supports transcription with diarization; however, speaker separation may be unreliable when there is not clear turn-taking in the dialogue.
Multichannel input (two audio channels, one per participant, in telehealth workflow) provides opportunity for improved speaker separation and labeling.
```json theme={null}
{
"multichannel": true,
"diarize": true,
"participants": [
{
"channel": 0,
"role": "doctor"
},
{
"channel": 1,
"role": "patient"
}
]
}
```
* Mono audio will produce transcripts with one channel (-1), whereas dual-mono transcripts will have two channels (0, 1).
* Diarization will be most reliable from multichannel audio and, depending on the audio/ conversation participants, may be inconsistent with mono audio.
* For multichannel audio, each channel should capture only one speaker’s microphone feed in order to avoid cross-talk or echo between channels.
* Keep all channels aligned in time; do not trim or delay audio streams independently.
* Use mono capture within each channel (16-bit / 16 kHz PCM) to prevent transcript duplication.
Please [contact us](https://help.corti.app/en/articles/10860711-how-to-get-support-at-corti) if you need more information about supported audio formats or are having issues processing an audio file.
Additional references and resources:
* [Wikipedia - Audio file format](https://en.wikipedia.org/wiki/Audio_file_format)
* [Wikipedia - Audio bit depth](https://en.wikipedia.org/wiki/Audio_bit_depth)
* [Hugging Face - Introduction to audio data](https://huggingface.co/learn/audio-course/chapter1/audio_data)
# Recording Best Practices
Source: https://docs.corti.ai/stt/best-practices
Learn about best practices for audio capture to ensure best speech to text quality and reliability
It cannot be overstated how important microphone type, placement, and calibration are for accurate and reliable speech recognition. This page outlines best practices to help make sure you get this right.
Please ensure your audio files conform to the specifications listed [here](/stt/audio#supported-audio-formats).
Let us know if you need [help](https://help.corti.app) with audio recording best practices!
***
## Environment
### Microphone Type
* Use directional microphones for dictation.
* Use beamforming array microphones for ambient conversations.
Goal is to focuses on the primary speaker(s) and suppresses background noise.
### Microphone Placement
* Keep the microphone near the **side of your mouth** so you do not breathe directly into it.
* A distance of 10–20 cm for dictation is ideal, or within 1 m for doctor/patient conversation.
Goal is to balances clarity and comfort.
### Microphone Calibration
* Ensure proper gain adjustment is used per workflow needs (e.g., near-field for dictation and far-field for ambient conversations)
* Recalibrate when changing environments or if audio quality issues are detected.
* Consider use of auto gain adjustment in ambient workflows.
Gain adjustment based on audio capture environment, workflow, and speaker diction pattern is essential for capturing audio at the correct volume.
### Ambient Noise and Reverberation
* Keep background noise below 40 dBA (quiet office).
* Use rooms with carpeted, non-reflective surfaces when possible.
Goal is to prevent unintentional audio, or echos/ reverberations, from being picked up by speech to text as they can harm accuracy or diarization.
### Use of Built-in Laptop Mics
* Avoid when possible: They can capture keyboard and fan noise.
Use microphones that connect via USB cables for best reliability. These can be desktop, wearable/ headset, or handheld devices.
### Use of Bluetooth Mics
* Use with caution: Ensure battery life and wireless range are sufficient for your needs.
Note that being out of range or low battery may cause issues with transmission of audio packets!
***
## Use of Mobile Devices
### iPhones and iPads
Modern iOS devices have high-quality MEMS microphone arrays and can deliver professional speech to text results if configured correctly:
* Use Voice Memos app or any third-party app (like Corti Assistant) that exports uncompressed WAV, FLAC, or Opus
* 16-bit / 16 kHz PCM Mono audio format
* Use the microphone on the bottom of the device as the primary microphone (talk towards where you would speak for a phone call, not the screen or top/side array mic)
* Disable Voice Isolation or Wide Spectrum as these apply aggressive filters that can distort audio quality
* Leave system gain fixed (do not rely on iOS loudness compensation) in order to prevent dynamic gain shifts that disrupt speech to text input consistency
* If possible, explore wired or MFi-certified microphones for optimal audio quality capture
Be mindful of cases that may obstruct the microphone!
### Android Devices
* Android devices have variable microphone hardware, but most of the guidelines for iPhones listed above can be applied.
Please [contact us](https://help.corti.app) if you need help with supported audio formats or audio quality concerns.
# Commands
Source: https://docs.corti.ai/stt/commands
Learn how to build custom speech to text commands
A key functionality that brings an application from speech to text to a complete dictation solution is Commands. Put your users in the driver seat to control their workflow by defining commands to insert templates, navigate the application, automate repetitive tasks, and more!
/transcribe
/stream
/transcripts
See the full API specification [here](/api-reference/transcribe#commands) for more information on how to define commands in your configuration.
***
## API Definitions
Commands are set in dictation configuration when directly calling the `/transcribe` API or when using the Dictation Web Component.
Explanation of parameters used in `/transcribe` command configuration:
| Parameter | Type | Definition |
| :-------- | :----------- | :-------------------------------------------------------------------------------------------------------------------------------------------------------- |
| id | string | Identifier for the command when it is detected by the speech recognizer. |
| phrases | string array | Word sequence that is spoken to trigger the command. |
| variables | string array | Placeholder in phrases to define multiple words that should trigger the command. The word options are defined as a enum list within the variables object. |
## Example Commands
When configured commands are recognized by the server, the `command` object will be returned over the web socket (as opposed to the `transcript` object for speech recognized text), which includes the command `ID` and `variables` that the integrating application uses to execute the defined action.
Below are some examples, including both the request configuration and server response.
Note that the `id`, `phrases`, and `variables` shown below are mere examples. Define these values as needed for your own commands. Additionally, your application must manage the actions to be triggered by recognized commands.
### Navigation
Command to navigate around your application (e.g., to a section within the current document template). The command includes a defined list of words that can be recognized for the `section_key` variable.
```javascript Command config: Navigation icon="square-js" expandable theme={null}
commands: [
{
id: "go_to_section",
phrases: ["go to {section_key} section"],
variables: [
{
key: "section_key",
type: "enum",
enum: ["subjective", "objective", "assessment", "plan", "next", "previous"]
}
]
}
]
```
```javascript Server response theme={null}
{
"type": "command",
"data": {
"id": "go_to_section",
"variables": {
"section_key": "assessment"
},
"rawTranscriptText": "Go to assessment section.",
"start": 47.58,
"end": 48.57
}
}
```
### Select Text
Command to select text in the editor. The command includes a defined list of words that can be recognized for the `select_range` variable. Your application can define different delete actions for each of the options, or add more complex handling for selecting specific words mentioned in the command utterance.
```javascript Command config: Select text icon="square-js" expandable theme={null}
commands: [
{
id: "select_range",
phrases: ["select {select_range}"],
variables: [
{
key: "select_range",
type: "enum",
enum: ["all", "the last word", "the last sentence"]
}
]
}
]
```
```javascript Server response theme={null}
{
"type": "command",
"data": {
"id": "select_range",
"variables": {
"select_range": "all"
},
"rawTranscriptText": "Select all.",
"start": 8.06,
"end": 8.88
}
}
```
### Delete Text
Command to delete text. The command includes a defined list of words that can be recognized for the `delete_range` variable. Your application can define different delete actions for each of the options!
```javascript Command config: Delete text icon="square-js" expandable theme={null}
commands: [
{
id: "delete_range",
phrases: ["delete {delete_range}"],
variables: [
{
key: "delete_range",
type: "enum",
enum: ["everything", "the last word", "the last sentence", "that"]
}
]
}
]
```
```javascript Server response theme={null}
{
"type": "command",
"data": {
"id": "delete_range",
"variables": {
"delete_range": "that"
},
"rawTranscriptText": "Delete that.",
"start": 7.19,
"end": 8.01
}
}
```
## Putting it All Together
The three commands defined above can be combined into one dictation configuration with accompanying Javascript to execute the actions. The below example includes `navigation commands` to move between sections within the SOAP note template, `delete text` command to remove last word, sentence, or paragraph, and `select text` commands to select text within the active text field:
```javascript Full Dictation Command Configuration expandable theme={null}
dictation.dictationConfig = {
primaryLanguage: "en",
spokenPunctuation: true,
automaticPunctuation: false,
commands: [
{
id: "go_to_section",
phrases: ["go to {section_key} section"],
variables: [
{
key: "section_key",
type: "enum",
enum: ["subjective", "objective", "assessment", "plan", "next", "previous"]
}
]
},
{
id: "delete_range",
phrases: ["delete {delete_range}"],
variables: [
{
key: "delete_range",
type: "enum",
enum: ["everything", "the last word", "the last sentence", "that"]
}
]
},
{
id: "select_range",
phrases: ["select {select_range}"],
variables: [
{
key: "select_range",
type: "enum",
enum: ["all", "the last word", "the last sentence"]
}
]
}
]
};
dictation.addEventListener("transcript", (e) => {
const { data } = e.detail;
const currentTextarea = textareas[activeIndex];
const interimTranscriptEl = document.getElementById("interimTranscript");
if (data.isFinal) {
// Instead of appending at the end, insert the text at the user's cursor
// or replace the selected range.
const start = currentTextarea.selectionStart;
const end = currentTextarea.selectionEnd;
const insertedText = data.text + " ";
const before = currentTextarea.value.slice(0, start);
const after = currentTextarea.value.slice(end);
currentTextarea.value = before + insertedText + after;
const newCursorPos = start + insertedText.length;
currentTextarea.setSelectionRange(newCursorPos, newCursorPos);
interimTranscriptEl.classList.add("hidden");
} else {
interimTranscriptEl.classList.remove("hidden");
interimTranscriptEl.innerText = data.rawTranscriptText;
}
});
dictation.addEventListener("command", (e) => {
const { data } = e.detail;
document.getElementById("interimTranscript").classList.add("hidden");
const commandOutput = document.getElementById("commandOutput");
if (data.id === "go_to_section") {
const section = data.variables.section_key.toLowerCase();
if (section === "next") {
if (activeIndex < textareas.length - 1) {
activeIndex++;
textareas[activeIndex].focus();
}
} else if (section === "previous") {
if (activeIndex > 0) {
activeIndex--;
textareas[activeIndex].focus();
}
} else {
const index = textareas.findIndex(el => el.id.toLowerCase() === section);
if (index !== -1) {
activeIndex = index;
textareas[activeIndex].focus();
}
}
commandOutput.innerHTML = "Command: " + data.id + " with section key: " + section;
} else if (data.id === "delete_range") {
const range = data.variables.delete_range.toLowerCase();
const currentTextarea = textareas[activeIndex];
let content = currentTextarea.value;
if (range === "everything") {
currentTextarea.value = "";
} else if (range === "the last word") {
let words = content.trim().split(/\s+/);
words.pop();
currentTextarea.value = words.join(" ") + (words.length > 0 ? " " : "");
} else if (range === "the last sentence") {
let sentences = content.match(/[^.!?]+[.!?]*\s*/g);
if (sentences && sentences.length > 0) {
sentences.pop();
currentTextarea.value = sentences.join("");
}
} else if (range === "that") {
// If there's a selection, delete it; otherwise, delete the last word.
const start = currentTextarea.selectionStart;
const end = currentTextarea.selectionEnd;
if (start !== end) {
currentTextarea.value = content.slice(0, start) + content.slice(end);
} else {
let words = content.trim().split(/\s+/);
words.pop();
currentTextarea.value = words.join(" ") + (words.length > 0 ? " " : "");
}
}
commandOutput.innerHTML = "Command: " + data.id + " with delete range: " + range;
} else if (data.id === "select_range") {
const range = data.variables.select_range.toLowerCase();
const currentTextarea = textareas[activeIndex];
const content = currentTextarea.value;
if (range === "all") {
currentTextarea.focus();
currentTextarea.setSelectionRange(0, content.length);
} else if (range === "the last word") {
const trimmedContent = content.trimEnd();
const lastSpaceIndex = trimmedContent.lastIndexOf(" ");
const start = lastSpaceIndex !== -1 ? lastSpaceIndex + 1 : 0;
currentTextarea.focus();
currentTextarea.setSelectionRange(start, trimmedContent.length);
} else if (range === "the last sentence") {
const sentences = content.match(/[^.!?]+[.!?]*\s*/g);
if (sentences && sentences.length > 0) {
let sum = 0;
for (let i = 0; i < sentences.length - 1; i++) {
sum += sentences[i].length;
}
const lastSentence = sentences[sentences.length - 1];
const start = sum;
const end = start + lastSentence.length;
currentTextarea.focus();
currentTextarea.setSelectionRange(start, end);
}
}
commandOutput.innerHTML = "Command: " + data.id + " with select range: " + range;
}
});
```
## Best Practices
Below are some recommendations, tips, and tricks for building commands that are effective and reliable:
| # | Best practice | Good Example | Bad Example |
| -- | :--------------------------------------------------------------------------------------------------------------------------------------------------------------------------------------------------------------------------- | :------------------------- | :------------------------------------------------------- |
| 1 | Use an action verb as the first word in your command phrase because users are telling the computer to do something | "go to assessment section" | "assessment" |
| 2 | Don't make command phrases too long or too complex so that users can remember them and say them in one concise utterance | "insert normal exam male" | "insert physical exam for male with history of diabetes" |
| 3 | Make sure to not create command phrases with content that also needs to be recognized dictation text | "pull latest vitals" | "vital signs" |
| 4 | Be mindful of including articles, extraneous terms, and filler words in your command phrases as the command will only be recognized when the defined phrase is matched in full | "insert normal exam" | "insert the normal exam template" |
| 5 | Use the variables feature to support having alternative methods to execute a single command | See `delete text` above | |
| 6 | Use the variables feature to support having a single command support many actions | See `navigation` above | |
| 7 | Add timeouts and error handling in the client-side application so that a command does not run indefinitely when there are errors executing the action following command recognition | | |
| 8 | Consider which commands should be standardized across all users of the application or opened for custom user configuration | | |
| 9 | Test your commands! Dictate command phrases to make sure they are recognized reliably, and ensure command actions can be validated for correct execution | | |
| 10 | Get creative! Most applications follow linear flows to click through from one place to another, but speech-enabling the application opens a world of opportunity for supporting more dynamic navigation through the workflow | | |
Use of commands is **optional** for dictation configuration. They should be configured based on how the integrating application will perform the actions.
Please [contact us](https://help.corti.app) to report errors, or for more information on this feature.
# Dictation Web Component
Source: https://docs.corti.ai/stt/dictation-web
Let us handle microphone device management and connecting with the API
The Corti Dictation Web Component is a package of UI elements and application logic built on top of the Corti API SDK. It enables real-time dictation - speech-to-text and command-and-control. It provides a simple interface for capturing audio, streaming it to the API, and returning transcripts to the client.
Recording device management
Audio and transcript streaming between client and API
Support for spoken punctuation
Ability to register custom commands
CSS support for custom styling
Integration examples
## UI Elements
* Button to turn microphone on/off
* Visual indication of audio volume
* Settings button
 **Example**: Dictation microphone bar embedded in an EHR documentation module, with a grab bar to move it around the interface
 * Select microphone device
* Select dictation language
* Select microphone device
* Select dictation language

If you are looking for documentation on the dictation API, then please see details [here in the API Reference](/api-reference/transcribe/).
## Authentication
OAuth 2.0 authentication is **not handled** by the Dictation Web Component.
The component is enabled by an API key or client authorization token. See details on how to [get access here](/get_started/getaccess/).
Please [contact us](https://help.corti.app) for help or questions.
# Formatting
Source: https://docs.corti.ai/stt/formatting
`beta`
Learn about how Corti speech to text supports formatting of dictation text output
Formatting feature is currently in `beta` testing. API details subject to change ahead of general release.
Speech to text can be used to create a verbatim transcript of the audio; however, some content is not documented in the same manner as it is verbalized. The `formatting` features provide control over how key information should for represented in the textual output.
/transcribe
/stream
/transcripts
Notes:
* Defining formatting in configuration is `optional`. When these preferences are not configured, the `default` values listed below will be applied automatically.
* Full support for the functionality outlined below is available in English (`en`), German (`de`), and French (`fr`).
* Limited support for the functionality outlined below is available in Danish (`da`) - you can set the formatting values as desired, but results may be inconsistent. Additional language model finetuning in progress to address this limitation.
* There are some terms (e.g., homophones) that will be disambiguated by the language model to determine if the symbol or the word should be inserted based on the context. Improvements on this front expected to continue.
***
## Formatting Options
### Dates
| Option | Format | Example |
| :------------ | :------------------------- | :--------------------------------------------------------- |
| `as_dictated` | Preserve spoken phrasing | "February third twenty twenty five" -> "February 3rd 2025" |
| `long_text` | Long date (default) | "3 February 2025" |
| `eu_slash` | Short date (EU) | "03/02/2025" |
| `us_slash` | Short date (US) | "02/03/2025" |
| `iso_compact` | ISO (basic, no separators) | "20250302" |
### Times
| Option | Format | Example |
| :------------ | :---------------- | :-------------------------------------------------------- |
| `as_dictated` | As dictated | "Four o'clock" or "four thirty five" or "sixteen hundred" |
| `h12` | 12-hour | "4:00 PM" |
| `h24` | 24-hour (default) | "16:00" |
### Numbers
| Option | Format | Example |
| :-------------------- | :----------------------------------------------------- | :--------------------------------------- |
| `as_dictated` | As dictated | "one, two, ... nine, ten, eleven, twelve |
| `numerals_above_nine` | Single digit as words, multi-digit as number (default) | "One, two ... nine, 10, 11, 12" |
| `numerals` | Numbers only | "1, 2, ... 9, 10, 11, 12" |
### Units and Measurements
| Option | Format | Example |
| :------------ | :-------------------- | :------------------------------------------------------------------------ |
| `as_dictated` | As dictated | "Millimeters, centimeters, inches; Blood pressure one twenty over eighty" |
| `abbreviated` | Abbreviated (default) | "mm, cm, in; BP 120/80" |
* Celsius (°C)
* Fahrenheit (°F)
* Kelvin (K)
* Inch (in)
* Meter (m)
* Centimeter (cm)
* Millimeter (mm)
* Nanometer (nm)
* Kilometer (km)
* Gram (g)
* Kilogram (kg)
* Milligram (mg)
* Microgram (mcg)
* Nanogram (ng)
* Pound (lb)
* Ounce (oz)
* Liter (L)
* Milliliter (mL)
* Deciliter (dL)
* International unit (IU)
* Milliequivalent (mEq)
* Millimole (mmol)
* Mole (mol)
* Blood pressure (BP and systole/diastole)
* Beats per minute (BPM)
* Respirations per minute (RPM)
* Body mass index (BMI)
* Percent (%)
* Millimeters of mercury (mmHg)
* Centimeters of water (cmH2O)
* Nanogram per milliliter (ng/mL)
* Milligram per deciliter (mg/dL)
* Milliequivalents per liter (mEq/L)
* Millimoles per liter (mmol/L)
* Units per liter (U/L)
* Pack years (pack-yrs)
### Ranges
| Option | Format | Example |
| :------------ | :------------------- | :----------- |
| `as_dictated` | As dictated | "one to ten" |
| `numerals` | As numbers (default) | "1-10" |
### Ordinals
| Option | Format | Example |
| :------------ | :-------------------- | :--------------------- |
| `as_dictated` | As dictated | "First, second, third" |
| `numerals` | Abbreviated (default) | "1st, 2nd, 3rd" |
Please [contact us](https://help.corti.app) to report errors, or for more information on this feature.
# Overview of Corti Speech to Text
Source: https://docs.corti.ai/stt/overview
Learn about the speech to text endpoints in the Corti API
Corti speech to text is specifically designed for use in the healthcare domain. The API endpoints detailed below provide access to different speech to text functionality. Selecting the right endpoint is important based on your needs and use case.
Please review the [languages page](/about/languages/) to learn more about languages supported per endpoint, functionality per language tier, and language code to use in API requests.
Please review the [dictation overview page](/stt/transcribe/) to learn more about features beyond speech to text.
## Corti Speech to Text Endpoints
Real-time speech to text and command-and-control
Power dictation workflows and speech-enable your application
Real-time conversational clinical intelligence
Power ambient documentation or decision support workflows
Speech to text via batch audio file processing
Enable dictation or conversational transcription
***
### Endpoint Functionality
| | Transcribe | Stream | Transcripts |
| :---------------------------- | :-----------------------------------------------------: | :---------------------------------------------------------: | :--------------------------------------------------------------: |
| **Connection** | WSS | WSS | REST |
| **Data processing** | Synchronous | Synchronous | Asynchronous 1 |
| **Architecture** | Stateless | Stateful | Stateful |
| **Speech to text** | Dictation | Conversational transcript | Dictation or transcript |
| **Diarization** | | | |
| **Multichannel** | | | |
| **Custom command definition** | | | |
| **Automatic punctuation** | | | |
| **Spoken punctuation** | | | |
| **Formatting** | `beta` | | |
| **Vocabulary** | `coming soon` | | |
1 Speech to text accuracy for async audio file processing via `/transcripts` endpoint may be degraded as compared to real-time recognition via the `/transcribe` and `/stream` endpoints. See the [languages page](/about/languages) or [release notes](/release-notes/speechrec#2025-09-29) for more information.
***
Please [contact us](https://help.corti.app) if you are interested in features that are not listed here, need help determining the best speech to text endpoint for your needs, or have questions about how to configure your API requests.
# Punctuation
Source: https://docs.corti.ai/stt/punctuation
Learn about how punctuation is supported by Corti speech to text
Speech to text can be used to create a verbatim transcript of the audio; however, punctuation is essential for coherent documentation. Two optional features are available for this need: **Spoken** and **Automated Punctuation**.
/transcribe
/stream
/transcripts
The two parameters, `spokenPunctuation` and `automatedPunctuation` are mutually exclusive - when both are set to true, `spokenPunctuation` will override `automatedPunctuation`.
***
## Punctuation configuration request parameters
| Parameter | Description | Recommendation |
| :--------------------- | :------------------------------------------------------------------------------------------------------------------------------------------------------------------------------------------- | :-------------------------------------------------------------------------- |
| `spokenPunctuation` | Enable users to control when punctuation is inserted in the document output, having punctuation symbols and line breaks added to the document instead of transcribed text, as defined below. | Use for dictation and transcription workflows (not available for `/stream`) |
| `automaticPunctuation` | STT model automatically inserts limited punctuation (e.g., period, comma, question mark) based on context and dictation cadence. | Use for conversational transcript workflows (on by default for `/stream`) |
## Spoken Punctuation Support
| Punctuation | | Spoken forms supported |
| :--------------- | :----: | :---------------------------------------------------------------------------------------------------------------------------------- |
| Period | `.` | "period", "full stop", "dot" |
| Comma | `,` | "comma" |
| New line | `\n` | "new line", "next line" |
| New paragraph | `\n\n` | "new paragraph", "next paragraph" |
| Percent | `%` | "percent", "percent sign" |
| Exclamation mark | `!` | "exclamation mark", "exclamation point" |
| Question mark | `?` | "question mark" |
| Colon | `:` | "colon" |
| Semicolon | `;` | "semicolon" |
| Hyphen | `-` | "hyphen", "dash" |
| Slash | `/` | "slash", "forward slash" |
| Quotation marks | `" "` | "open quote", "open quotation"
"close quote", "close quotation" |
| Parentheses | `( )` | "open parenthesis", "open paren", "open bracket(s)"
"close parenthesis", "closed paren", "close bracket(s)", "end bracket(s)" |
| Punctuation | | Spoken forms supported |
| :--------------- | :----: | :------------------------------------------------------------------------------------- |
| Period | `.` | "punktum", "punktom", "og punktum" |
| Comma | `,` | "komma" |
| New line | `\n` | "ny linje", "næste linje", "og næste linje", "og ny linje" |
| New paragraph | `\n\n` | "nyt afsnit", "ny afsnit", "og nyt afsnit", "og ny afsnit" |
| Percent | `%` | "procent", "procenttegn" |
| Exclamation mark | `!` | "udråbstegn" |
| Question mark | `?` | "spørgsmålstegn" |
| Colon | `:` | "kolon" |
| Semicolon | `;` | "semikolon" |
| Hyphen | `-` | "bindestreg" |
| Slash | `/` | "skråstreg" |
| Quotation marks | `" "` | "åbn anførselstegn", "anførselstegn"
"luk anførselstegn", "anførselstegn slut" |
| Parentheses | `( )` | "parentes begynd", "parentes", "parentes start"
"parentes slut", "parentes stop" |
| Punctuation | | Spoken forms supported |
| :--------------- | :----: | :--------------------------------------------------------------------------------------------------------------- |
| Period | `.` | "punt", "dot", "puntje", "eindpunt" |
| Comma | `,` | "komma" |
| New line | `\n` | "nieuwe regel", "volgende regel" |
| New paragraph | `\n\n` | "nieuwe alinea", "volgende alinea" |
| Percent | `%` | "procent", "procentteken" |
| Exclamation mark | `!` | "uitroepteken" |
| Question mark | `?` | "vraagteken" |
| Colon | `:` | "dubbele punt" |
| Semicolon | `;` | "puntkomma" |
| Hyphen | `-` | "koppelteken", "streepje", "minteken" |
| Slash | `/` | "schuine streep", "slash" |
| Quotation marks | `" "` | "open aanhalingsteken", "open quote", "open citaat"
"sluit aanhalingsteken", "sluit quote", "sluit citaat" |
| Parentheses | `( )` | "open haakje", "open haak", "open ronde haakje"
"sluit haakje", "sluit haak", "sluit ronde haakje" |
| Punctuation | | Spoken forms supported |
| :--------------- | :----: | :------------------------------------------------------------------------------------------------ |
| Period | `.` | "point" |
| Comma | `,` | "virgule" |
| New line | `\n` | "à la ligne" |
| New paragraph | `\n\n` | "nouveau paragraphe", "paragraphe" |
| Percent | `%` | "pour cent" |
| Exclamation mark | `!` | "point d'exclamation" |
| Question mark | `?` | "point d'interrogation" |
| Colon | `:` | "deux points" |
| Semicolon | `;` | "point virgule" |
| Hyphen | `-` | "tiret", "trait d'union" |
| Slash | `/` | "slash", "barre oblique" |
| Quotation marks | `" "` | "ouvrir les guillemets"
"fermer les guillemets" |
| Parentheses | `( )` | "ouvrir la parenthèse", "parenthèse ouvrante"
"fermer la parenthèse", "parenthèse fermante" |
| Punctuation | | Spoken forms supported |
| :--------------- | :----: | :-------------------------------------------------------------- |
| Period | `.` | "Punkt" |
| Comma | `,` | "Komma" |
| New line | `\n` | "neue Zeile" |
| New paragraph | `\n\n` | "neuer Absatz" |
| Percent | `%` | "Prozent" |
| Exclamation mark | `!` | "Ausrufezeichen" |
| Question mark | `?` | "Fragezeichen" |
| Colon | `:` | "Doppelpunkt" |
| Semicolon | `;` | "Semikolon", "Strichpunkt" |
| Hyphen | `-` | "Bindestrich" |
| Slash | `/` | "Schrägstrich" |
| Quotation marks | `" "` | "Anführungszeichen öffnen"
"Anführungszeichen schliessen" |
| Parentheses | `( )` | "Klammer auf"
"Klammer zu" |
| Punctuation | | Spoken forms supported |
| :--------------- | :----: | :----------------------------------------------------------------------------------- |
| Period | `.` | "pont", "pontjel" |
| Comma | `,` | "vessző" |
| New line | `\n` | "új sor", "következő sor" |
| New paragraph | `\n\n` | "új bekezdés" |
| Percent | `%` | "százalék", "százalékjel" |
| Exclamation mark | `!` | "felkiáltójel" |
| Question mark | `?` | "kérdőjel" |
| Colon | `:` | "kettőspont" |
| Semicolon | `;` | "pontosvessző" |
| Hyphen | `-` | "kötőjel", "mínusz jel" |
| Slash | `/` | "perjel", "törtvonal" |
| Quotation marks | `" "` | "idézőjel", "idézet nyitása"
"idézőjel zár", "idézet zárása", "idézőjel bezár" |
| Parentheses | `( )` | "zárójel", "zárójel nyit", "nyitó zárójel"
"zárójel zár", "zárójel bezár" |
| Punctuation | | Spoken forms supported |
| :--------------- | :----: | :--------------------------------------------------------------------------------------------------------------------------------------------------------- |
| Period | `.` | "punktum", "prikk", "full stopp" |
| Comma | `,` | "komma" |
| New line | `\n` | "ny linje", "neste linje" |
| New paragraph | `\n\n` | "nytt avsnitt", "neste avsnitt" |
| Percent | `%` | "prosent", "prosenttegn" |
| Exclamation mark | `!` | "utropstegn", "utrop" |
| Question mark | `?` | "spørsmålstegn" |
| Colon | `:` | "kolon" |
| Semicolon | `;` | "semikolon" |
| Hyphen | `-` | "bindestrek", "strek", "dash" |
| Slash | `/` | "skråstrek", "slash", "fremoverskråstrek" |
| Quotation marks | `" "` | "åpne anførselstegn", "åpne sitat"
"lukk anførselstegn", "lukk sitat" |
| Parentheses | `( )` | "åpne parentes", "åpne paren", "åpne bracket", "åpne parenteser"
"lukk parentes", "lukk paren", "slutt parentes", "lukk parenteser", "slutt bracket" |
| Punctuation | | Spoken forms supported |
| :--------------- | :----: | :-------------------------------------------------------------------------------------------------------------------- |
| Period | `.` | "punkt" |
| Comma | `,` | "kommatecken", "komma" |
| New line | `\n` | "ny rad" |
| New paragraph | `\n\n` | "nytt stycke" |
| Percent | `%` | "procenttecken", "procent" |
| Exclamation mark | `!` | "utropstecken" |
| Question mark | `?` | "frågetecken" |
| Colon | `:` | "kolon" |
| Semicolon | `;` | "semikolon" |
| Hyphen | `-` | "bindestreck" |
| Slash | `/` | "snedstreck" |
| Quotation marks | `" "` | "citattecken", "öppna citattecken", "citationstecken", "citat", "start citat"
"slut citat", "stäng citattecken" |
| Parentheses | `( )` | "start parentes", "öppna parentes"
"slutparentes", "stäng parentes" |
**Notice the tabs atop the table above to see spoken punctuation phrases supported per language.**
Some punctuation may be supported by more than one utterance. For example, either "open parentheses" and "open paren" can be spoken to return `(`. There are also some terms (e.g., "colon") that will be disambiguated by the language model to determine if the symbol or the word should be inserted based on the context.
[Contact us](https://help.corti.app) if you have issues with `spokenPunctuation` recognition or would like to see other alternative phrases added.
***
## Don't Smart Quote Me On That
Some applications provide support for "smart punctuation": Transformation of plain ASCII characters to look nicer and be more readable in modern text editors. Such smart transformations, however, can cause issues with speech-to-text integrations.
See a [detailed guide here](/stt/smart-punctuation) to learn how to insert and handle these characters appropriately, and prevent unexpected whitespace from being added into your text.
There are some terms (e.g., "colon") that will be disambiguated by the language model to determine if the symbol or the word should be inserted based on the context.
Please [contact us](https://help.corti.app) to report errors, or for more information on this feature.
# Smart Punctuation Integration Guide
Source: https://docs.corti.ai/stt/smart-punctuation
Learn how to prevent unexpected whitespace from being added in your text when smart punctuation is supported by the editor
Speech to text can be used to create a verbatim transcript of the audio; however, punctuation is essential for coherent documentation. Two settings are available for users to control how [punctuation](/stt/punctuation) is added during dictation/transcription: `spokenPunctuation` and `automaticPunctuation`. These settings are mutually exclusive, and when both are set to true in the configuration, `spokenPunctuation` will take precedence over `automaticPunctuation`.
Some applications provide support for **"smart punctuation"**: Transformation of plain ASCII characters to look nicer and be more readable in modern text editors. Such smart transformations, however, can cause issues with speech-to-text integrations. This guide will explain how to render punctuation correctly so that extra whitespace is not unexpectedly added into the text.
The goal of this guide is to ensure text from Corti speech to text presents consistently across all applications, without unwanted substitutions, spacing, or character transformations.
***
## Core Principal
* Insert **plain Unicode punctuation** exactly as received from STT (e.g., `U+0022` for `"`, `U+0027` for `'`, `U+000A` for line breaks, etc.)
* Disable or bypass any "smart punctuation" or auto-formatting features in the target editor when possible
## Recommendations for Correct Handling of Smart Punctuation
| Punctuation | "Smart" form | Risk | Correct Handling |
| :-------------------------------------------- | :----------: | :------------------------------------------------------ | :-------------------------------------------------------------------------------------------------------------- |
| **Quotes** (`"`, `'`) | “ ” ‘ ’ | Adds spaces or mis-guesses direction | Disable smart quotes; trim spaces before/after |
| **Apostrophes** (`'`) | ’ | Curly apostrophe may break contractions | Keep '; use `U+2019` only if deliberate typography |
| **New line** (`\n`) | | Some editors auto-convert to paragraph breaks or ignore | Preserve \n as single line break; map explicitly to platform’s line-separator rule |
| **New paragraph** (`\n\n`) | | May collapse or double-space inconsistently | Treat as paragraph boundary; insert exactly two newlines unless target API defines separate paragraph insertion |
| **Hyphens or Dashes** (`-`) | — | Converts to en/em dash; may add or remove spaces | STT should output only the hyphen `U+002D`; disable dash substitution; define spacing manually |
| **Ellipsis** (`...`) | … | Single-character ellipsis affects truncation logic | Keep `...`; insert `U+2026` only for typographic output |
| **Fractions or Symbols** (`1/2`, `%`, `(tm)`) | ½ % © | Encoding or semantic changes | Insert literal ASCII; disable replacements |
| **Non-breaking space** | `U+00A0` | Alters spacing, wrapping, or copy/paste | Normalize to standard space `U+0020` |
## Specific Handling for the Most Common Edit Controls
| Environment | Behavior | Integration Recommendation |
| :--------------------------------------------------------------- | :---------------------------------------------- | :------------------------------------------------------------------------------------- |
| **Windows**
(`Edit`, `TextBox`, `RichEdit`, `WPF TextBox`) | Generally plain text; some intercept key events | Insert text directly via API, not simulated typing |
| **macOS or iOS**
(`NSTextView`, `UITextView`) | Smart punctuation enabled by default | Set `smartQuotesType = .no`, `smartDashesType = .no`, `smartInsertDeleteType = .no` |
| **Web**
(``, `